
Looking to add a website screenshot feature to your product?
Want to take full page web screenshots, screenshots of specific elements or screenshots from emulated devices?
In this article we'll show you how you can use puppeteer to capture various kinds of screenshots from any url on the web.
Why capture website screenshots?
Here are just a few reasons why you might want to take website screenshots:
- Capture screenshots of charts, dashboards and user-generated content to show on a user's profile page or send in an email:
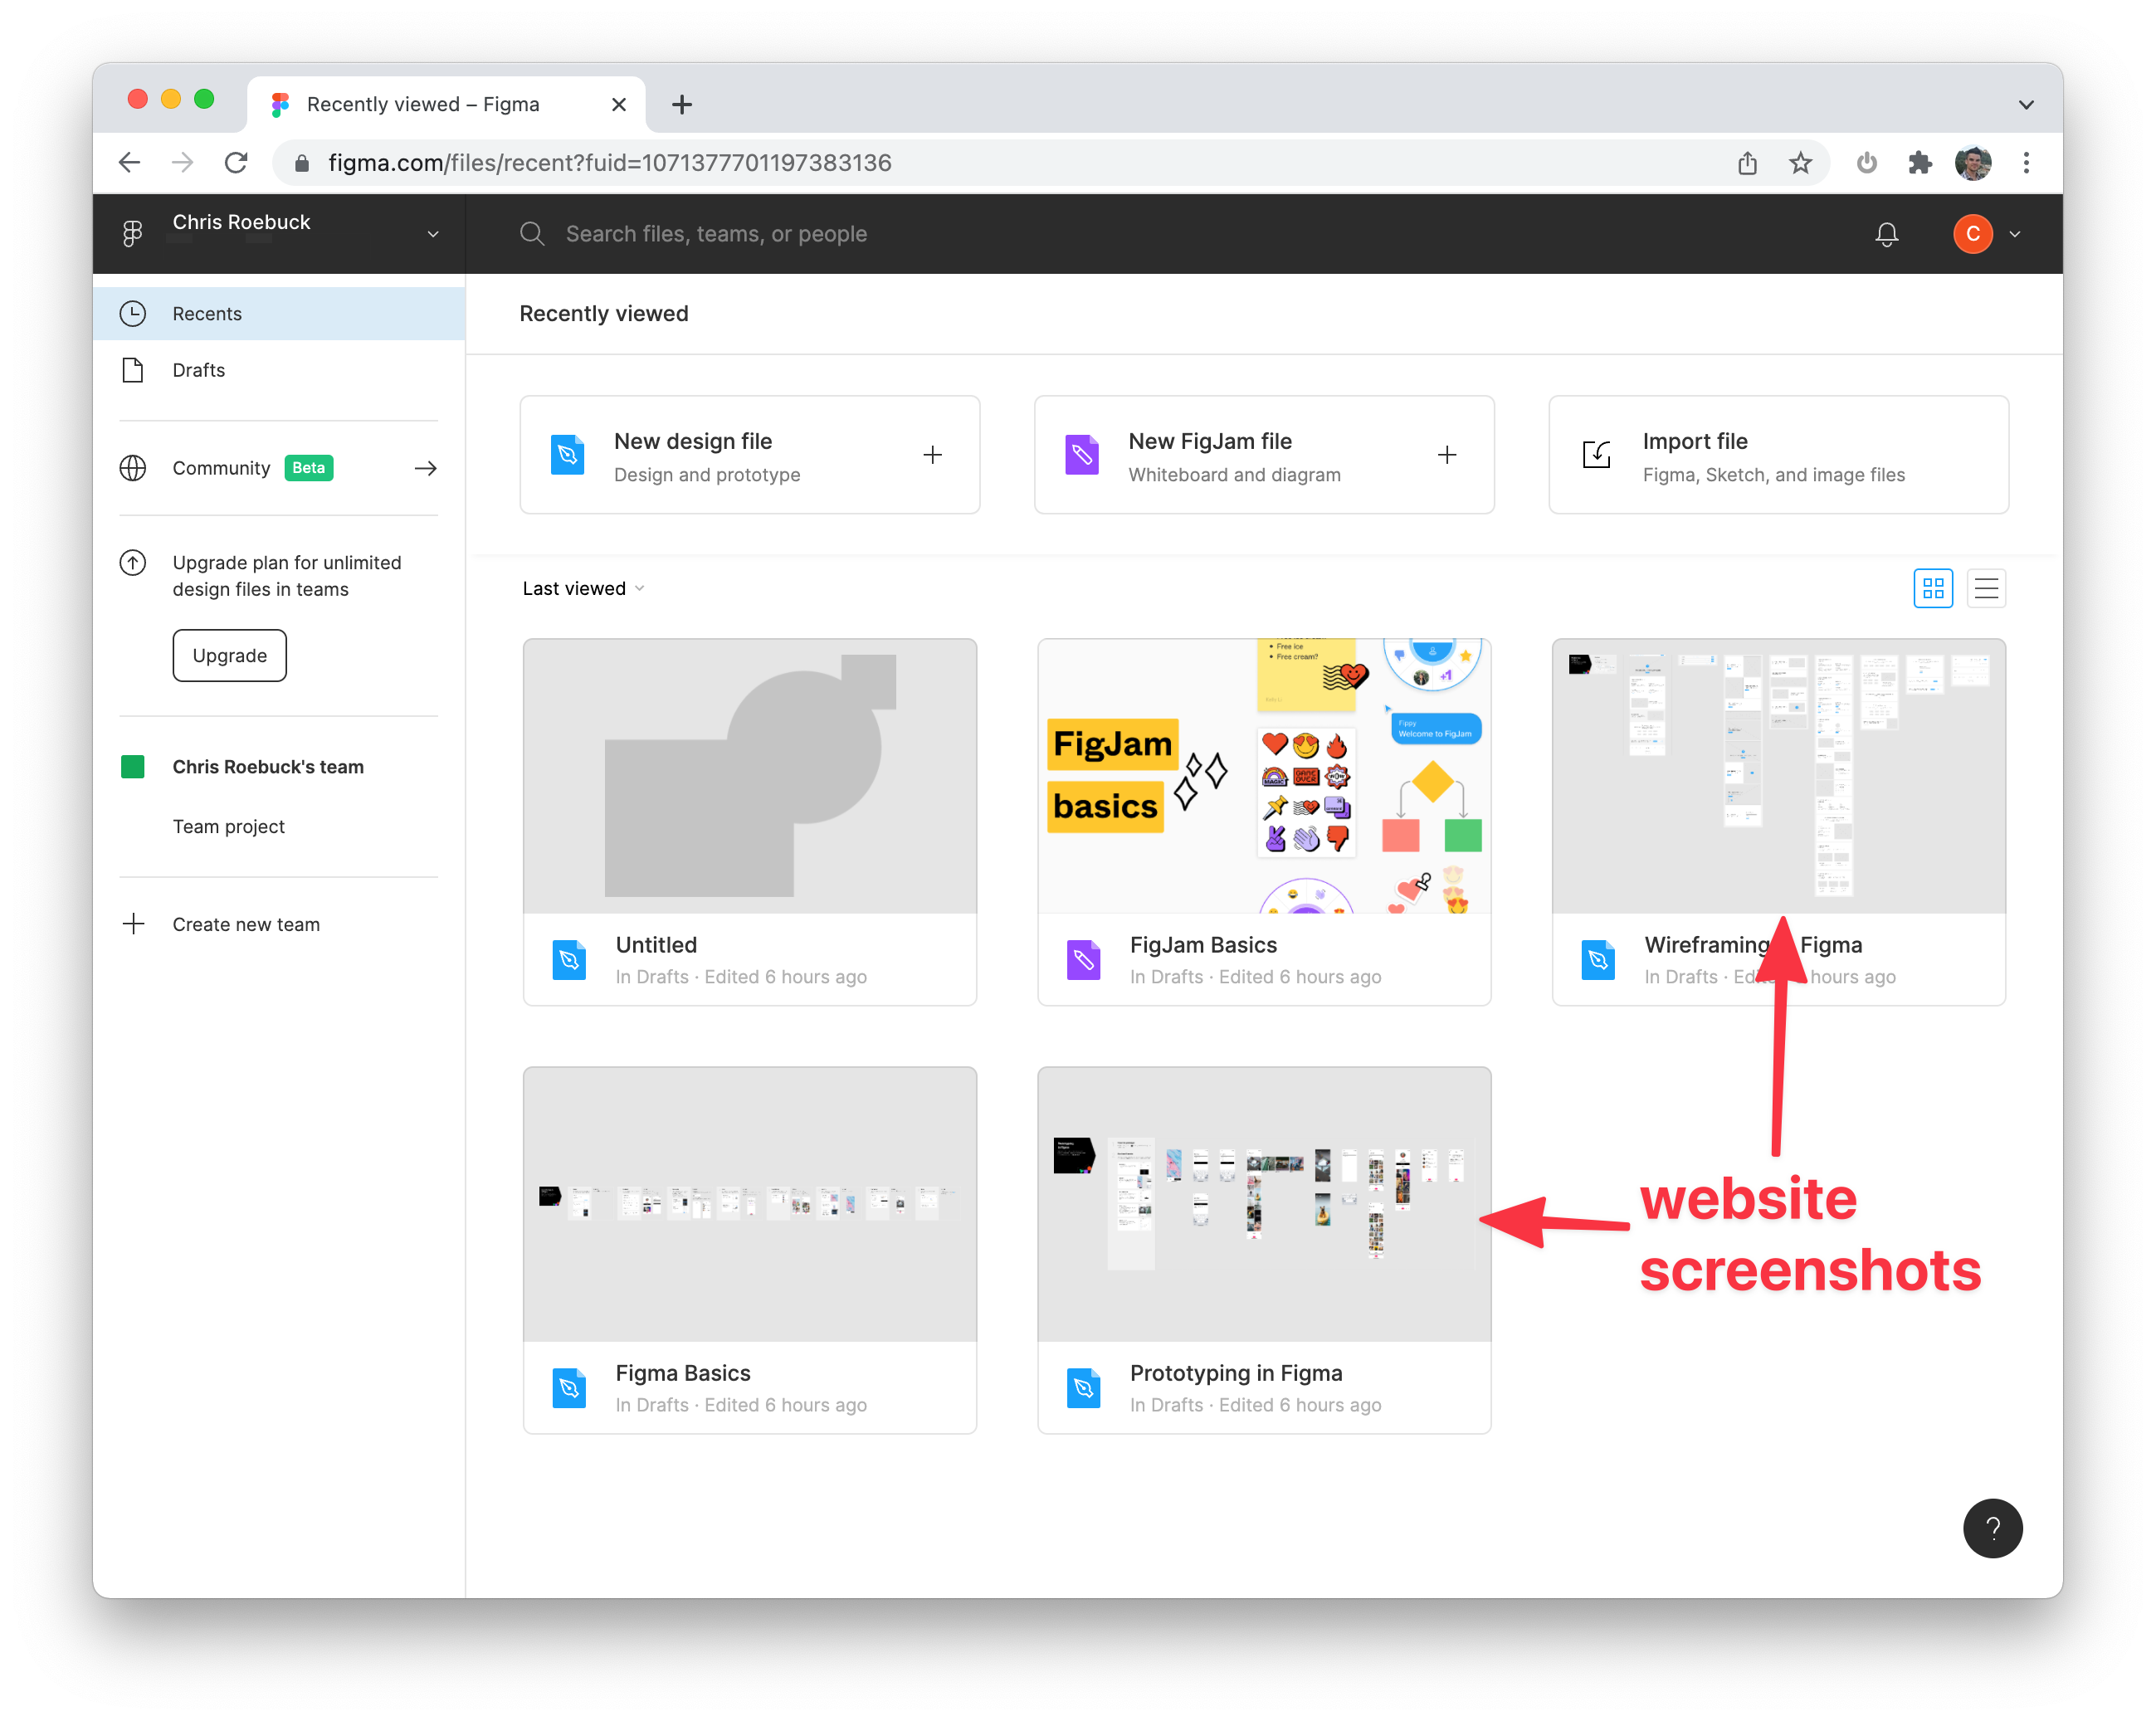
- Capture screenshots on a schedule, hourly or daily for archiving or comparison:

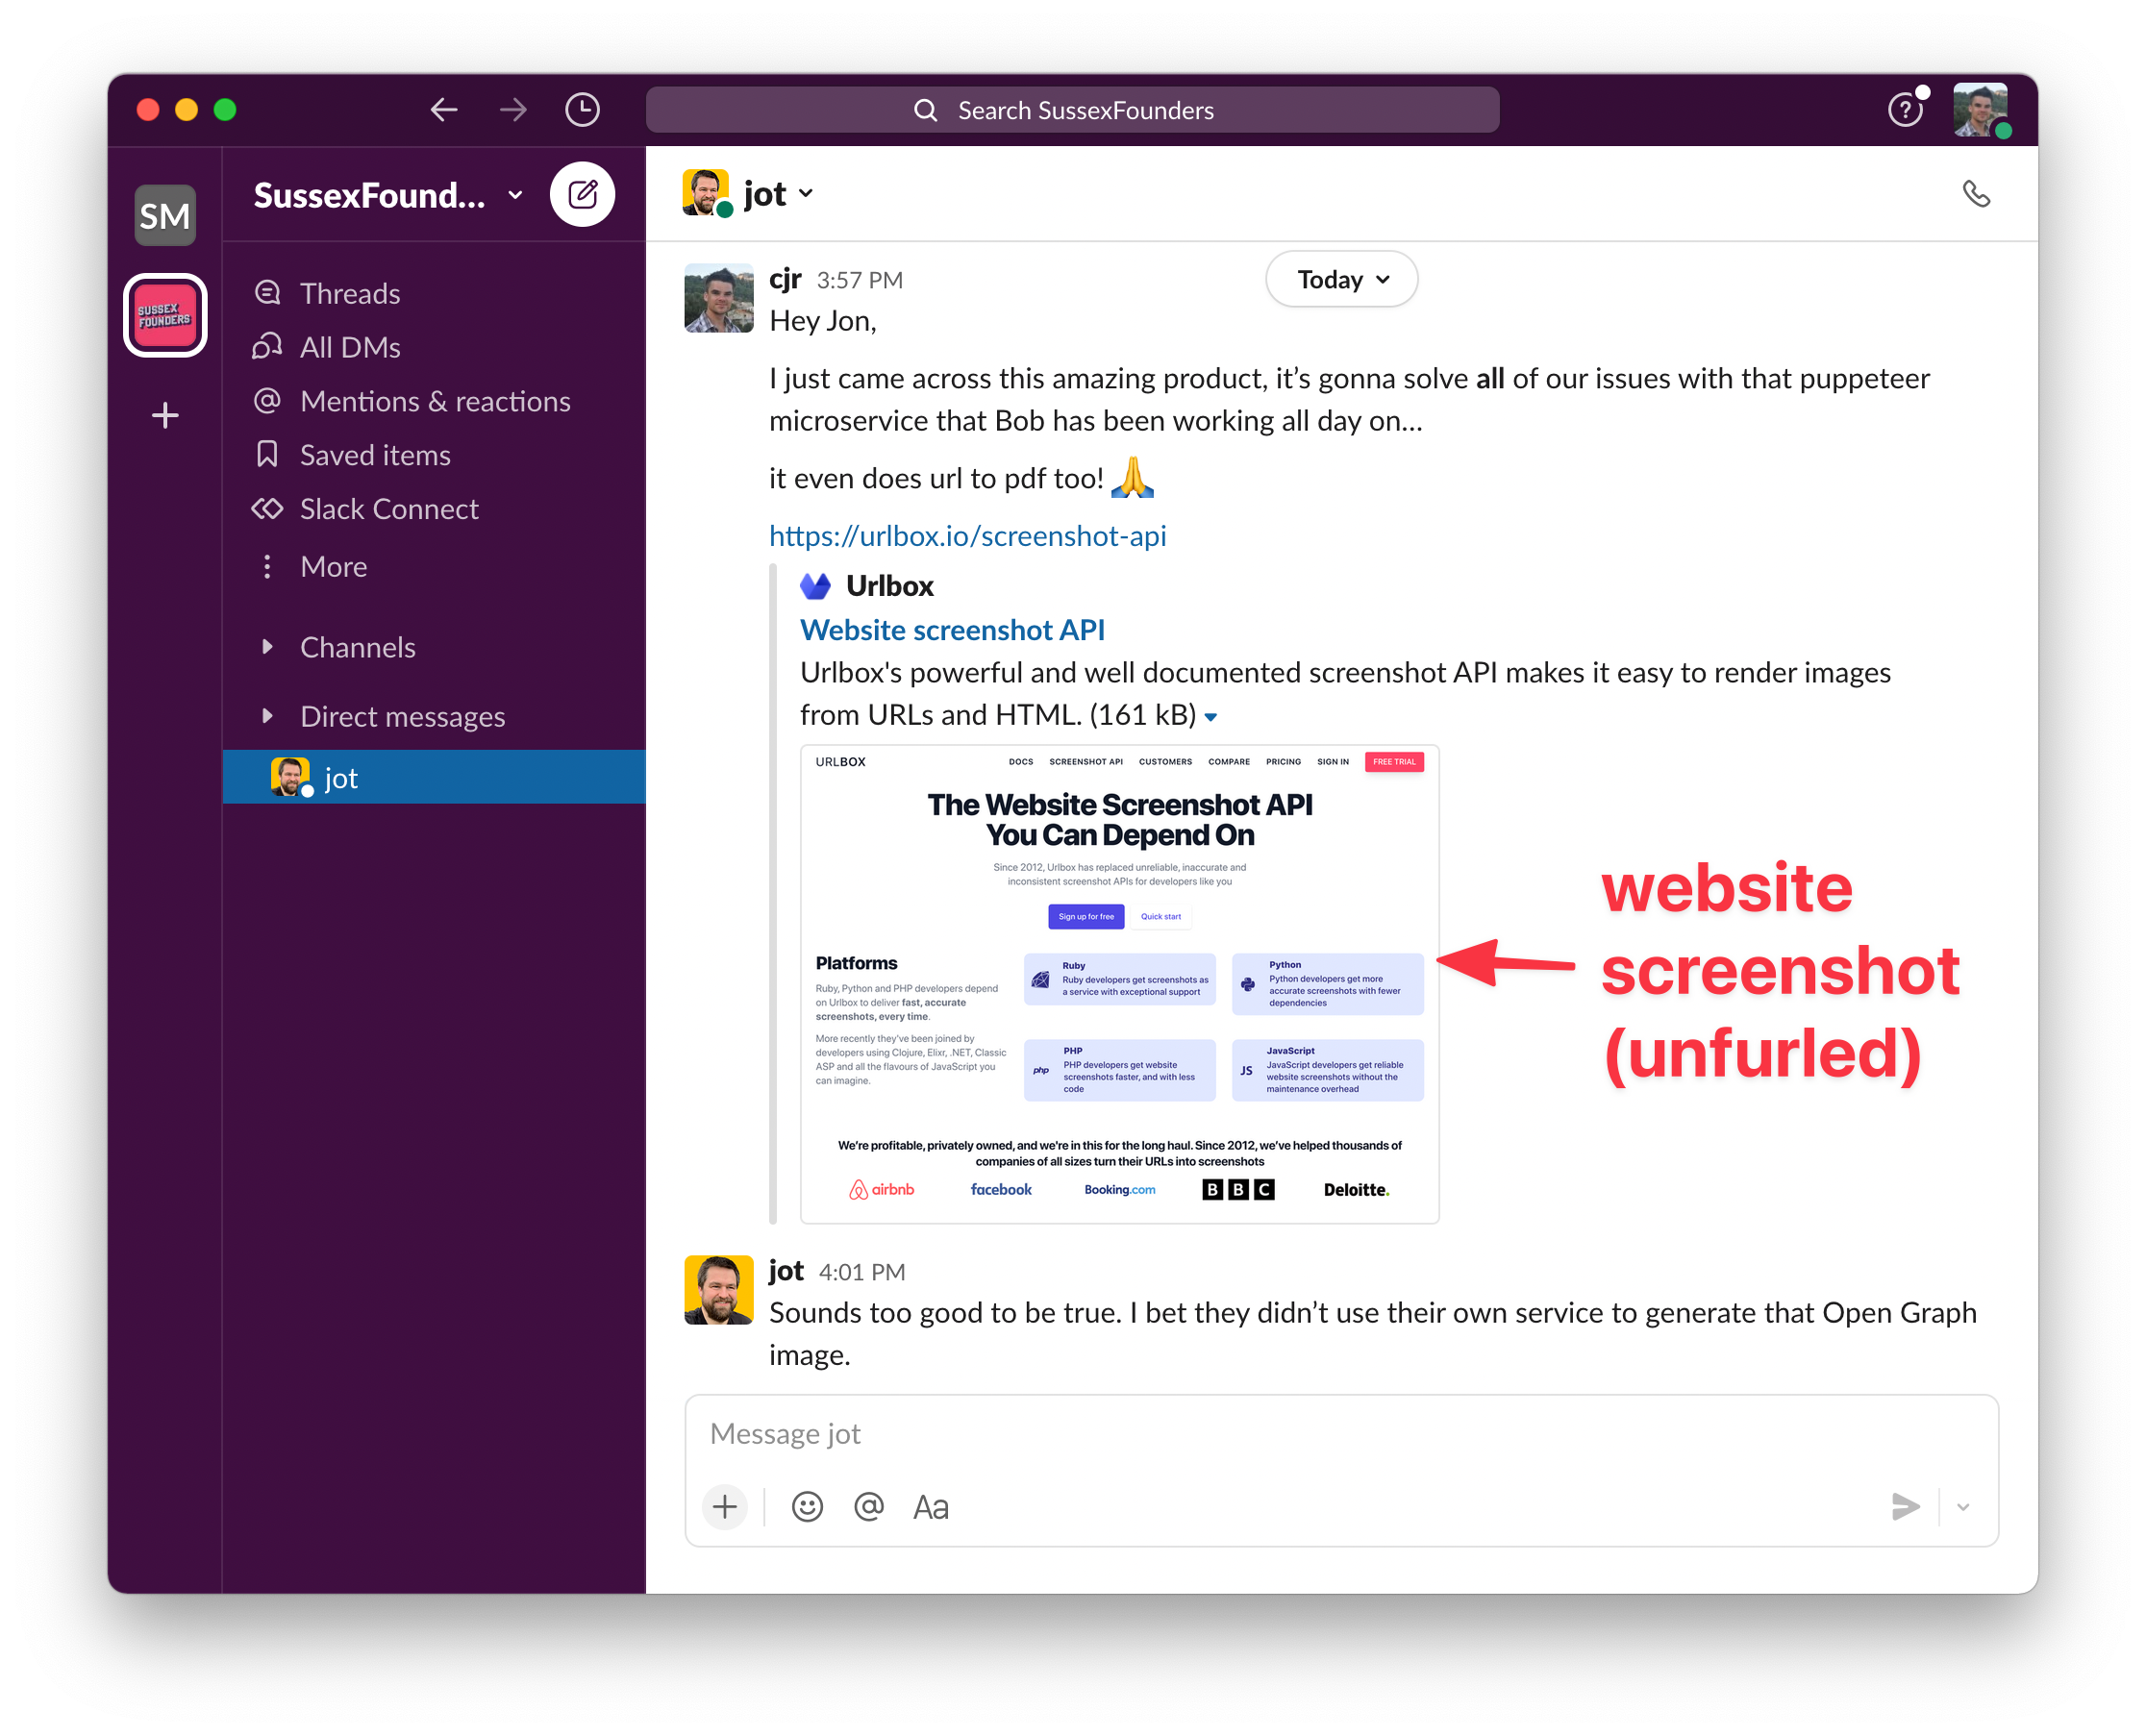
- At urlbox, we use website screenshots in our open-graph and twitter card metatags. When a link is shared to any page on urlbox.io, the link gets unfurled on slack, twitter or facebook, there will now be a nice screenshot of the page that is being shared.
- Perhaps you just want to take a screenshot of a specific portion of a web page, such as a chart, the maps component on a google search results page, or of an individual tweet.
There are lots of use-cases for website screenshots, whichever use-case you have, capturing a screenshot of a website is made possible by using puppeteer.
What kind of website screenshots can you capture?
-
Viewport screenshots
This is where you set the viewport of the headless browser to a specific resolution and take a screenshot of the content that fills that viewport. This content is sometimes referred to as being 'above-the-fold'.
-
Full page screenshots
Full page screenshots capture the entire webpage from the top of the page to the bottom of the footer. These are usually the most difficult kind of screenshot to capture accurately, due to how some sites are coded.
-
Screenshots of specific elements
Element screenshots are useful for capturing a specific portion of a page, such as a specific tweet, the price of an item on an e-commerce page, or the comments section on an article.
-
Emulated device screenshots
It's also possible to capture screenshots of a website by emulating a device. You can do this by altering the viewport, and setting a device specific user agent.
-
Geo-restricted website screenshots
Sometimes a website will display different content to visitors in different countries. For example a news site based in the E.U. may not display certain articles to visitors from the U.S. To get around these scenarios, we can use a proxy server with puppeteer to make it appear to the website that we are based in the E.U. and allow us to access the geo restricted content.
Prerequisites
In order to get the most from the rest of this article, you should be comfortable with the following:
- node.js, npm and JavaScript
- Chrome devtools
- CSS selectors, XPath expressions and DOM manipulation
Introduction to puppeteer
Puppeteer is a node.js library that allows you to automate headless browsers like chromium and chrome.
What is the difference between chrome and chromium?
Chromium is the open-source project behind the proprietary Google Chrome browser. The main differences are that
Google Chrome adds extra features such as the ability to login to a google account and sync browser settings.
There
are also differences in the support of proprietary codecs for various media formats, such as h264 video. This means that
chromium sometimes will not load and display video's in your screenshots, whereas chrome would.
Puppeteer is a nice abstraction on top of the chrome devtools protocol. The devtools protocol could potentially be used directly, but the reason puppeteer is preferred is because it makes interfacing with the various methods and features of the devtools protocol much smoother.
As an example, when you ask puppeteer to navigate to a website, it will call the devtool protocol's
Page.navigate method described here.
All that said, in certain instances puppeteer gets in the way and it is necessary to use the devtools protocol directly in order to get around some of puppeteer's bugs.
Let's try to capture a viewport screenshot of google.com...
Using puppeteer to capture a website screenshot of google.com
To get started using puppeteer, first we need to install it using npm:
npm install puppeteerAs part of the install, puppeteer will download the latest compatible version of headless chromium. If you want to skip the download for some reason, you can pass the environment variable PUPPETEER_SKIP_CHROMIUM_DOWNLOAD=true.
Next, we need to import the puppeteer module and write our first puppeteer script:
const puppeteer = require("puppeteer"); // using commonjs require syntax
// import puppeteer from "puppeteer"; // if using es6/typescript import syntax
puppeteer.launch().then(async (browser) => {
  const page = (await browser.pages())[0];
  await page.goto("https://www.google.com");
  await page.screenshot({ path: "google.png" });
  await browser.close();
});
This puppeteer script launches a new instance of headless chrome, navigates to the url "https://google.com" and captures a screenshot of the page. It saves the screenshot locally to a file named "google.png".
By default, puppeteer will always start chromium with a new, empty page (or tab) with the url about:blank. Instead of creating a new page we can just get a reference to this blank page by calling browser.pages() and getting the first item.
To run the script, save the above code to a file named screenshot.js and run it
using the command:
node screenshot.jsHere is the resulting website screenshot of google.com:
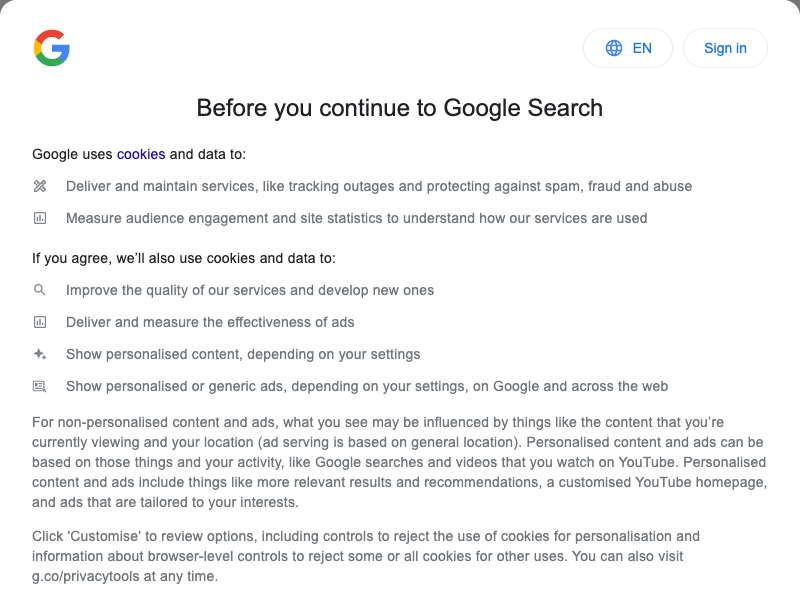
Oh dear - we were expecting to see the classic google.com homepage, with a simple search bar and the I'm Feeling Lucky button, but we seem to have taken a screenshot of a cookie popup instead!
Also, it looks like our screenshot is quite small, by default the viewport on puppeteer is set to
800x600px which defines the screenshot dimensions.
Let's increase the viewport to something larger like 1280x1024 so we can see what's going on.
Do this by calling page.setViewport and pass in our desired width and height:
const puppeteer = require("puppeteer");
puppeteer.launch().then(async (browser) => {
  const page = (await browser.pages())[0];
  await page.setViewport({ width: 1280, height: 1024 });
  await page.goto("https://www.google.com");
  await page.screenshot({ path: "google-1280x1024.png" });
  await browser.close();
});
Here's the resulting screenshot:
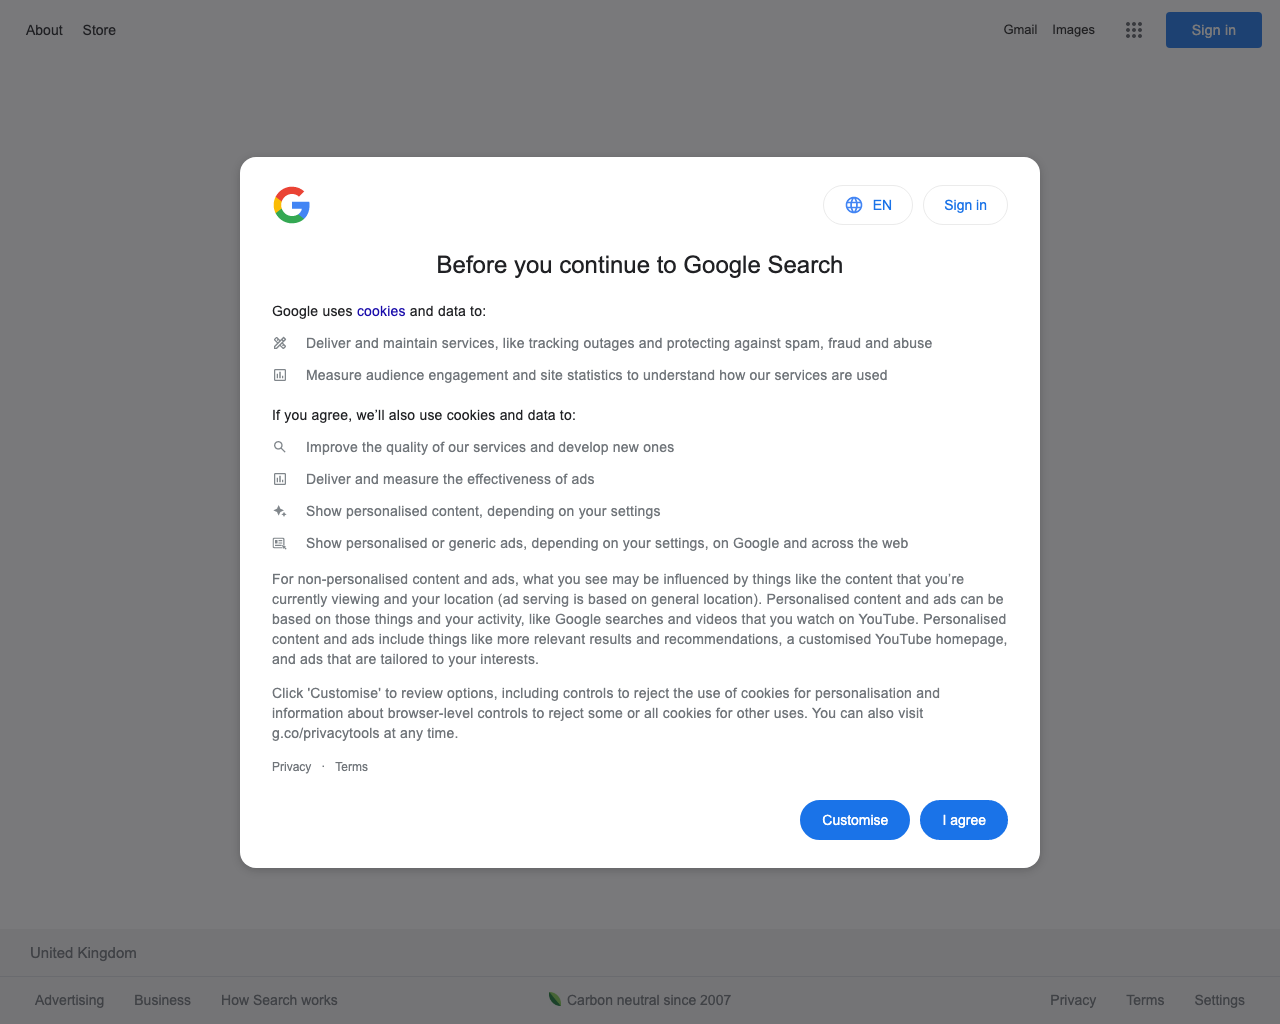
Now it's a bit clearer what's happening. The google.com site is showing us a cookie popup asking us to agree to their terms. That's annoying but part and parcel of the web in 2022! This is a common problem when using puppeteer to capture screenshots of websites.
Removing the cookie popup from the screenshot
In order to remove this popup, we have a few strategies - we can try to interact with the popup, like a regular human user would do, or we can forcefully hide the popup in order to reveal the actual content behind.
We can also get puppeteer to set a specific cookie, which google checks to see if a user that has previously agreed to the terms.
Let's try to interact with the popup.
We can do this by telling puppeteer to click the 'I agree' button for us.
The easiest way is to use an XPath selector so that we can select the button element using it's actual text.
The XPath expression //button[contains(., 'I agree')] should select all button elements with text that contains 'I agree'.
We can test this in chrome devtools manually first, to ensure it is selecting the correct element.
Start a new incognito session in your regular browser, browse to google.com and hopefully you should see the same cookie popup that we have screenshotted.
If so, open the devtools console (option + command + J on a mac, control + shift + J on windows). Now in the chrome devtools console,
you should be able to evaluate the expression using the code $x("//button[contains(., 'I agree')]").
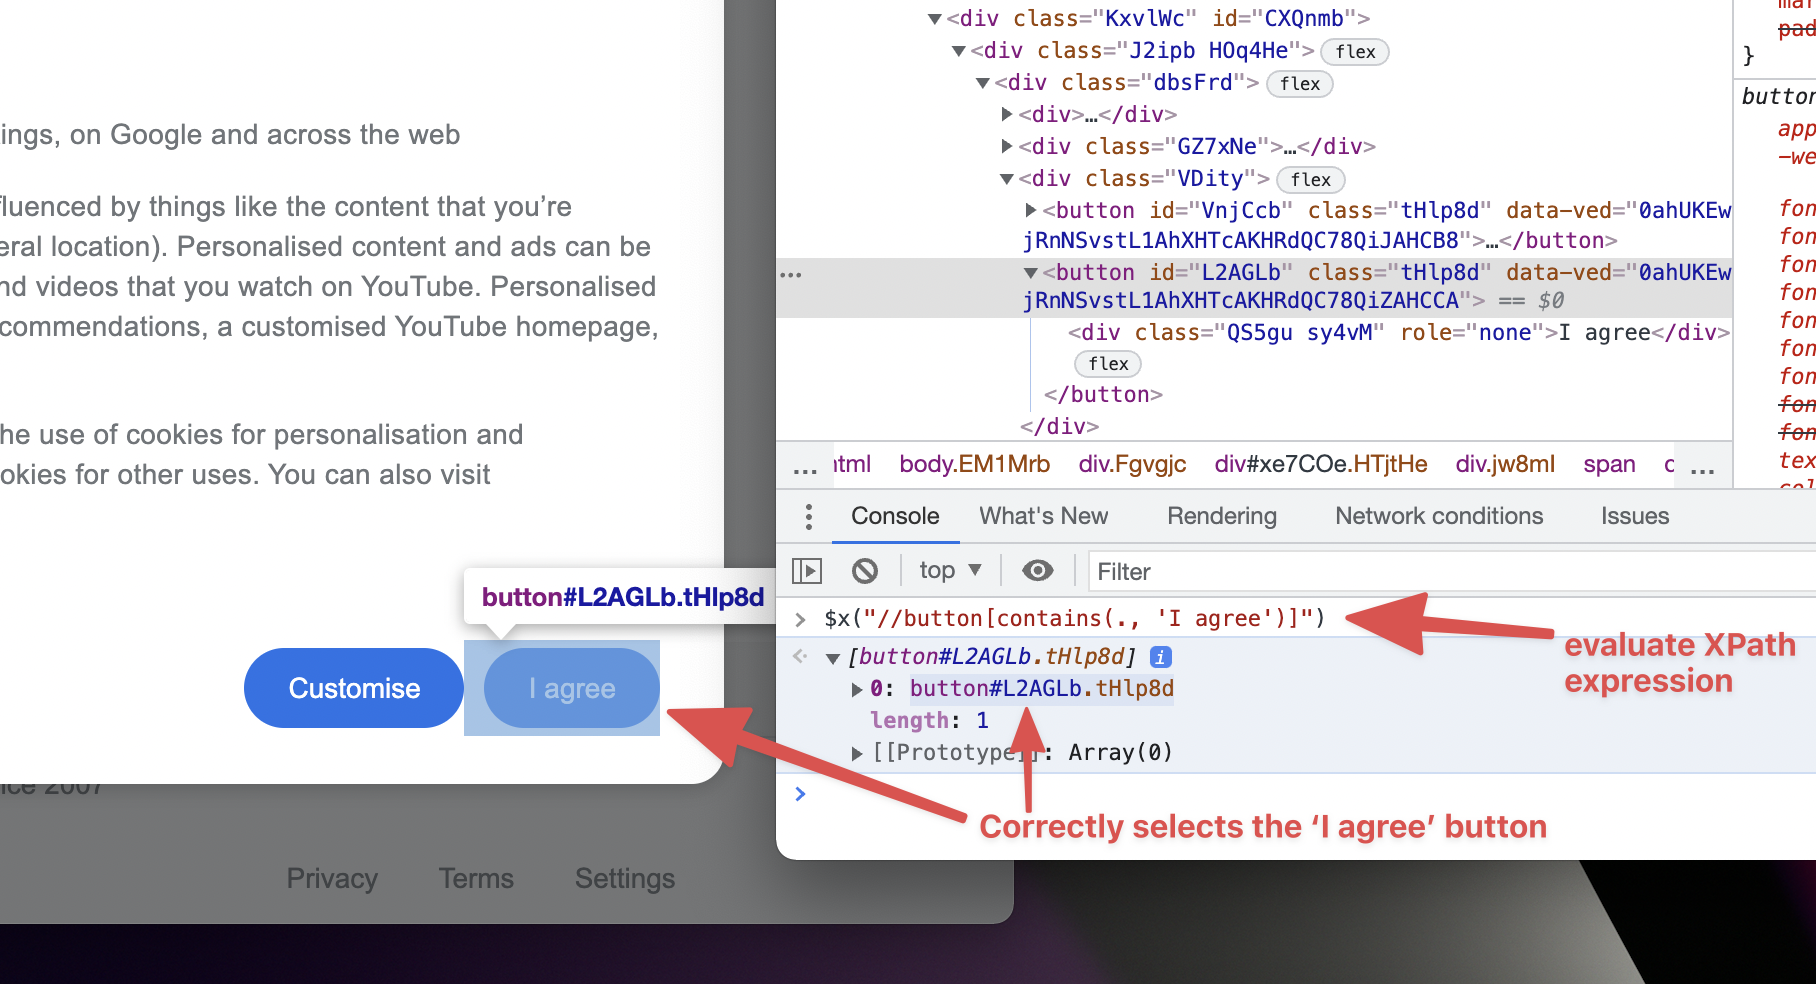
Great, this is working, it is correctly selecting the button we want to click on.
Notice that the result from evaluating the XPath expression is an array, and the first item in the array is our button element.
Now we can update our puppeteer script to run this same XPath expression and click on the button.
const puppeteer = require("puppeteer");
puppeteer.launch().then(async (browser) => {
  const page = (await browser.pages())[0];
  await page.setViewport({ width: 1280, height: 1024 });
  await page.goto("https://www.google.com");
  const xpathResult = await page.$x("//button[contains(., 'I agree')]"); // <- evaluate the xpath expression
  if (xpathResult.length > 0) {
    await xpathResult[0].click(); // <- clicking on the button
  }
  await page.screenshot({ path: "google-clicked.png" });
  await browser.close();
});
Here, we're using the page.$x(expression) method to evaluate the XPath expression,
and then using the click() method on the first element handle in the returned array to simulate clicking the button element.
Run the script again, and here is the resulting screenshot:
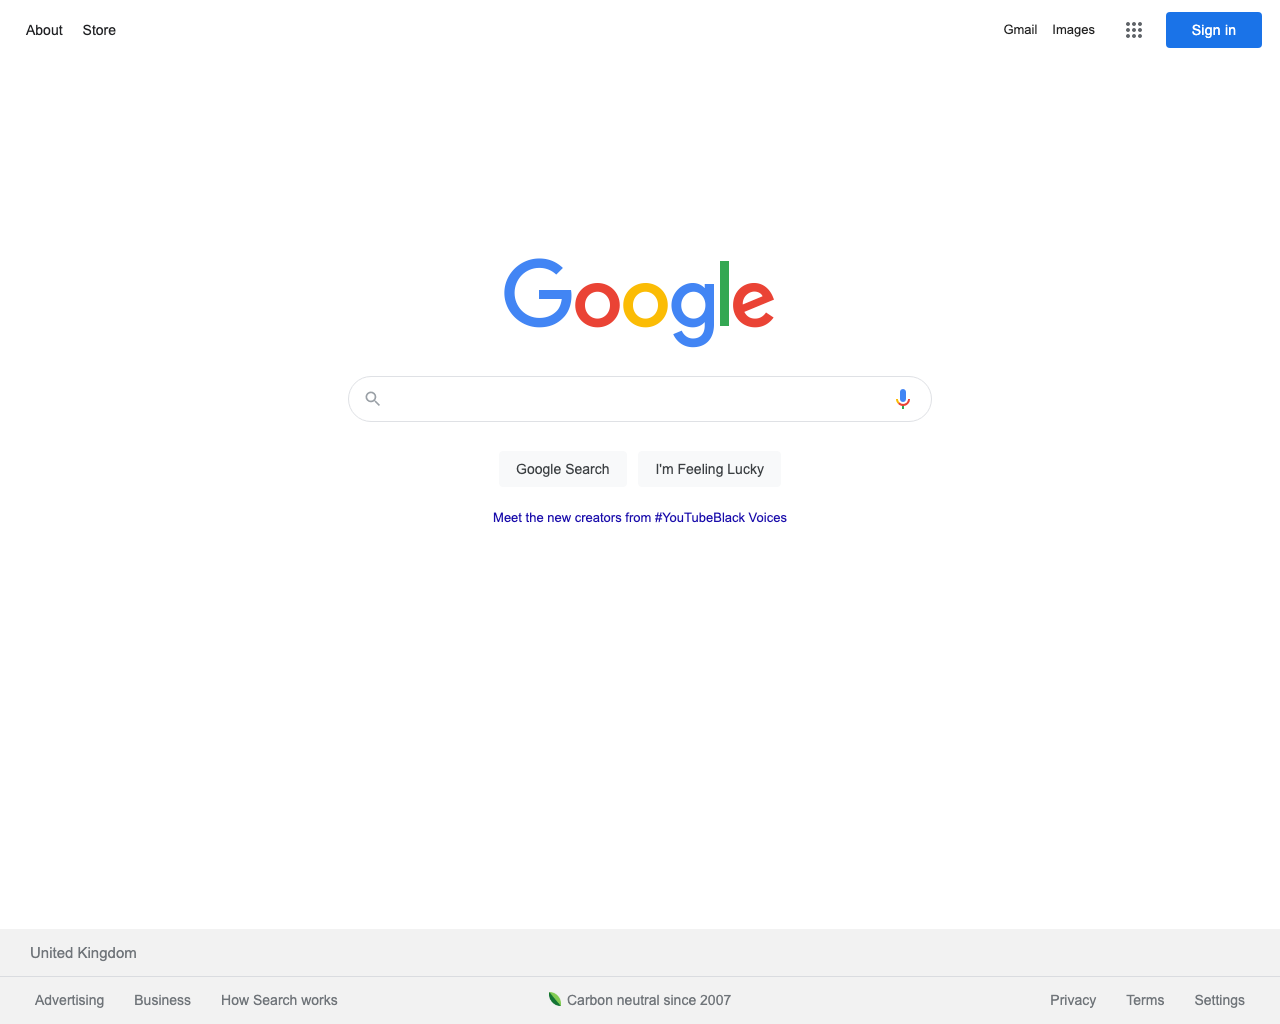
That's better, the cookie popup has been clicked and we can finally see the search bar and the I'm Feeling Lucky button!
Using puppeteer to capture full page website screenshots
Now that we've taken a basic screenshot, let's take a screenshot of the entire page. Let's choose a different url to capture, as google.com is a bit too small for this. Something like apple.com would be better.
Let's update our script to the following:
const puppeteer = require("puppeteer");
puppeteer.launch().then(async (browser) => {
  const page = (await browser.pages())[0];
  await page.setViewport({ width: 1280, height: 1024 });
  await page.goto("https://apple.com");
  await page.screenshot({
    path: "apple-fullpage.png",
    fullPage: true,
  });
  await browser.close();
});
We simply pass fullPage: true in the options to the page.screenshot method.
Let's see the resulting full page screenshot of apple.com:
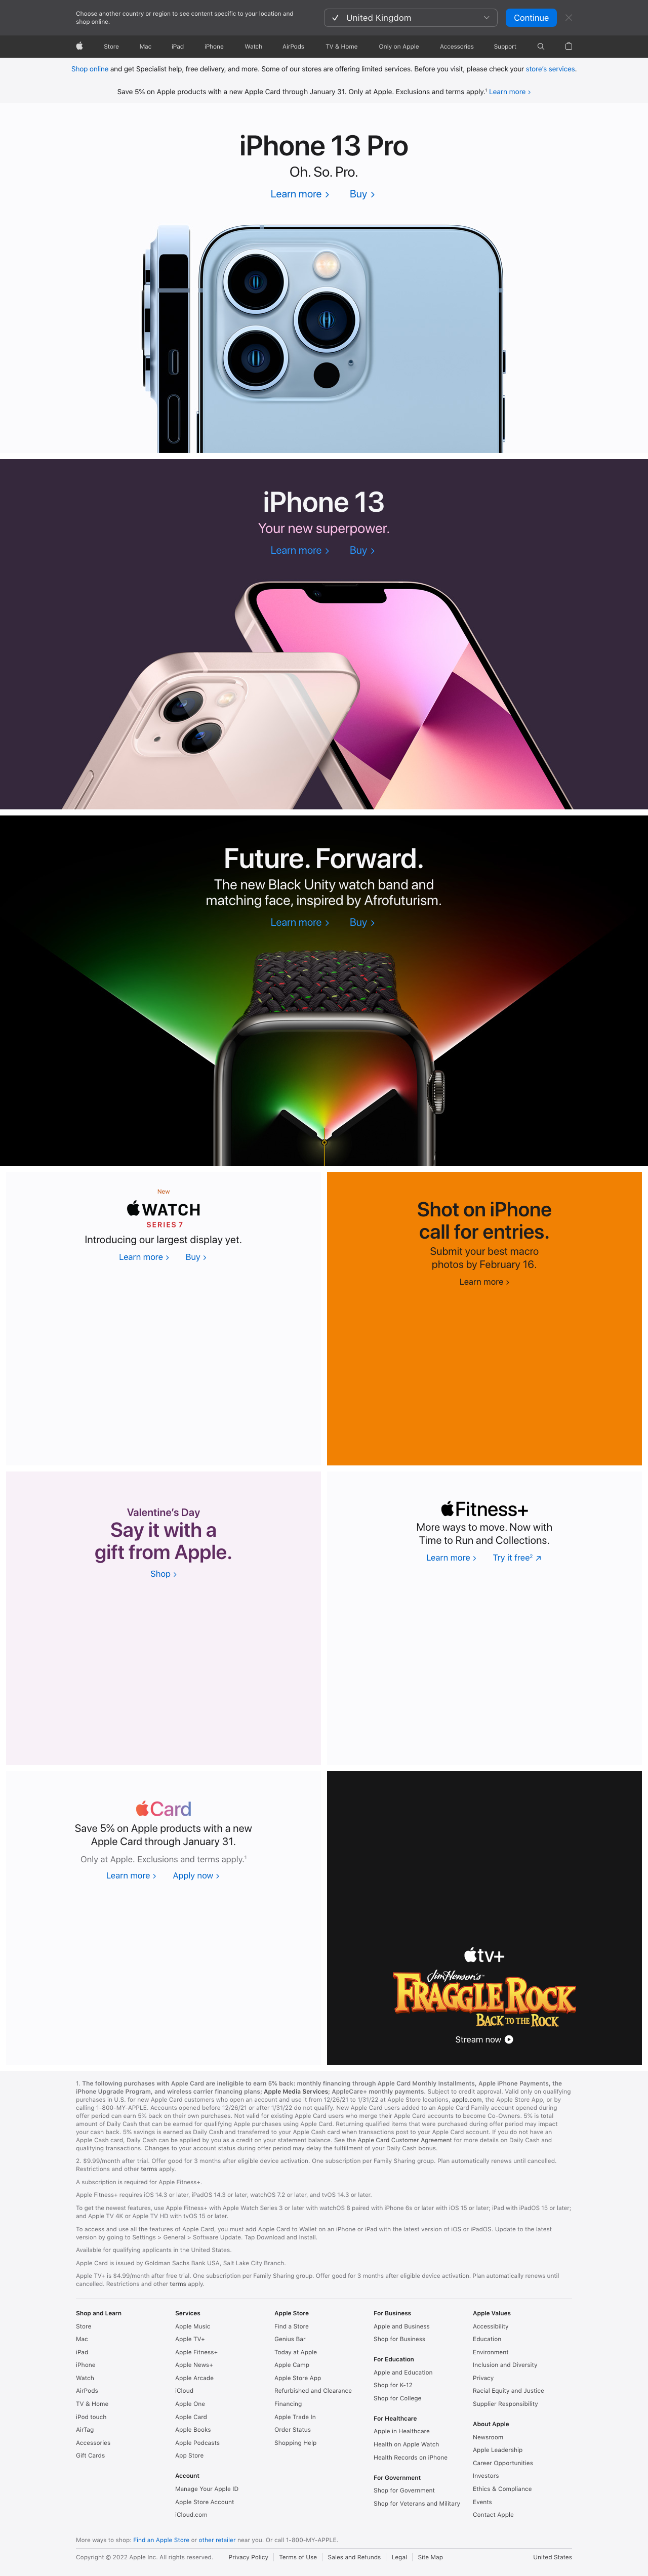
The issue with this full page screenshot is that there are some lazy loaded images at the bottom that have not loaded and so are blank in the screenshot.
Let's fix that now.
Scrolling to the bottom of the page to trigger lazy loaded images
Lazy loaded image elements are designed to reduce the initial page load. They will only load when they enter or are about to enter the viewport.
In order to get these images to load, we need to get puppeteer to scroll the page down, like a normal human user would do.
We can use the page.evaluate method to simulate a human scrolling the page down.
The page.evaluate method allows us to run arbitrary JavaScript code in the context of the website itself.
It is equivalent to running code inside the devtools console. We could use this method for a whole variety of things -
scraping particular information from the page like the title, clicking on certain elements or measuring the dimensions of the page.
The fact that the code runs in the context of the page brings with it some
problems, as it means we cannot be sure that any of our global objects such as
Array, Promise, JSON and even console have not been tampered with by some
code or plugin that the website has already loaded. This can be the source of some very strange and unexplained freezes when running puppeteer scripts on the wild web.
The following method will scroll the page to the bottom, then back to the top:
const scrollPage = async (page) => {
  await page.evaluate(() => {
    return new Promise((resolve, reject) => {
      let interval;
      const reachedBottom = () =>
        document.scrollingElement.scrollTop + window.innerHeight >=
        document.scrollingElement.scrollHeight;
      const scroll = async () => {
        document.scrollingElement.scrollTop += window.innerHeight / 2;
        if (reachedBottom()) {
          clearInterval(interval);
          document.scrollingElement.scrollTop = 0;
          resolve();
        }
      };
      interval = setInterval(scroll, 100);
    });
  });
};
The function above takes in the page object as an argument, then calls evaluate on it. The evaluate method takes an inner function which is evaluated inside the
context of the website.
If the inner function returns a promise, then page.evaluate will wait for the promise to resolve before returning. So, the first thing we
do is return a new promise.
Inside this promise, we create two functions, reachedBottom and scroll. reachedBottom is a function that checks if the page has scrolled to the bottom.
scroll is a function that scrolls the page down by half the window height. It does this by setting the document's scrollingElement's scrollTop property programatically.
The scroll function is called on an interval of 100ms and if the
reachedBottom function returns true, it clears the interval, sets the scrollTop back to 0 and resolves the promise.
We await the scrollPage function from our script, after the page has loaded, but before we take the screenshot:
const puppeteer = require("puppeteer");
puppeteer.launch().then(async (browser) => {
  const page = (await browser.pages())[0];
  await page.setViewport({ width: 1280, height: 1024 });
  await page.goto("https://apple.com");
  await scrollPage(page);
  await page.screenshot({
    path: "apple-fullpage-scrolled.png",
    fullPage: true,
  });
  await browser.close();
});
And here is the resulting screenshot now:

You can see that the images below the fold have now successfully loaded and the full page screenshot looks complete!
Using puppeteer to take an element screenshot
Now let's see how we can take an element screenshot using puppeteer.
For this example we'll find a tweet, and try to grab a screenshot of just the tweet container rather than the whole page.
Here's a random example tweet we can use. If we take a normal screenshot of this url we get the following image:
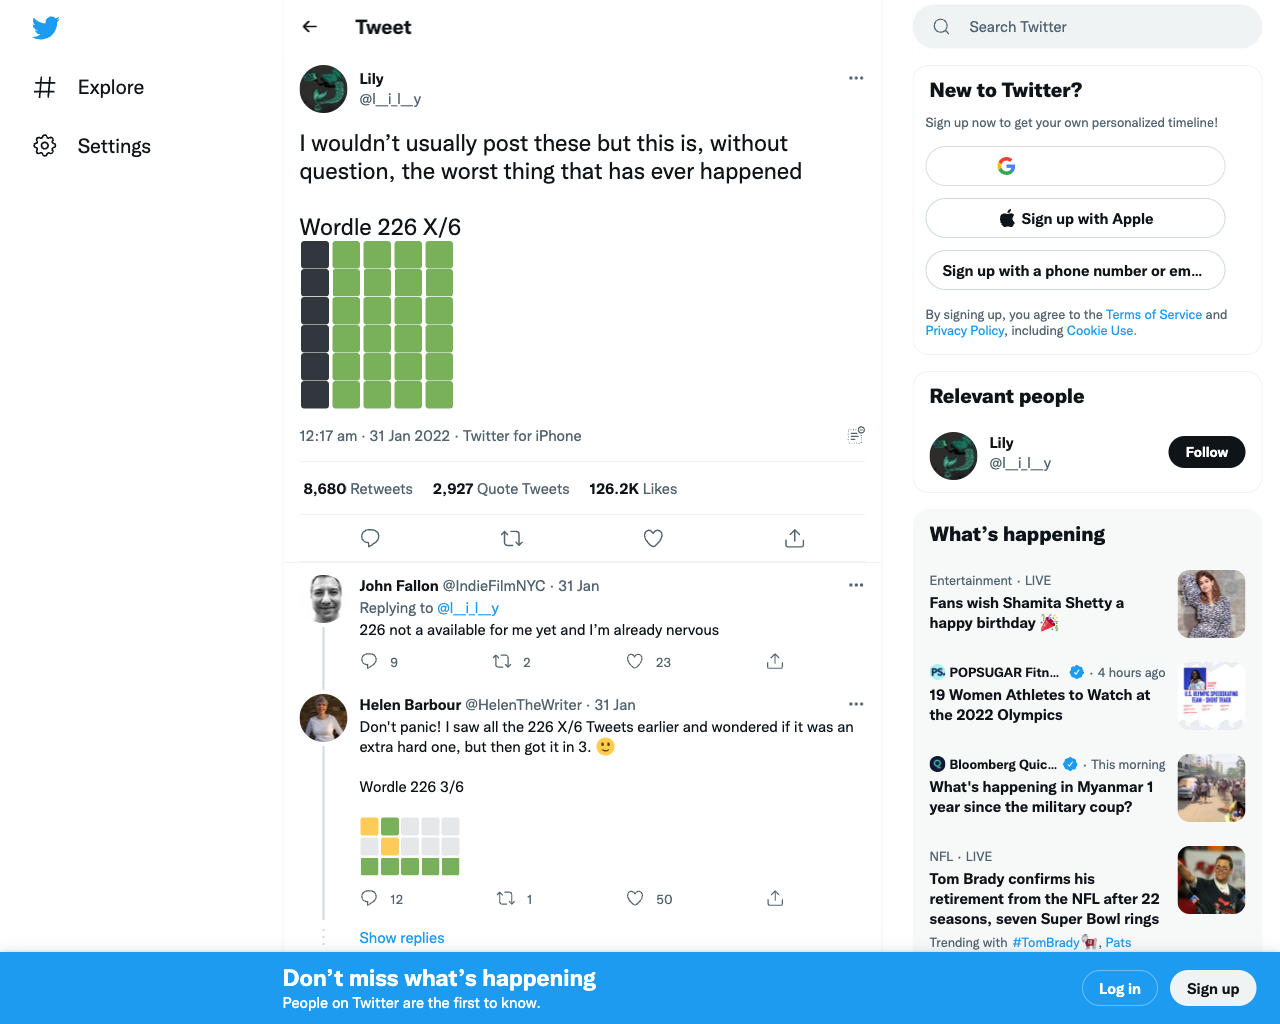
The screenshot above shows the tweet and all of the other elements that surround it on the page.
But if we wanted to create a gallery of tweets, we'd want to focus on the tweet content and only capture a screenshot of this portion of the page.
In order for puppeteer to capture an element screenshot, it needs to know how to find the specific element in the DOM. We can use CSS selectors or XPath expressions to find the element. In this example we'll use CSS selectors to target the element.
Finding the element to screenshot
Open a new incognito browser window, navigate to the tweet url and open the devtools.
Once inside devtools, click on the 'elements' tab and hover over the elements in the DOM tree until you find the most appropriate element that contains the whole tweet and nothing but the whole tweet:

From here, you can right click on the element and choose the copy > copy selector option.

This will copy the selector of the element to your clipboard. For me, the selector was:
#react-root > div > div > div.css-1dbjc4n.r-18u37iz.r-13qz1uu.r-417010 > main > div > div > div > div.css-1dbjc4n.r-14lw9ot.r-jxzhtn.r-1ljd8xs.r-13l2t4g.r-1phboty.r-1jgb5lz.r-11wrixw.r-61z16t.r-1ye8kvj.r-13qz1uu.r-184en5c > div > section > div > div > div:nth-child(1) > div > div:nth-child(1) > article
Which is kind of gnarly.
It's also really brittle - if twitter updates it's DOM structure, it's likely to break this selector.
If we just use our own eyes we can observe that there's only two <article> elements on the page,
and running document.querySelector('article') will return the first one, which happens to be the element we'd like to screenshot. Therefore, the CSS selector we can use to target the tweet element is simply article.
Now let's modify our first script to take a screenshot of the tweet element:
const puppeteer = require("puppeteer");
puppeteer.launch({ headless: false }).then(async (browser) => {
  const page = (await browser.pages())[0];
  await page.setViewport({ width: 1280, height: 1024 });
  await page.goto("https://twitter.com/l__i_l__y/status/1487943103990403074");
  const tweetElem = await page.$("article");
  await tweetElem.screenshot({ path: "tweet-selector.png" });
  await browser.close();
});
Note I'm disabling headless mode here by passing { headless: false } to the launch function. When you run puppeteer in headful mode, it will show the browser window and you can visualise what's happening. This makes debugging things a little easier :)
Here we're using the page.$ method to get a handle to the element we want to screenshot. This is equivalent to running document.querySelector(selector) in the devtools console.
We're then calling the screenshot method on the element handle rather than on the page object, in order to get a screenshot of just the element.
Here's the resulting screenshot:
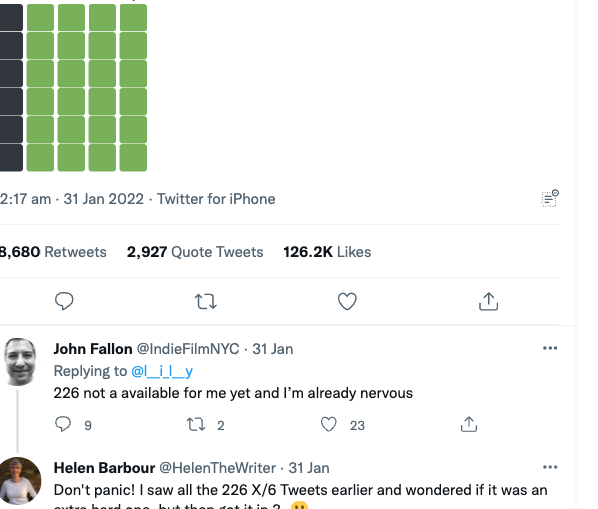
Hmm, that is not the element screenshot we wanted!
Instead of taking a screenshot of the tweet element, we appear to have taken a tweet-sized screenshot but with the wrong offset, as demonstrated below:
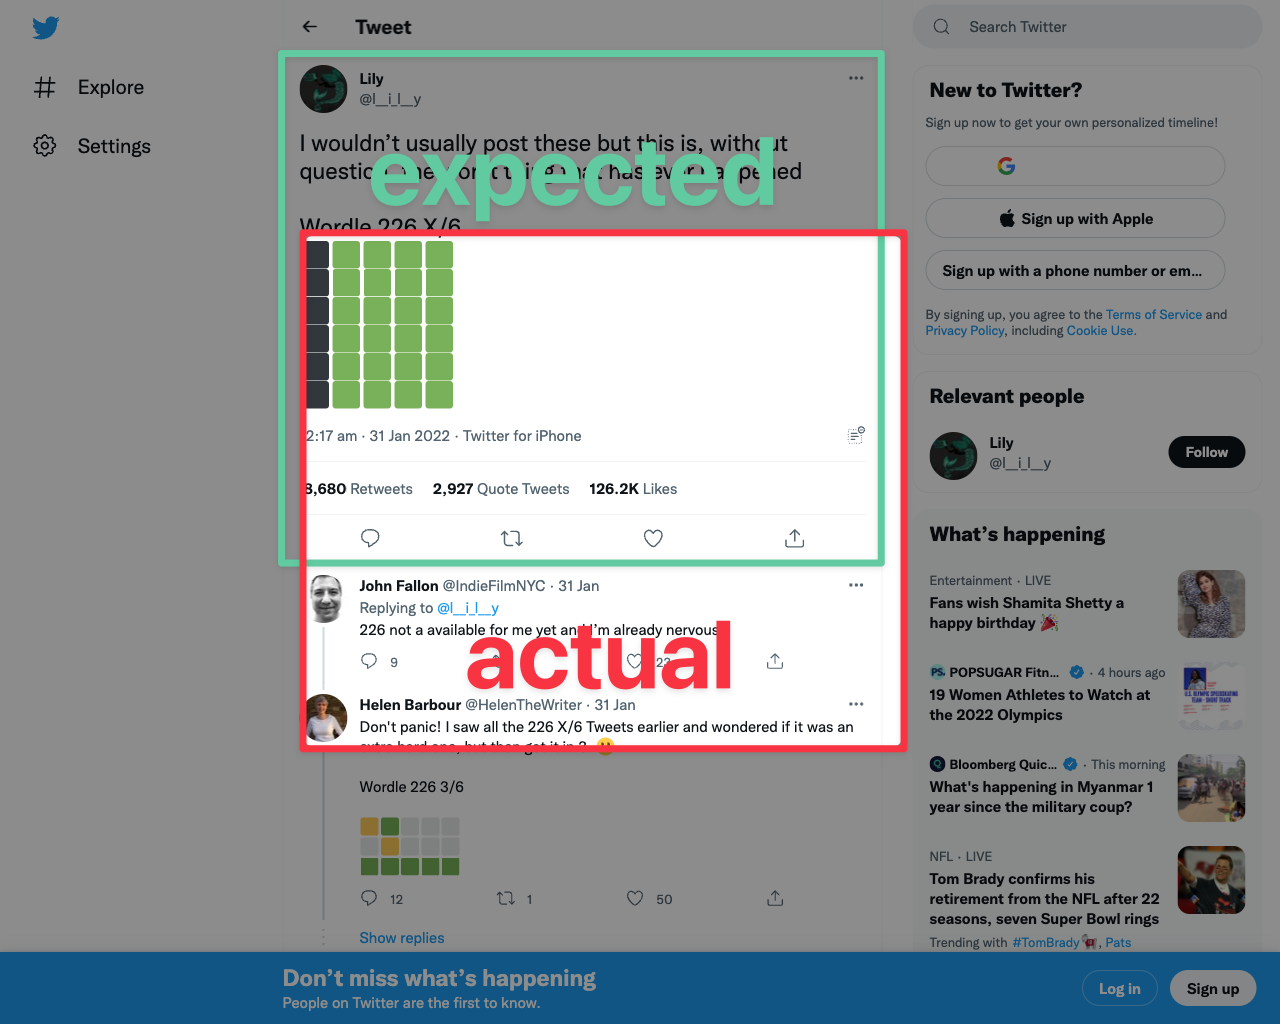
In order to figure out what's going on, we need to delve right into the puppeteer code for element screenshots.
This function in the puppeteer source code is responsible for taking an element screenshot.
It:
- scrolls the element into view (if needed) using
element.scrollIntoView() - gets the
boundingBoxof the element usingDOM.getBoxModel()from chrome devtools protocol. - offsets the
boundingBoxby addingpageXandpageYvalues from thecssLayoutViewportobject returned fromPage.getLayoutMetrics, and returns the offsettedboundingBox. - calls the
Page.screenshotmethod, passing theboundingBoxinto theclipproperty, which clips the screenshot to the dimensions specified by the offset bounding box.
Unfortunately, step 3 above is currently a bug in puppeteer, which has been reported a few times already.
The pageX and pageY values returned from cssLayoutViewport are sometimes incorrect in headless mode, and should not be added as offsets to the clip object.
Working around puppeteer's element screenshot bug
To fix the bug with puppeteers default element screenshot implementation, we can write our own method to find the element, get the correct co-ordinates and dimensions for the element, and pass that as the clip object to the page#screenshot method.
The method we'll write is called getElementDimensions:
const getElementDimensions = async (page, selector) => {
  return page.evaluate(async (innerSelector) => {
    let elem = document.querySelector(innerSelector);
    if (!elem) {
      throw new Error("element not found");
    }
    elem.scrollIntoViewIfNeeded();
    let boundingBox = elem.getBoundingClientRect();
    return {
      width: Math.round(boundingBox.width),
      height: Math.round(boundingBox.height),
      x: Math.round(boundingBox.x),
      y: Math.round(boundingBox.y),
    };
  }, selector);
};
This method takes in the page object, and a CSS selector.
It then calls the evaluate method on the Page as we've seen before.
But this time we want to pass our selector string as a parameter to our evaluate function, so that we can use it inside the inner function.
How do we pass parameters to puppeteers evaluate function? The way we do this is to pass in the argument as the second parameter to evaluate (after our function argument). This becomes the first argument in our inner function. In the example above I've explicitly renamed the selector argument to innerSelector to make it clear that we're now accessing the variable inside a different context.
The getElementDimensions function:
- attempts to find the element in the DOM using
document.querySelector(selector)with the passed-in selector argument - throws an error if the element is not found
- scrolls the element into view using
element.scrollIntoViewIfNeeded() - gets the
boundingBoxof the element usingelement.getBoundingClientRect() - returns an object with the element dimensions with keys corresponding to the
clipobject that puppeteer's screenshot function expects
Why do we need to round the dimensions? The clip object that we are passing to Page.screenshot expects whole numbers, whereas the values returned by element.getBoundingClientRect are decimal values. To convert them into whole numbers, we use Math.round, which should return the closest whole number
Now let's update our original script to call our new getElementDimensions function:
const puppeteer = require("puppeteer");
puppeteer.launch({ headless: true }).then(async (browser) => {
  const page = (await browser.pages())[0];
  await page.setViewport({ width: 1280, height: 1024 });
  await page.goto("https://twitter.com/l__i_l__y/status/1487943103990403074");
  let elementClip = await getElementDimensions(page, "article");
  await page.screenshot({
    path: "tweet-selector.png",
    clip: elementClip,
  });
  await browser.close();
});
Run the updated script, and then the output should be:
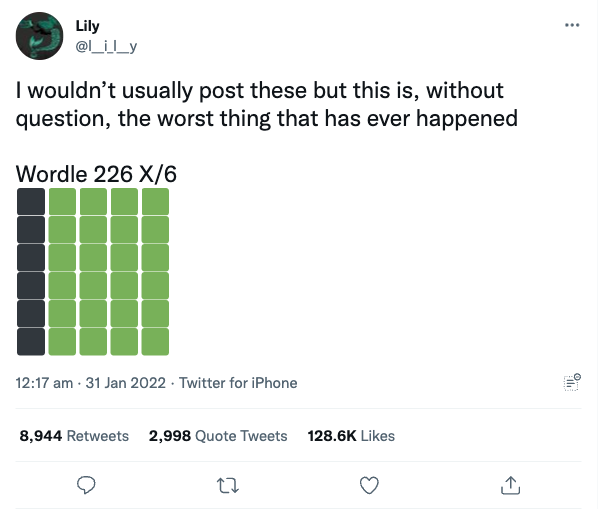
Ok, finally.. that looks better :)
Conclusion
In this article we attempted to take three different types of screenshots, on three of the most prominent websites on the internet:
- A viewport screenshot of google.com
- A full-page screenshot of apple.com
- An element screenshot of a tweet on twitter.com
In each case, we ran into issues that had to be worked around:
- Google showed us a cookie banner which we had to manually target and remove.
- Apple's use of lazy-loaded images meant that our initial full page screenshot had empty images, so we had to write some code to scroll the page to the bottom before taking the screenshot.
- The initial tweet screenshot was off, due to a bug in puppeteers element screenshot algorithm. So we had to write some code to get the correct co-ordinates of the tweet element.
These kind of issues can make it time consuming to maintain your own screenshot service. They are just the tip of the iceberg when trying to screenshot the wild web.
If you require perfect screenshots in your product and don't want to waste time working around puppeteer's issues, urlbox can help.
Urlbox provides a simple API for taking perfect screenshots at scale, let us handle the edge-cases and save yourself some time, money and stress.
With Urlbox you can:
Discover the power of the Urlbox in our API docs.
There is a free 7-day trial, so go ahead and sign up now to get started.
