
A swipe file is a list of valuable ideas and insights to draw from when you feel like you hit a roadblock. Everyone feels stuck from time to time, so having a collection of materials you can get inspiration from can be a lifesaver, especially when your deadline is closing in.
Swipe files are mainly used by marketers, although they can be an excellent asset for designers and developers alike.
In this article, you'll learn how to create your own swipe file using no-code tools and share it with your followers, employees, or clients.
Why build your own Swipe File
If you're a marketer, designer, or indie developer, chances are you've experienced creator's block. Often, you find yourself looking at a task the same way as you always did, thus failing to consider other outside-the-box options.
Checking your swipe file is a great way to shift your approach and come up with fresh ideas and solutions. Here are the most common swipe file examples by industry.
Marketing Swipe Files
Creating a marketing campaign is a tedious process that can inevitably induce a mental block. This can happen to everyone, regardless of how experienced they are.
People have created swipe files since the early 1920s. Back then, they cut out pieces of magazines and newspapers and kept them in an album.
Today, all you have to do is take a screenshot. It can be anything that sparked your interest, like a landing page, headline, ad, or even Twitter post. You can then save that screenshot locally or upload it to your Google Drive or Dropbox. You can also automate this process, as I'll share in a minute.
But before that, here are the most common marketing swipe file categories.
-
Headline Swipe File - This kind of swipe file contains screenshots of various ads and articles and is focused on headlines
-
Copywriting Swipe File - This type of swipe file features screenshots of sales letters and landing pages
-
Email Swipe File - This swipe file consists of emails that feature great copy or have a great template design
-
Ads Swipe File - This swipe file is mainly used by PPC marketers to save screenshots of various display ads
-
Twitter Swipe File - This swipe file is used by social media specialists to screenshot tweets and threads they find interesting.
Besides marketers, other industry experts keep swipe files to overcome the creator's block.
Web Design and Development Swipe Files
Designers and web developers alike keep swipe files. These are mainly focused on the visual part of a website or platform and less on the actual copy.
These swipe files are usually focused on the most important pages of a website or app:
-
Landing Pages Swipe File - This type of swipe file consists of full page screenshots of landing pages
-
Dashboards Swipe File - This type of swipe file features screenshots of various dashboards and elements
-
Pricing Page Swipe File - Mostly used by designers, this type of swipe file features screenshots of pricing pages with a focus on how the information is displayed.
Keeping a swipe file can help when you get stuck and need inspiration. But you can also use it to keep track of trends and even your competitors.
How to build a swipe file with Urlbox and Zapier
The fastest and easiest way to start your own swipe file is by using Zapier and a website screenshot generator.
Note: Zapier connects to thousands of apps, so the possibilities are virtually limitless.
Create a Landing Page Swipe File with Google Sheets and Zapier
One of the most common types of swipe files is a Landing Page swipe file. You can start your own by connecting Google Sheets with Urlbox and Google Drive through Zapier.
Before you start, you'll need to sign up for Urlbox and Zapier. You'll also need a Google account.
Step 1. Create a Urlbox account
Signing up to Urlbox is extremely simple. Simply go to the pricing page and select a plan that suits your needs. Alternatively, you can directly sign up for a 7-day free trial.
The cheapest plan goes for $19 per month and lets you capture up to 2,000 screenshots each month.
Step 2. Sign up for Zapier
Now you have to register a Zapier account. You can do so by following this link. Remember that you will need the premium Zapier subscription for this automation, which involves three steps.
Their cheapest plan is $19.99 per month, but if this is your first time registering, you'll get a 7-day free trial.
Step 3. Create a Google Sheet
With the accounts ready, you'll need to create your swipe file directory as a Google Sheets document.
Note: I always create a new folder for each swipe file I plan on building. This helps me keep things organized and easily accessible.
For this example, I have created a new folder called Landing Page Swipe File. Then I simply right-clicked and created a new Google Sheets document. You can copy the spreadsheet by clicking here.
This document should have a single column titled "Landing Page URL." As the name suggests, this is where you will paste the URL of the landing page you want to screenshot and save.
Step 4. Create the Zap
Zaps are the automations you are going to set up with Zapier. Just log in to your account and click on Zaps in the right menu to create one. Alternatively, you can click on the big "+ Create Zap" orange button.
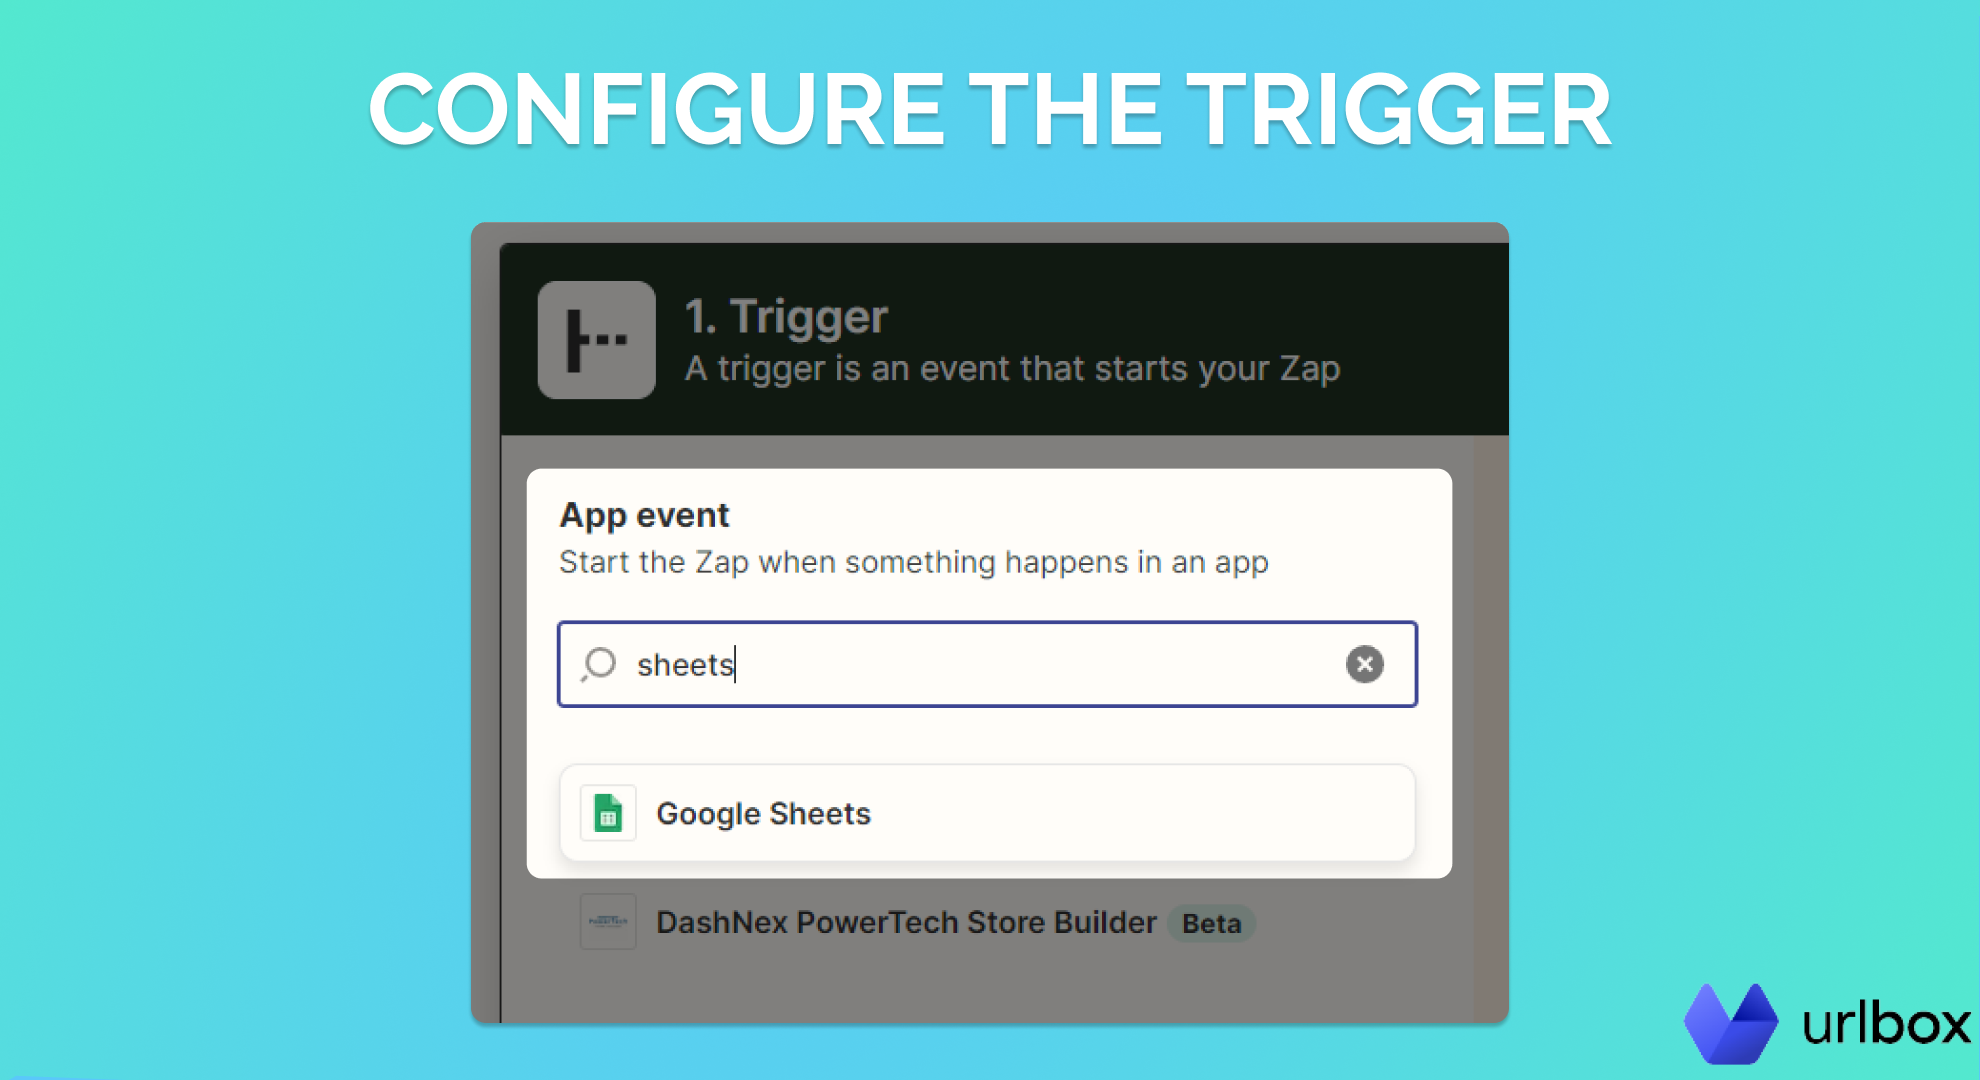
Step 5. Configure the trigger
This will take you to a new page where you must set up the trigger of this automation. Type in sheets and select Google Sheets from the list.
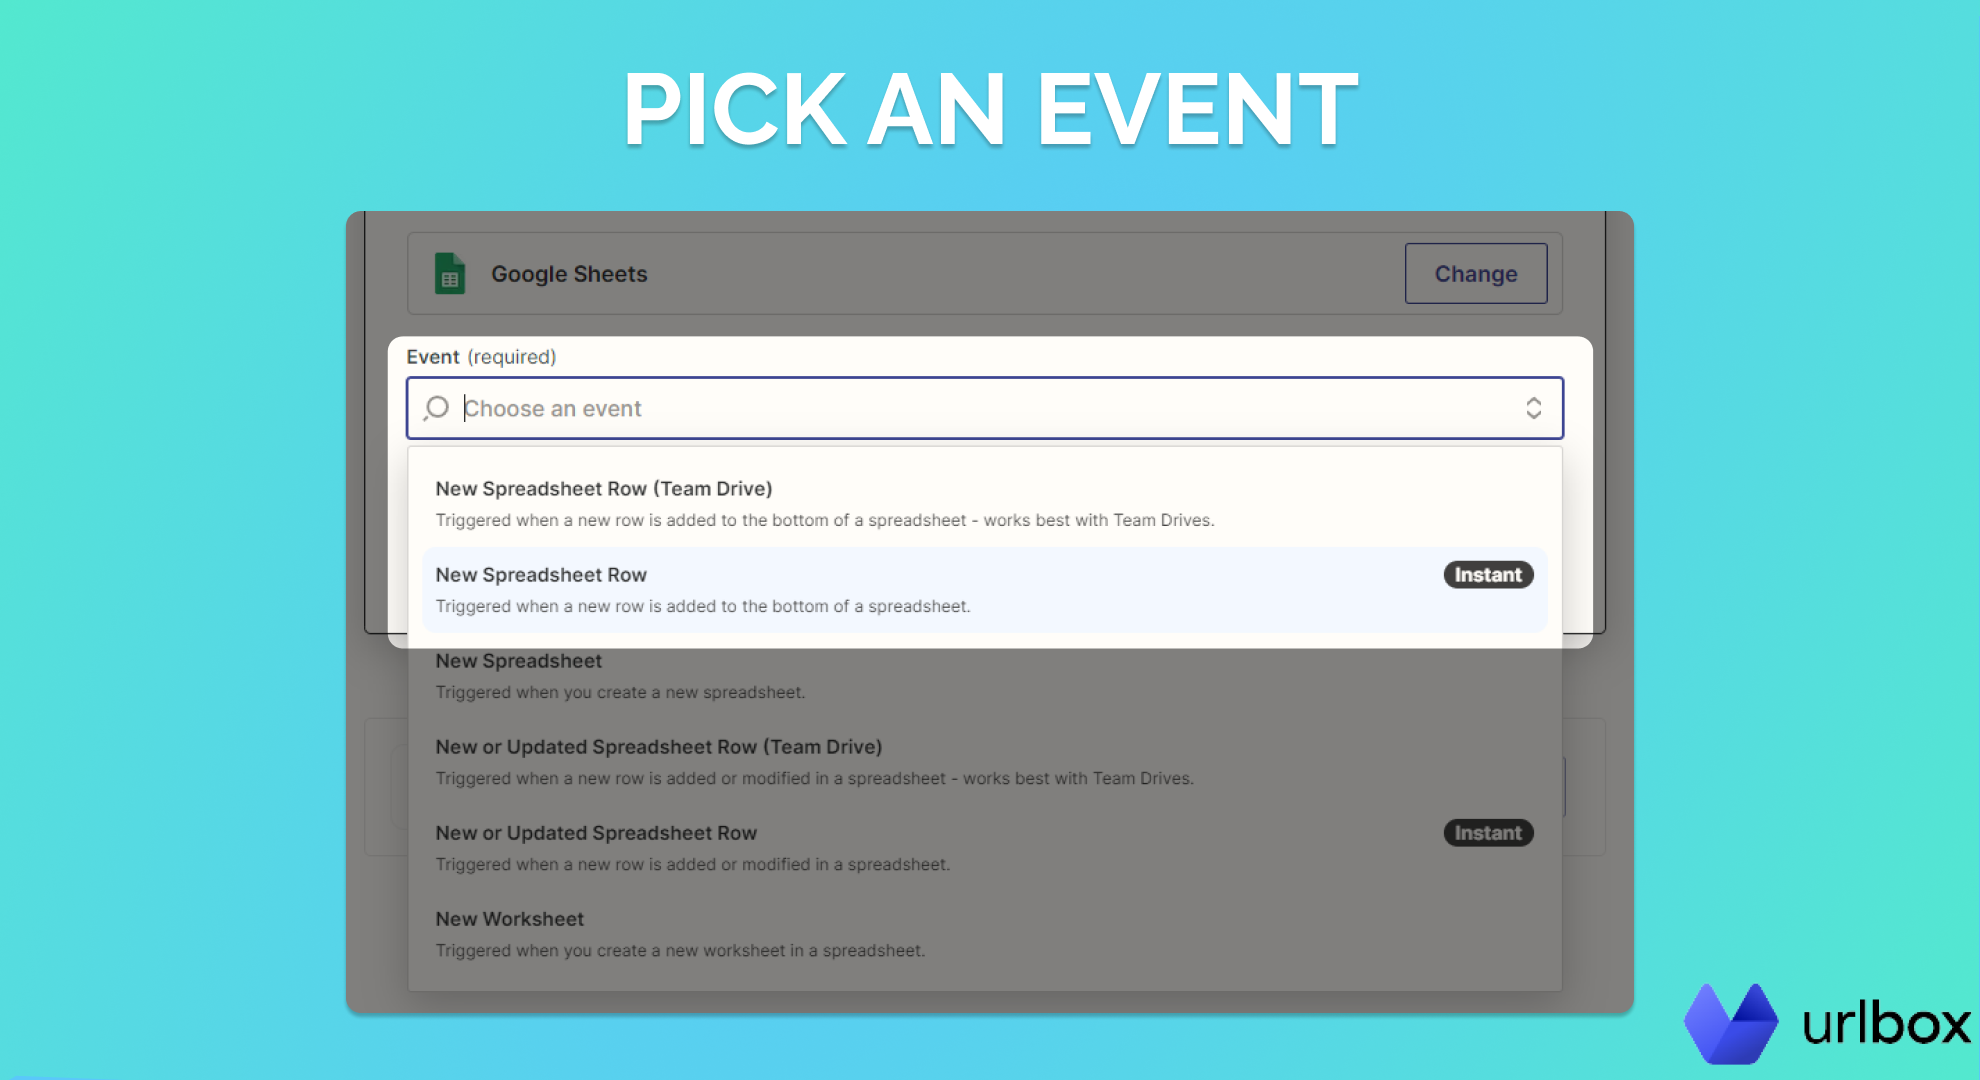
Now select "New Spreadsheet Row" as the triggering event. This will ensure that each time you add a new URL to the spreadsheet, Urlbox will take a screenshot of it.
Pick the Google Account you used to create the spreadsheet and log into it.
Finally, select the spreadsheet you just created from the dropdown list (it should be the first one in the list called "Landing Page Swipe File"). Now select the Worksheet. This is the name of the tab you are going to use, and it should be "Sheet1".
Click "Continue" and test your trigger. Since the spreadsheet is empty, you might need to add a row to it for Zapier to check if the trigger is working.
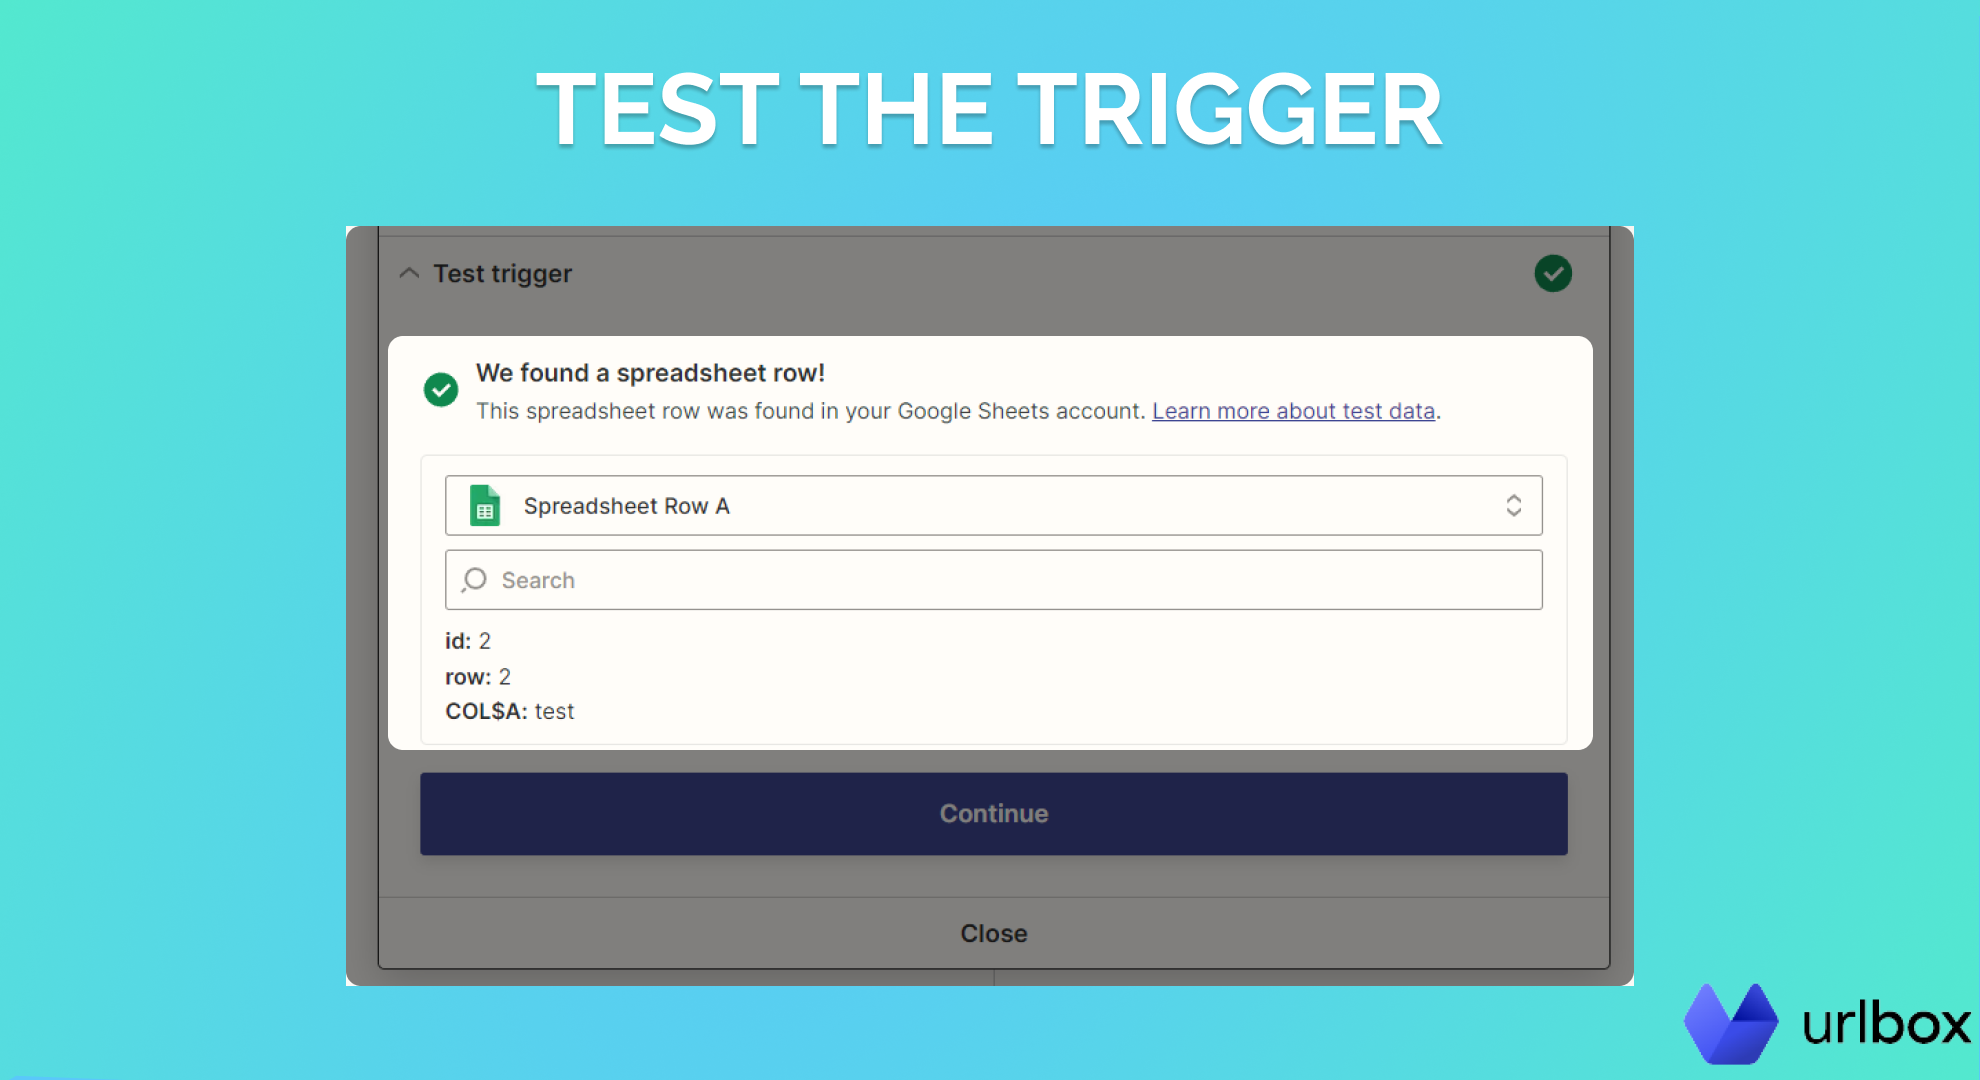
That's it; the first step is done. Now you need to set up an Action.
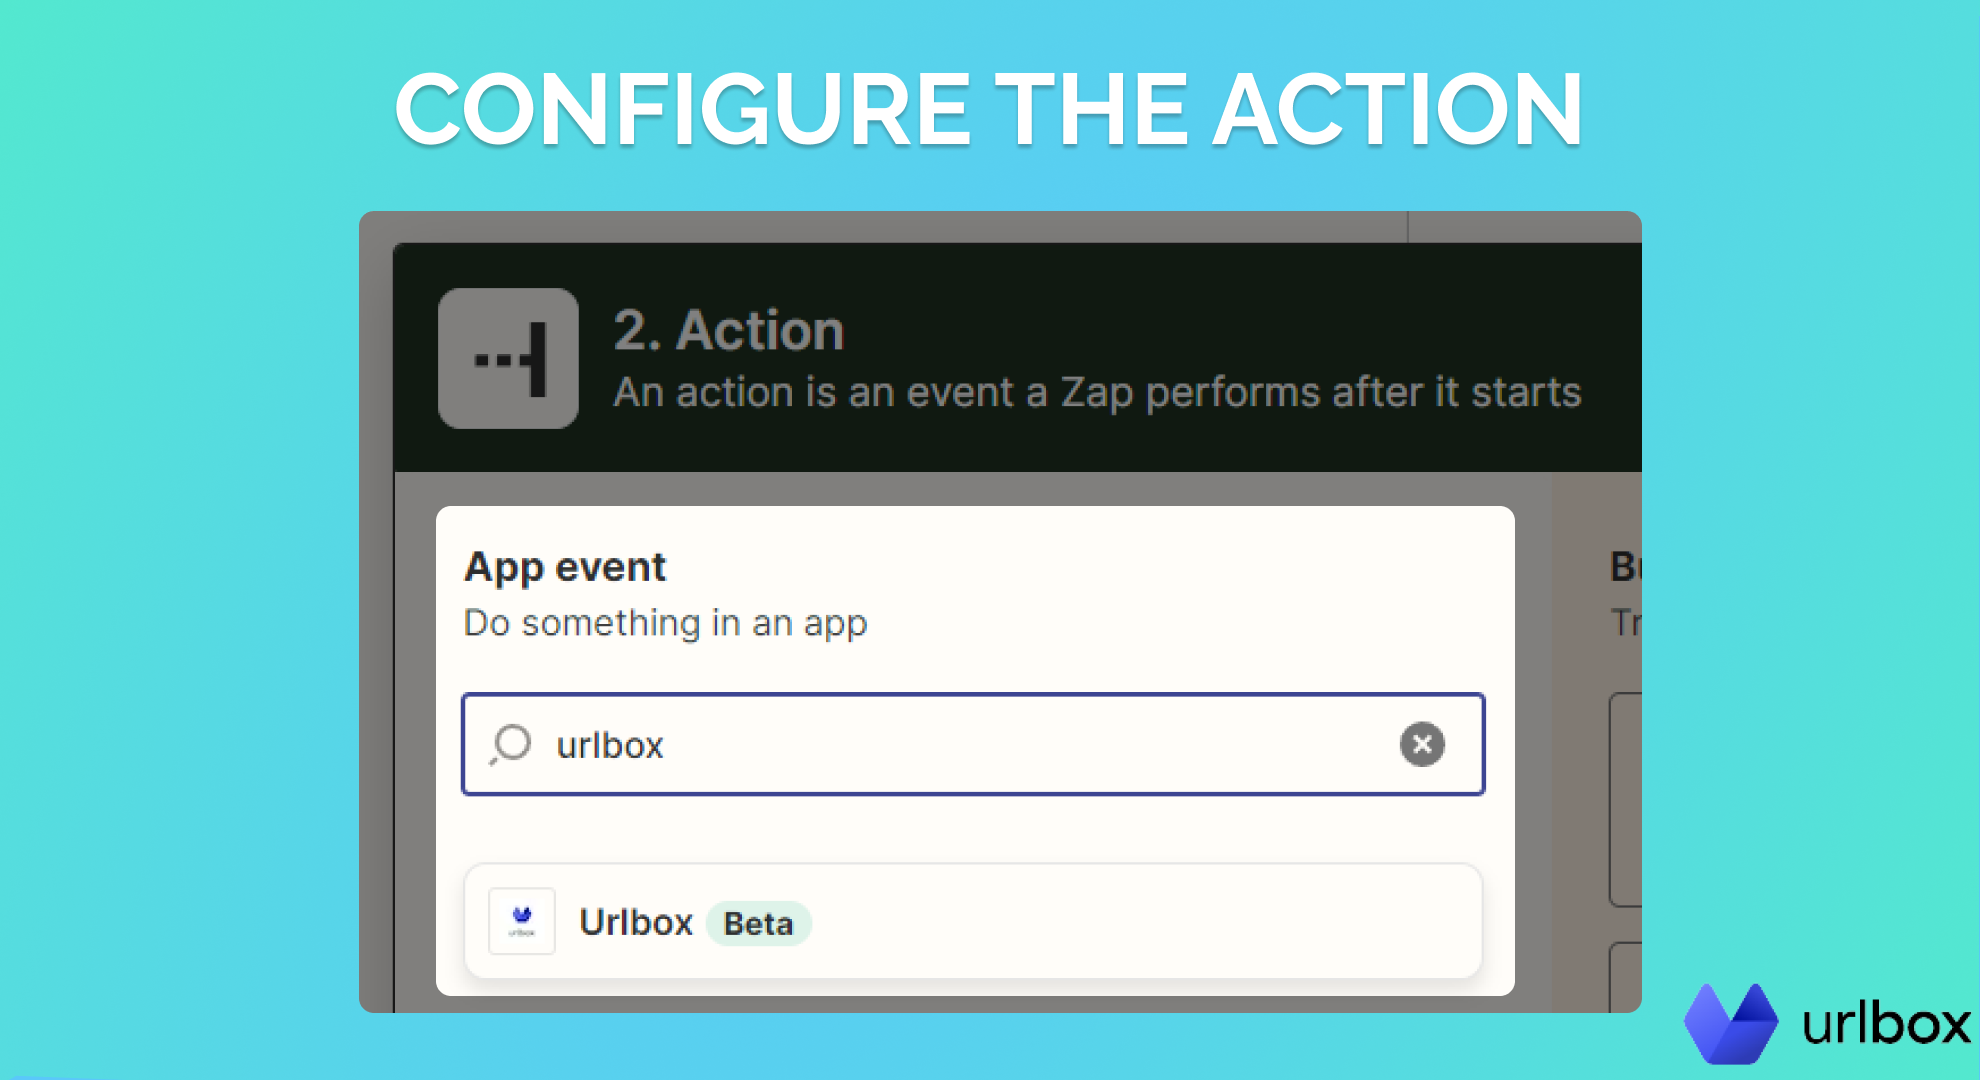
Step 6. Configure the action
The action simply tells Zapier what should be done when a new row has been added to the spreadsheet. In this case, we want to take a full-page screenshot of a URL that has been pasted inside the spreadsheet.
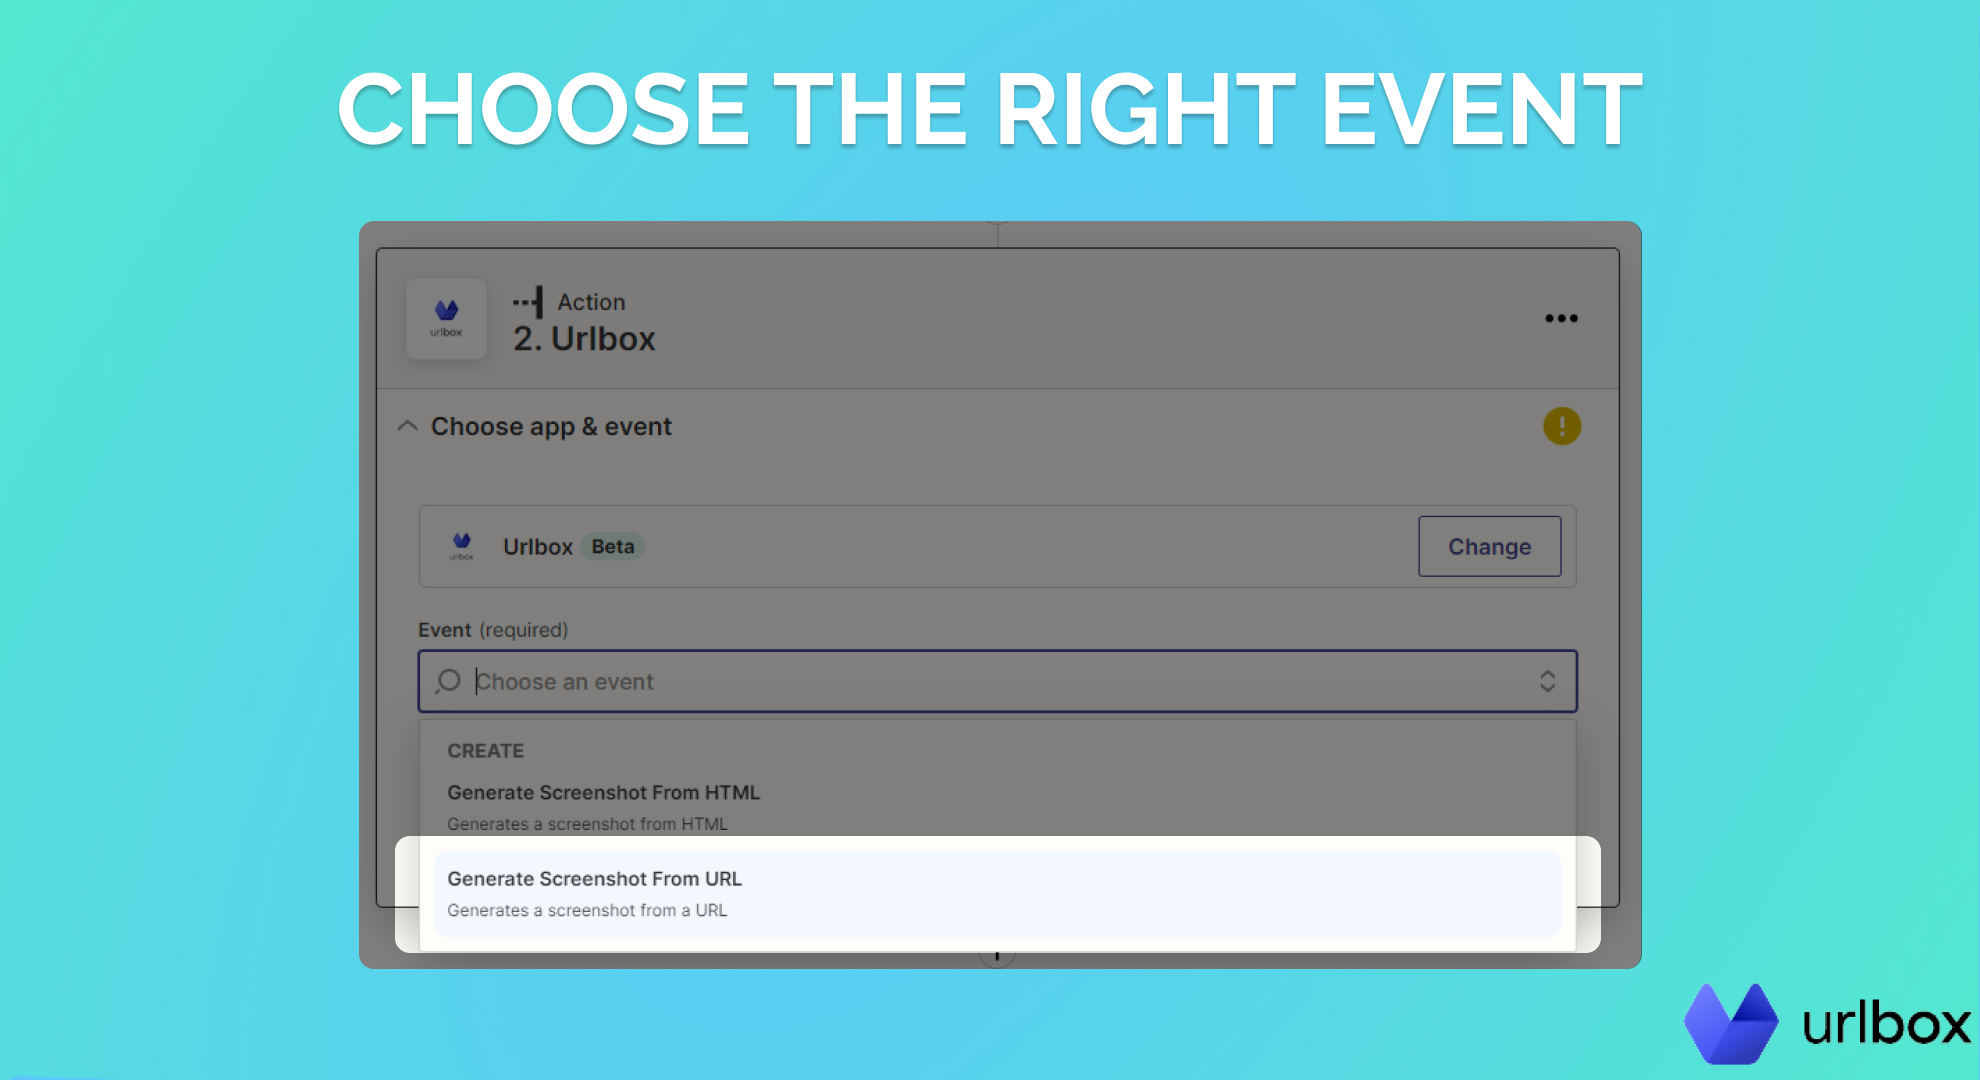
Type "Urlbox" in the search field and select it.
Next, you'll want to select "Generate Screenshot From URL" as the Event.
In the next step, you will have to connect your Urlbox account to Zapier. Just follow the prompts.
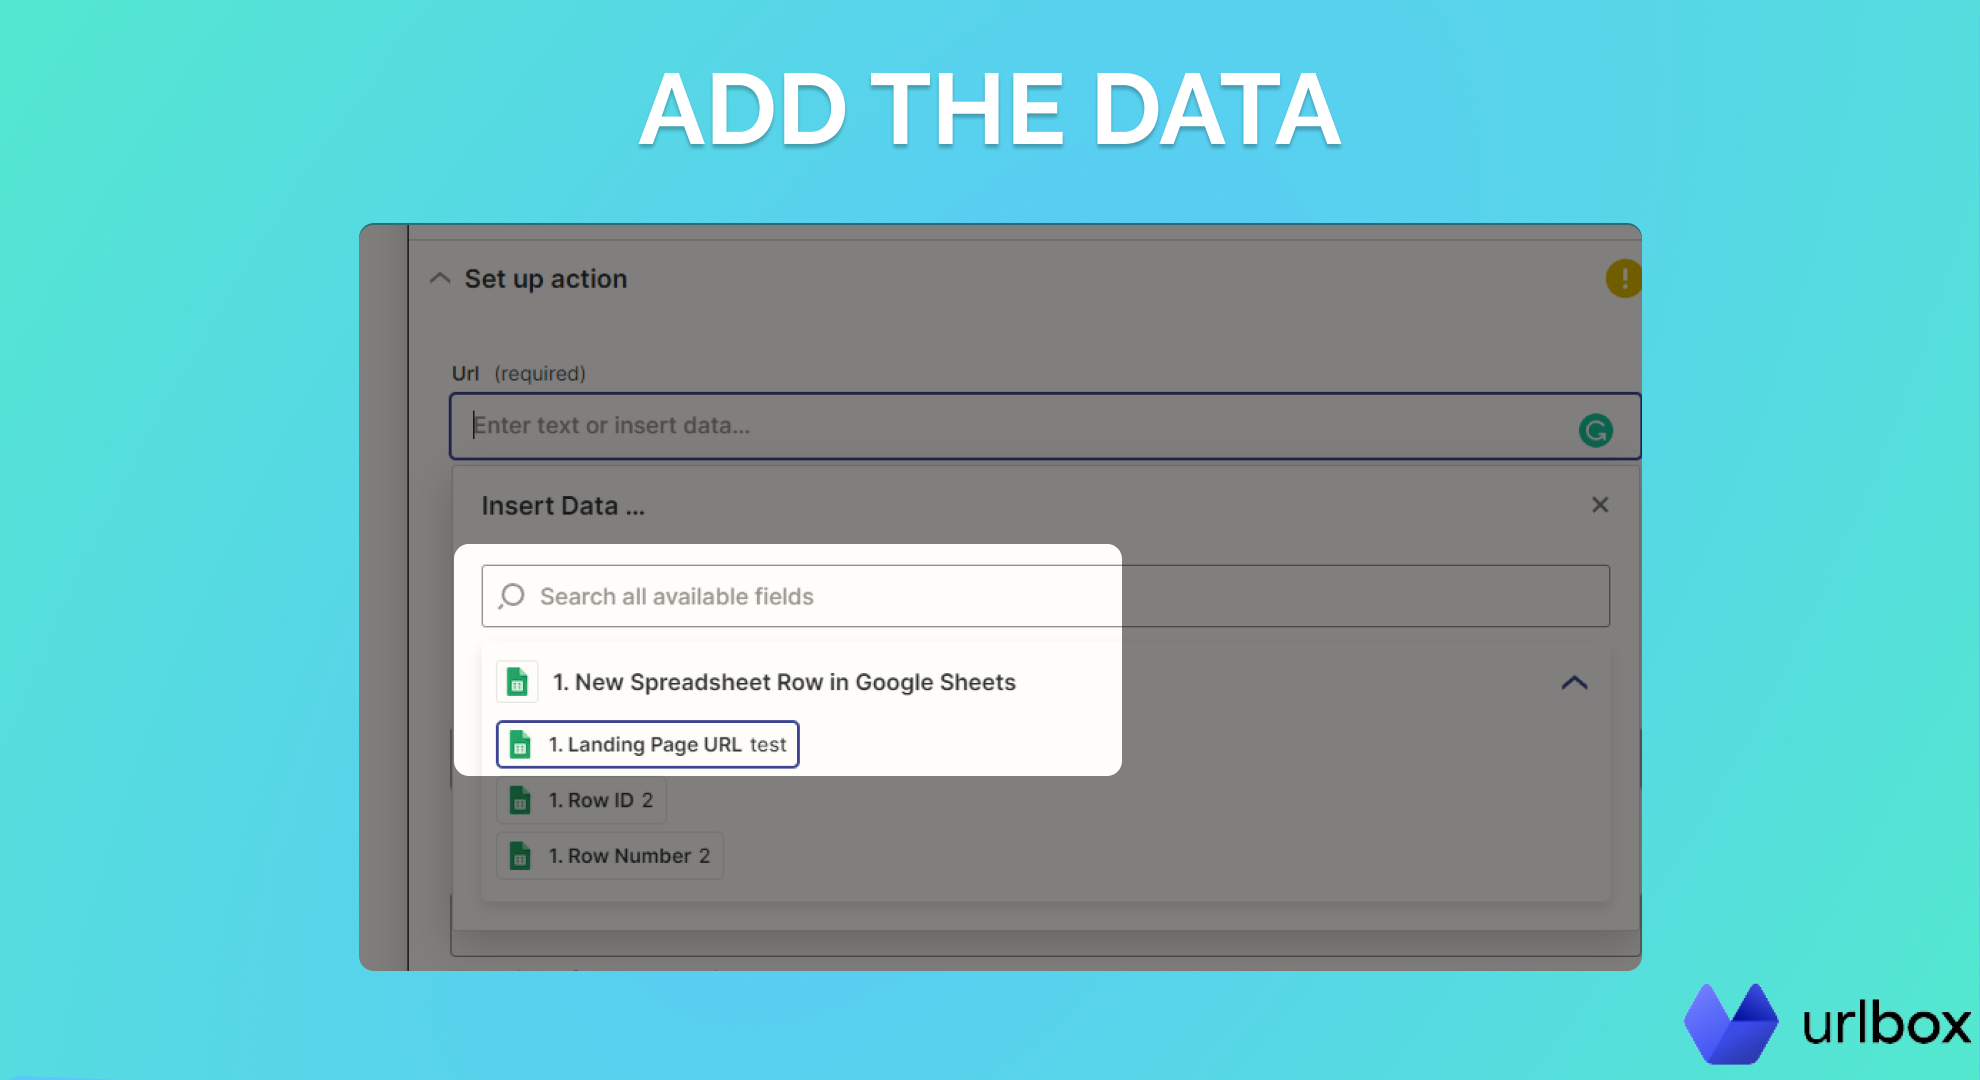
Right after that, you must configure the action's parameters. This tells Zapier what data to send to Urlbox. Click on the "Url" field and select the "Landing Page URL" column.
You can change the screenshot's output file format to anything you like. I prefer to stick with PDF for full-page screenshots.
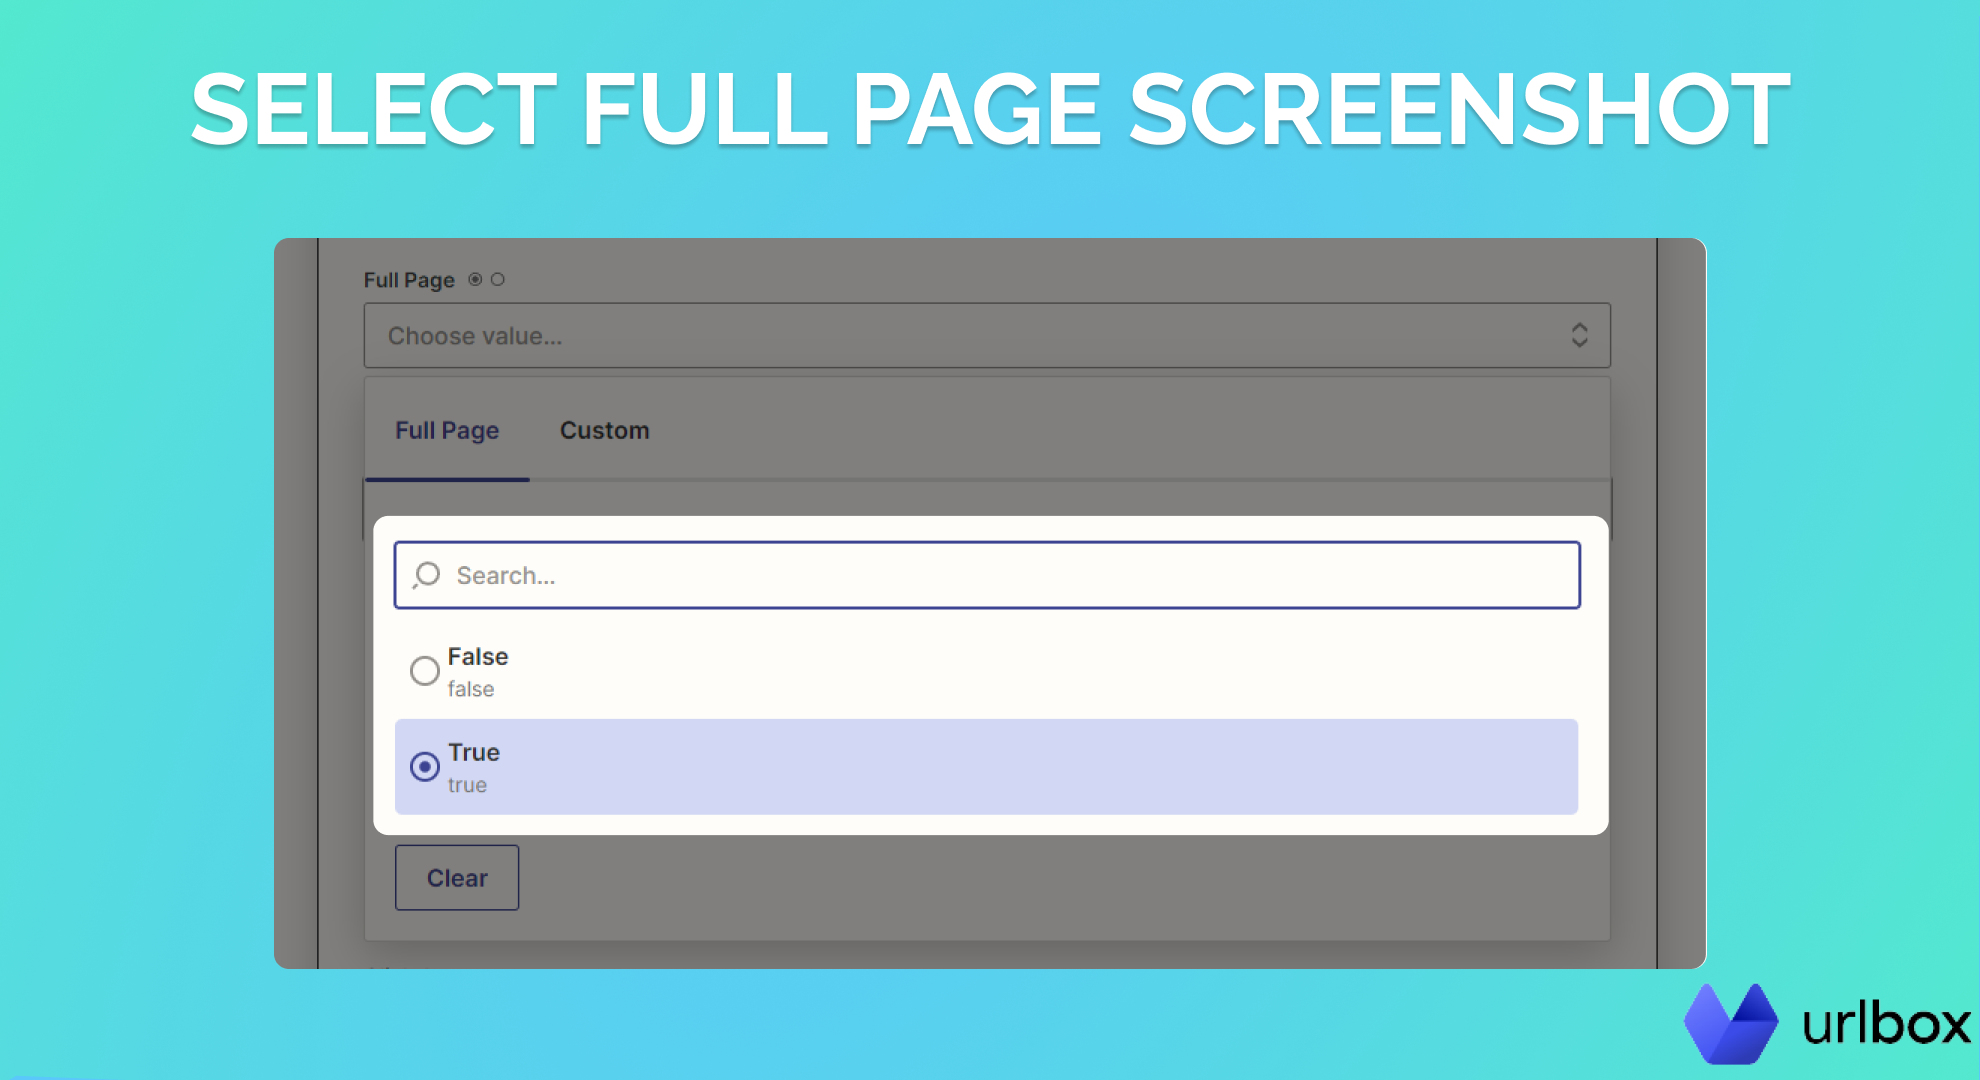
Next, you must scroll to the "Full Page" field and select "True". This will make sure that Urlbox will capture the whole landing page.
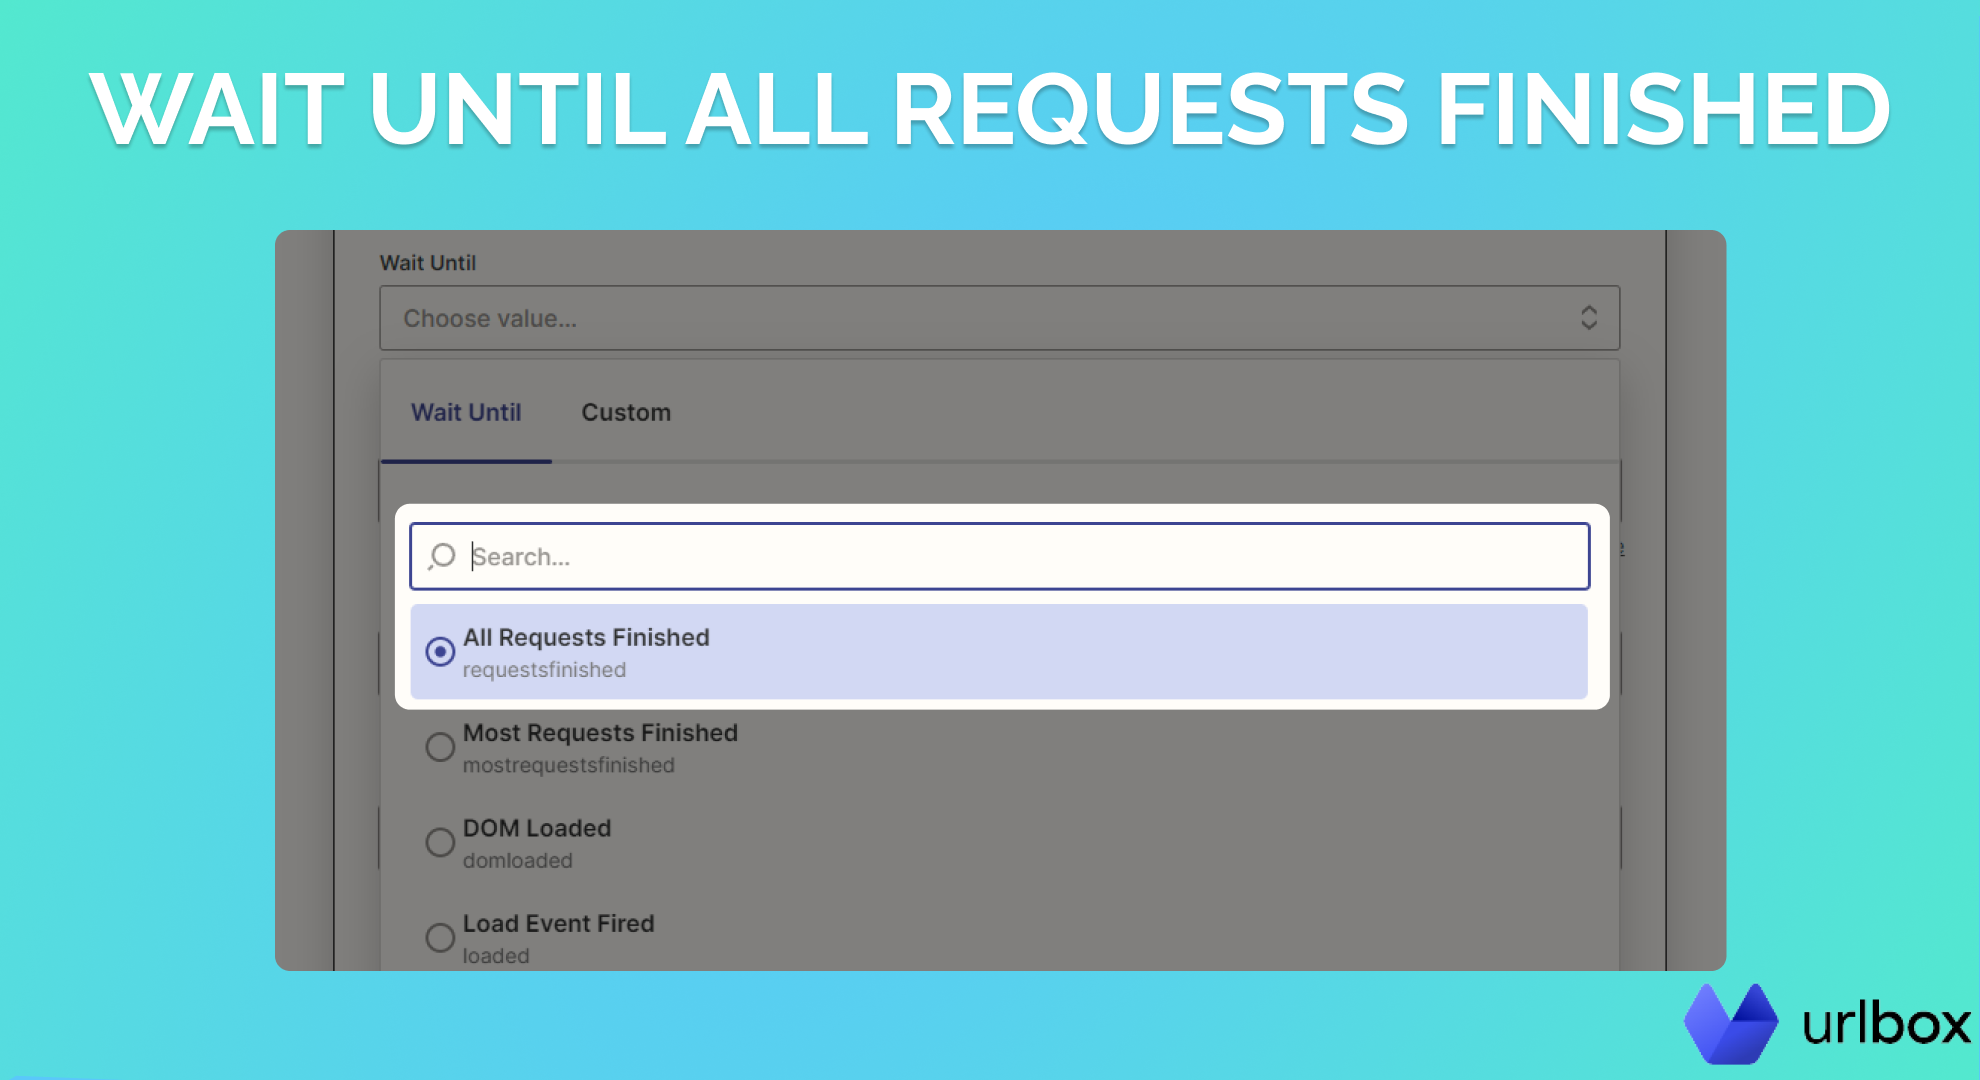
Note: An extra step would be to set the "Wait Until" field to "All Requests Finished." This will make sure the page is fully loaded before Urlbox screenshots it.
To test if the action is working, you must have the correct URL inside your spreadsheet.
You may get an error when testing this Zap. To fix it, you will have to go to the "New Spreadsheet Row in Google Sheets" Trigger, click on the "Spreadsheet Row A," then click on "Load More," then select "Spreadsheet Row B." This will tell Zapier that you want to use the second row to test the Zap.
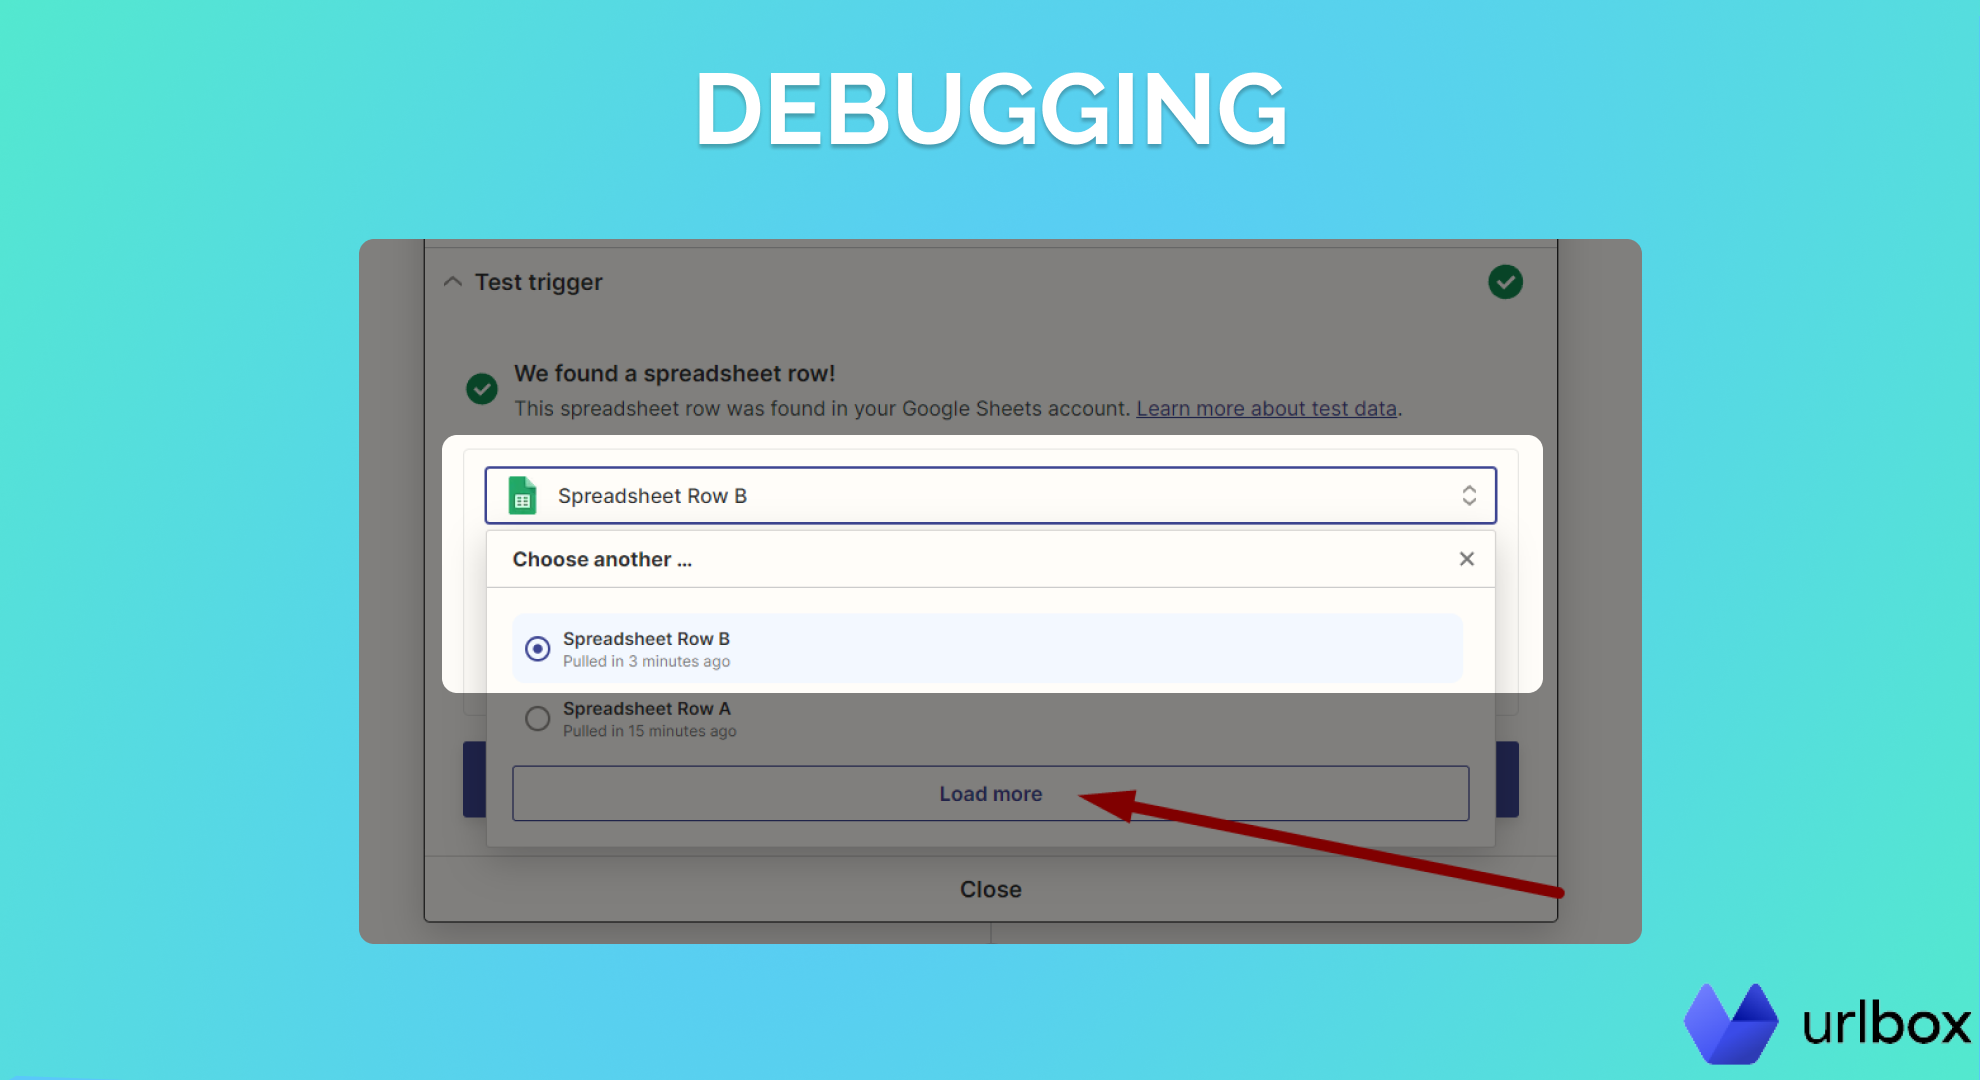
If you've followed all steps, then you should see something like this:
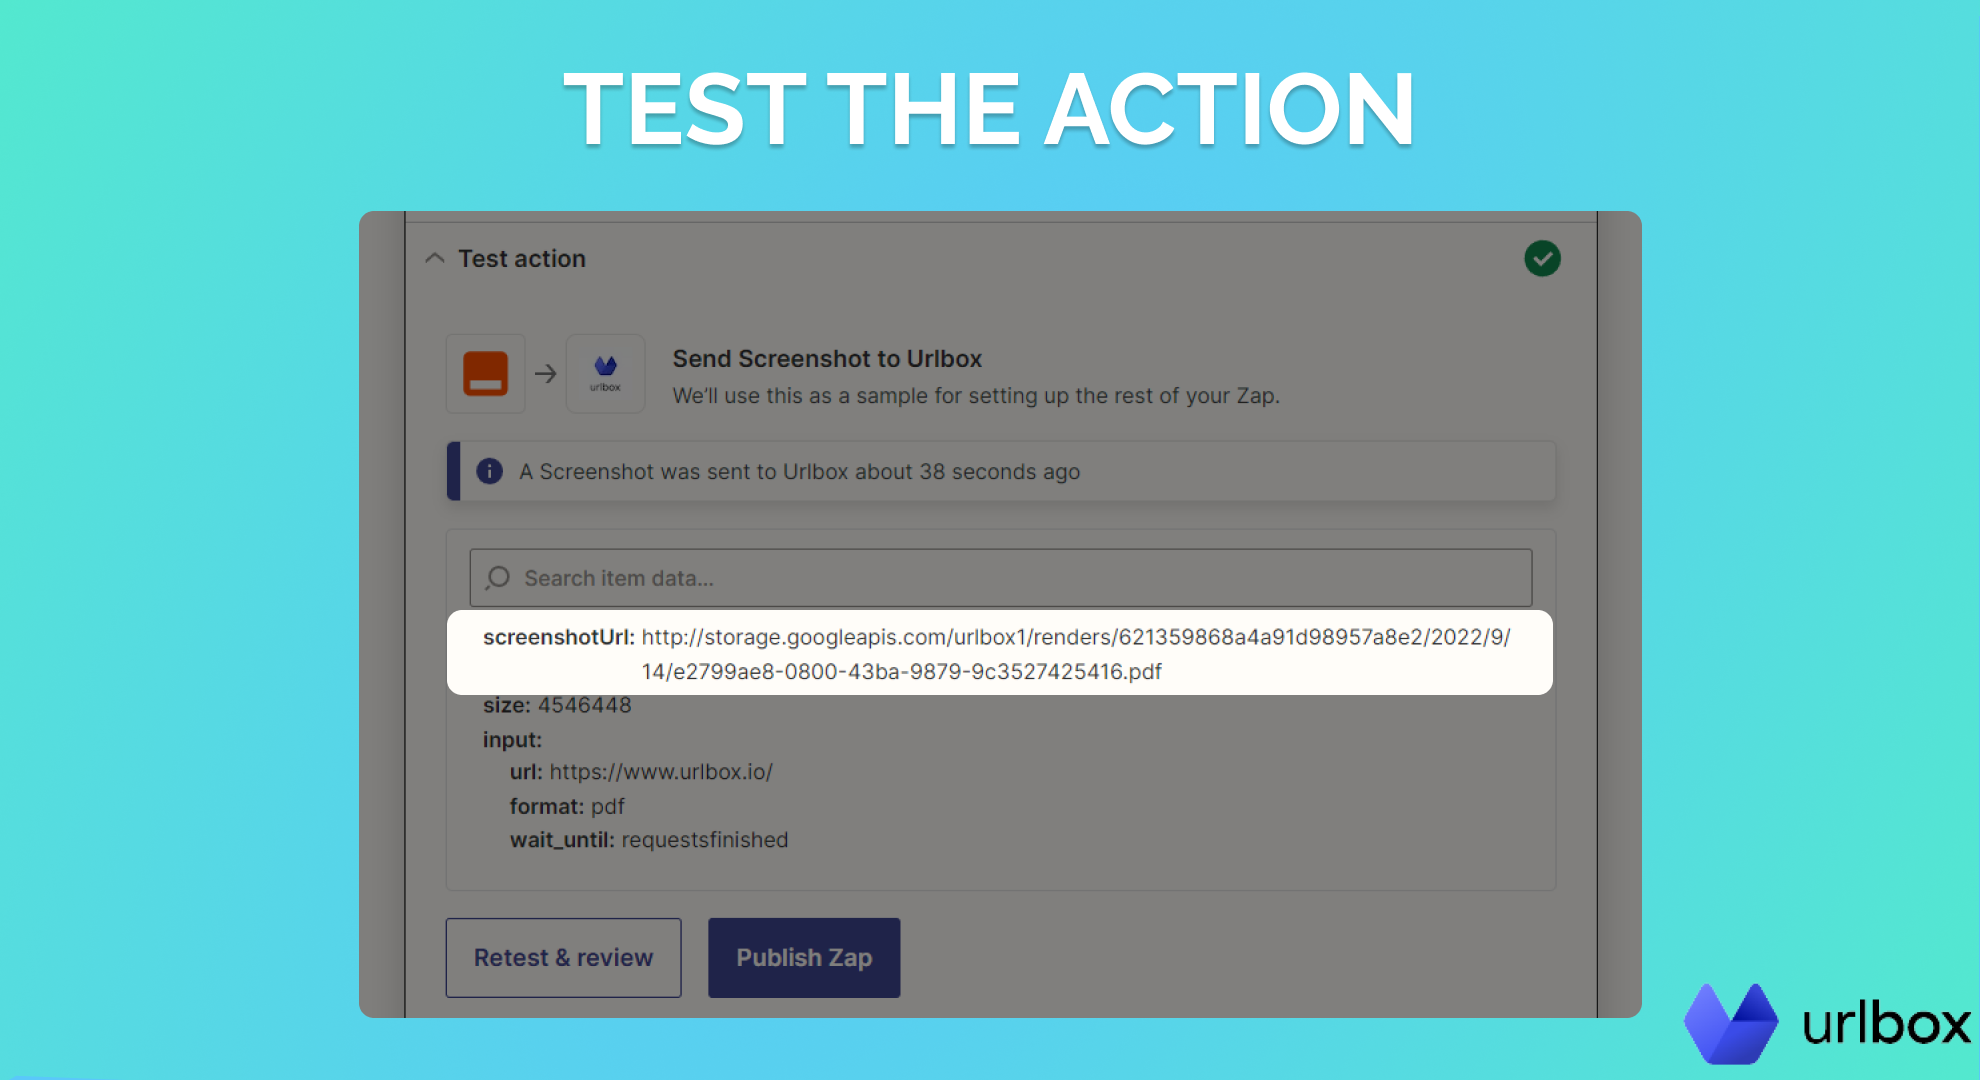
You can check the screenshot by pasting the screenshotUrl link into your browser.
Now that you configured the Zap to take a screenshot for each new URL you add to your swipe file document, and it's time to push this screenshot to the Google Drive folder.
Step 7. Save the screenshots to Google Drive
Click on the small plus icon at the bottom of the screen to create a new action. This time you will select Google Drive as the app.
Select "Upload File" as the event and click "Continue." Select your account and continue (you might need to authorize Zapier to access your Google Drive).
Now you'll have to select your Drive and Folder. Make sure you use the same folder where your Google Sheet is located. It should be called "Landing Page Swipe File."
Click on the "File" field, select "Generate Screenshot From URL in Urlbox," click on "Show all options" and select "Screenshot URL".
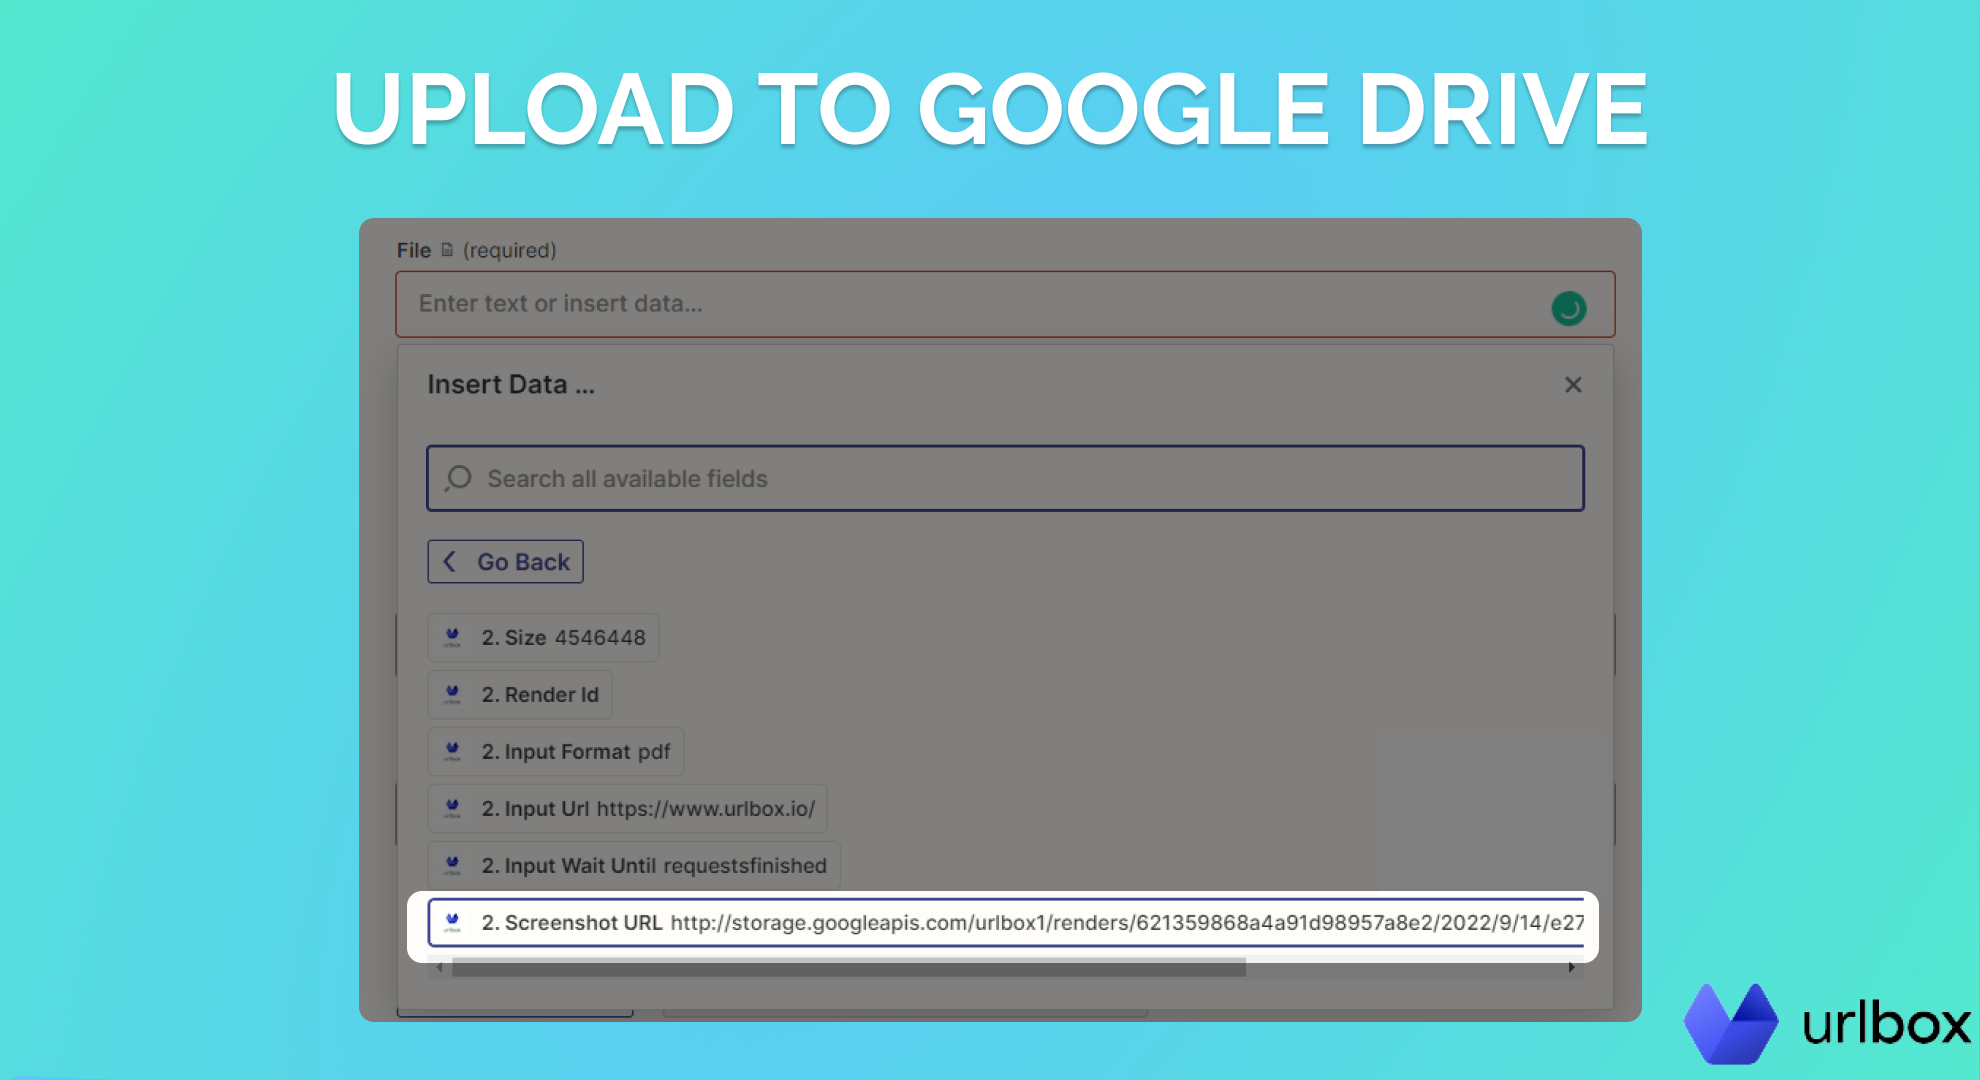
That's it.
Now click continue and test your Zap. You'll see a new document in your Google Drive folder in a few seconds. This document will be a PDF version of the landing page you want to save.
Last but not least, click on "Publish."
Congratulations, you just started your first swipe file.
Step 8. Share the swipe file
Since you are hosting your swipe file on Google Drive, you can share that folder with anyone.
Moreover, you can even share the spreadsheet with your team so they can contribute to the swipe file.
As mentioned before, you can use any other cloud hosting service, like Dropbox, Onedrive, pCloud, etc.
Conclusion
A swipe file is a collection of valuable ideas, insights, and inspiration to draw from when you feel like you hit a roadblock. It can be a lifesaver when your deadline is closing in. And the sooner you start your first swipe file, the more examples it will include.
You can create any type of swipe file with Google Sheets, Zapier, and Urlbox. But you can also switch Google Sheets with Airtable or even a completely different app, like Twitter.
All you need to do is pass a URL to the Urlbox Zapier "Action", which will automatically capture a screenshot and generate a link.
Need some inspiration on things to swipe? We recommend you check out Swipe-Worthy and SwipeWell. Both use Urlbox behind the scenes to take the best screenshots. Read more about Swipe-Worthy's experience.
