
Capturing a screenshot of a web page is a relatively straightforward process that can be done by using:
-
the built-in functionality of your operating system (Windows, macOS, Android, etc.)
-
a third-party app that will upload your screenshot to their servers
-
the built-in functionality of your browser
-
a browser extension
-
no-code tools and screenshot APIs (to automate this process).
This article will teach you how to screenshot a web page using any of the methods mentioned above.
What screenshot method is best?
It depends on what you are planning to do with the screen capture. Is it for personal use or business-related?
You probably don't need a high-resolution image if you keep it for yourself or share it with friends. The best way to screenshot a webpage is by using your device's built-in functionality or a simple third-party app.
On the other hand, if you want to add a screenshot to a work presentation or an investor's pitch deck, it'd be best to go with a dedicated service that can generate pixel-perfect images. Most of these screenshot tools allow you to change the image's file type (JPEG, PNG, PDF, etc.), plus they can even help you capture a full page screenshot.
But if you need to capture webpages at scale, you will have to use a dedicated screenshot API, like Urlbox.
Now that you know which method is best, it's time to jump straight into the process.
How to screenshot a web page on Windows
Capturing a screenshot on your Windows machine is extremely easy. All you have to do is press 2 keys on your keyboard simultaneously.
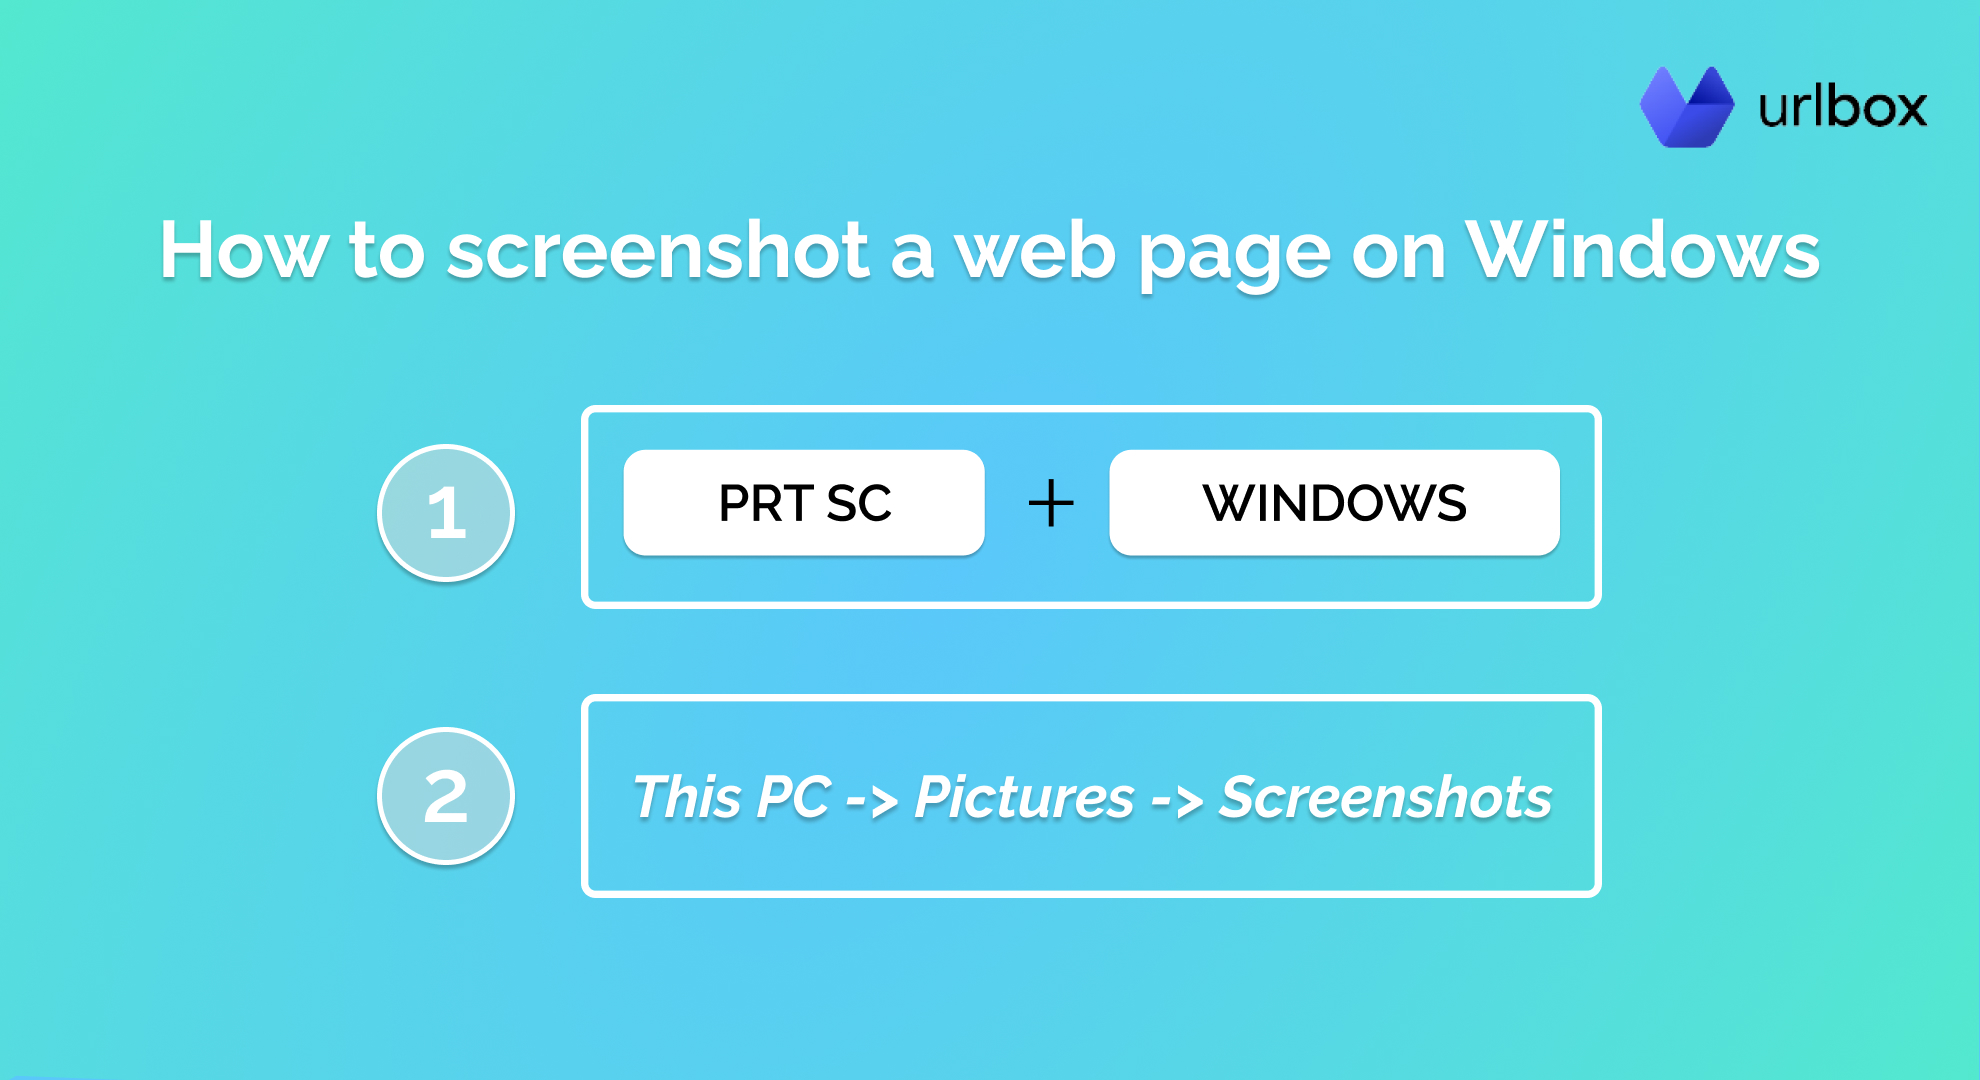
If you want to capture AND save your screenshot, press the "PrtSc" and the "Windows" keys simultaneously. This will capture your entire screen and save a PNG image in the dedicated screenshot folder. You can access this folder by going to "This PC" -> "Pictures" -> "Screenshots."
Notes:
-
you must use a photo editing app to crop the screenshot (Paint works just fine).
-
this method captures a fullscreen screenshot, meaning that if you have multiple monitors, your screenshot will feature everything displayed on all of them.
If you want to capture AND copy the image to the clipboard, you can simultaneously press the "PrtSc" and the "Alt" keys. Now you can simply paste the image into your preferred photo editing app. This method works with Paint, Figma, and even Photoshop.
Remember that you'll have to manually crop the screenshot to save a web page, not your entire screen.
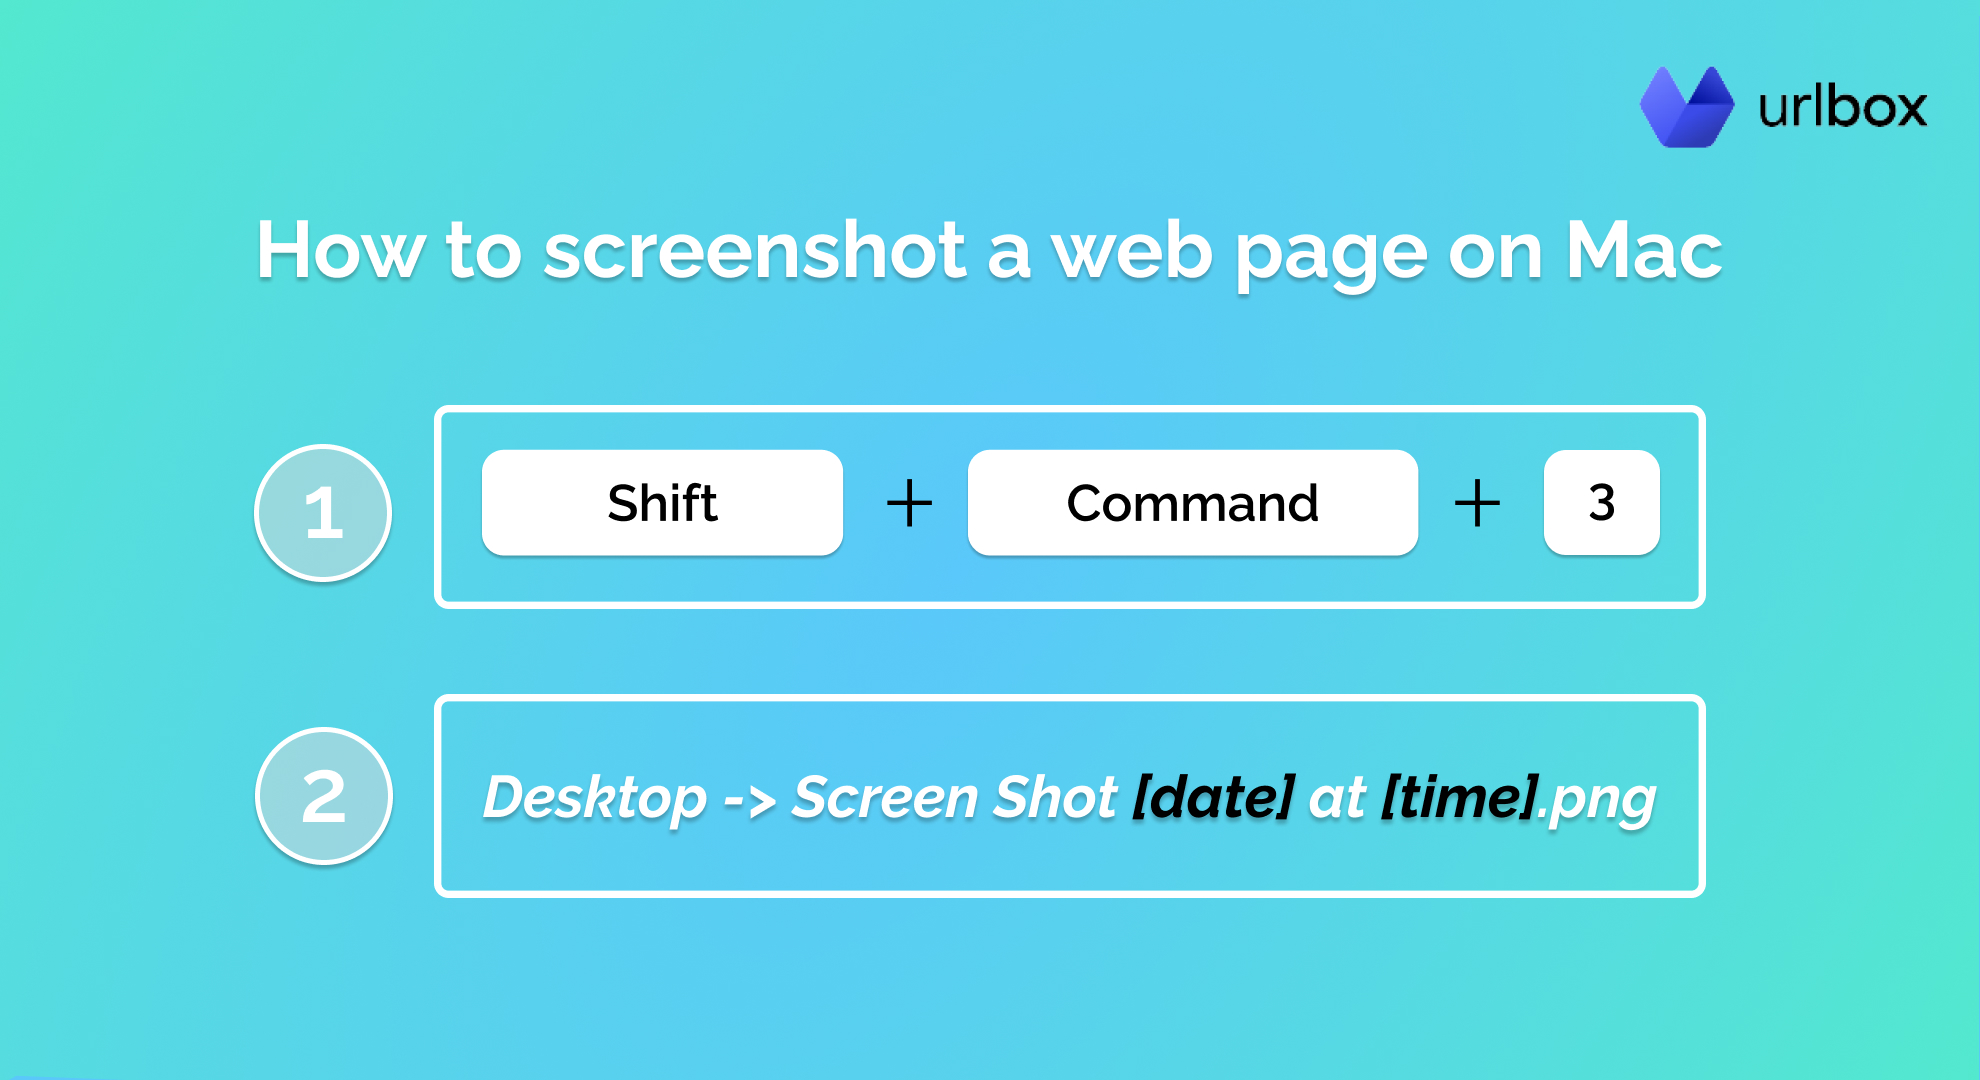
How to screenshot a web page on Mac
Capturing screenshots on Mac is also straightforward. You can take a fullscreen screenshot by pressing the "Shift," "Command," and "3" keys at the same time.
You should immediately see a thumbnail in the corner of your screen. If you click on the thumbnail, you'll be able to edit the screenshot, which is a must if you want it to feature the contents of a web page and not your whole screen.
On the other hand, you can capture a specific part of your screen by pressing the "Shift," "Command," and "4" keys at the same time.
Drag the crosshair to select which area of the screen you want to capture. You can also cancel this process by pressing the "Escape" key on your keyboard.
Your screenshots will be saved on your Desktop with the name ”Screen Shot [date] at [time].png.”
Third-party screenshot tools
There has been a surge of third-party screenshot tools in recent years. What makes them really popular is the ability to add elements on top of your screenshot.
Lightshot - Best third-party screenshot tool for Mac and Windows
My favorite third-party screenshot tool is Lightshot. Of course, this is a personal preference, and you can pick any other, but I decided to stick with Lightshot after testing countless apps.
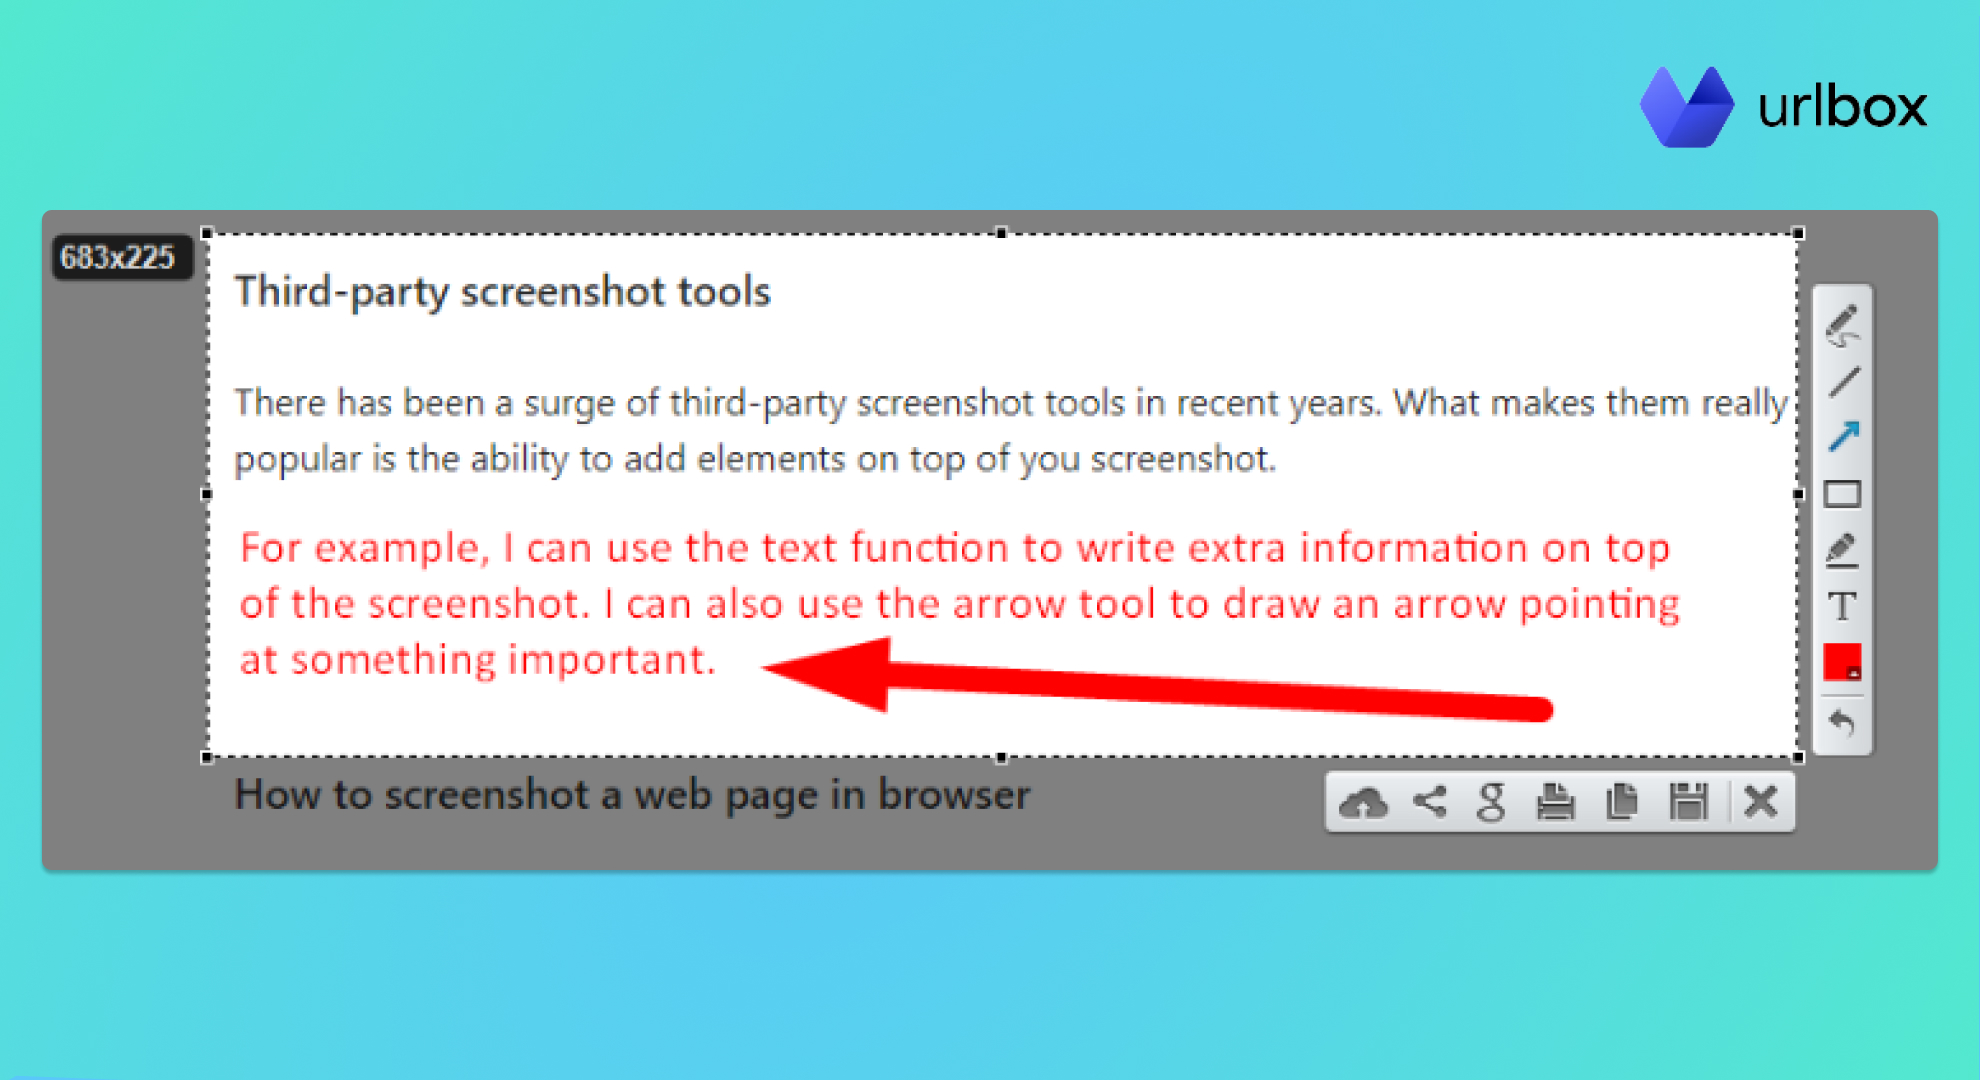
It's free to use and very lightweight. It works on Mac and Windows machines and is available in more than 10 languages. In addition, it has built-in editing tools to draw lines, arrows, rectangles, or add extra text on top of images.
But the best Lightshot functionality I use daily is the "Upload screenshot" option. This uploads your screenshot to Lightshot's servers and generates a unique URL you can share with anyone. It's great because it makes collaboration extremely easy.
Here's what a link generated by Lightshot looks like: https://prnt.sc/qJVdAFwLc9my.
You can also download their Chrome extension if you don't want to install it locally; just remember that this will work inside the browser window. It's best if you want to screenshot web pages and nothing else. This brings us to the following method.
How to screenshot a web page in a browser
All browsers have some sort of built-in screenshot functionality to capture a part of a web page. If that is not enough, you can install third-party extensions, like the previously mentioned Lightshot.
How to capture a screenshot in Chrome
Capturing a screenshot with Chrome's built-in functionality can be a pain for non-technical people. Here's an example of how to capture a full page screenshot in Chrome. Click on the link to read the step-by-step process.
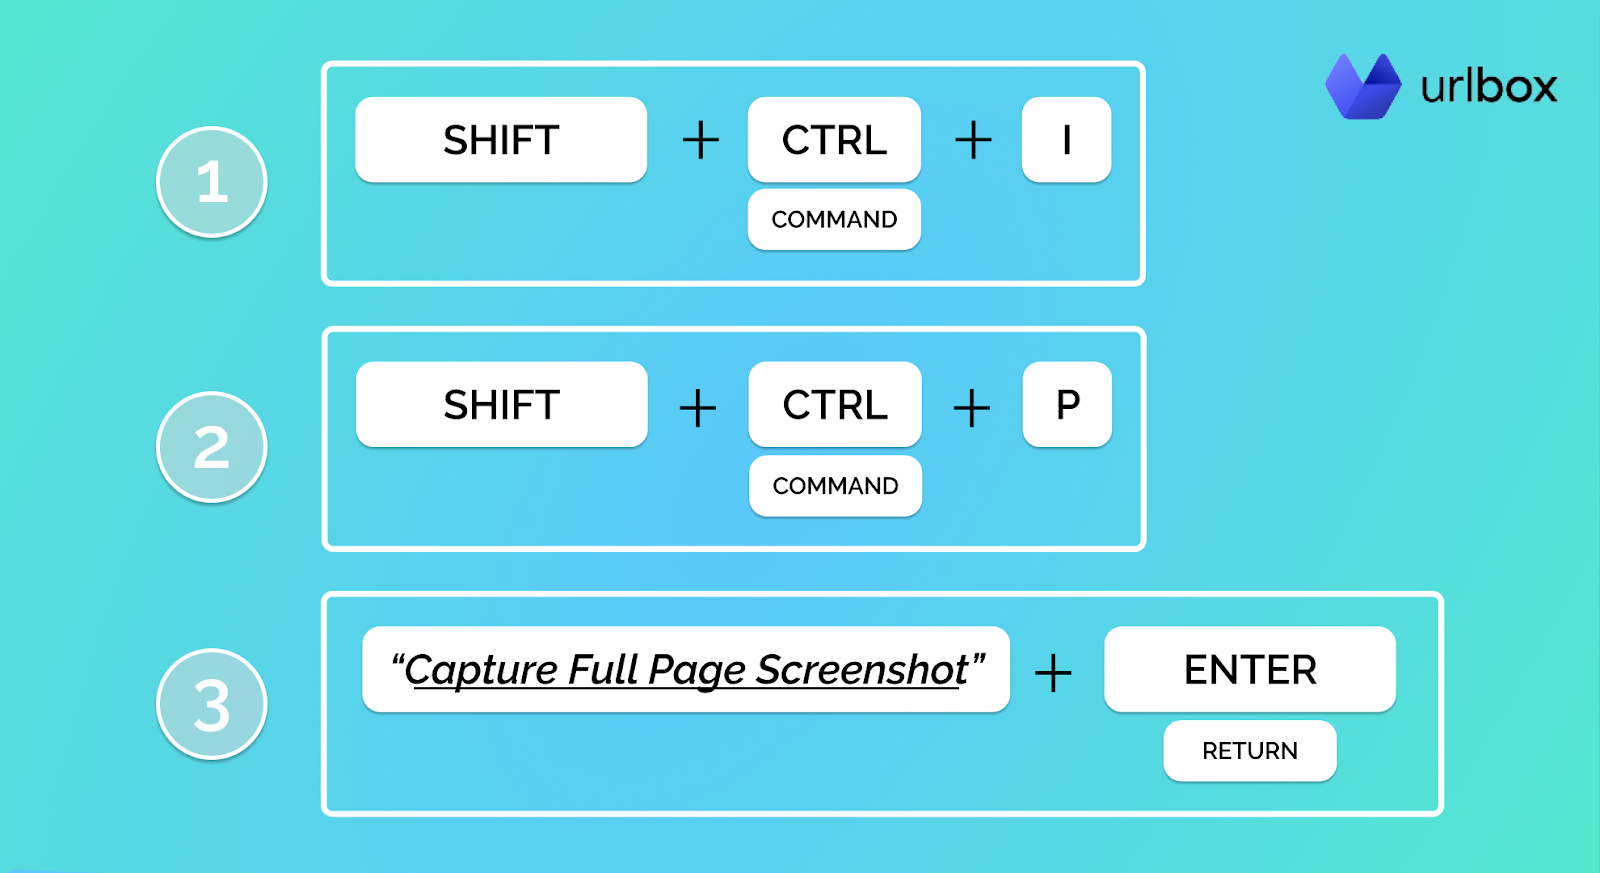
I highly recommend you go for an extension if you use Chrome as your default browser (like Lightshot, Full Page Screenshots, etc.).
How to capture a screenshot in Mozilla Firefox
It's way easier to capture a screenshot in Firefox compared to Chrome. All you have to do is right-click on an empty part of the page and select "Take Screenshot."
Alternatively, you can press the "Ctrl," "Shift," and "S" keys at the same time.
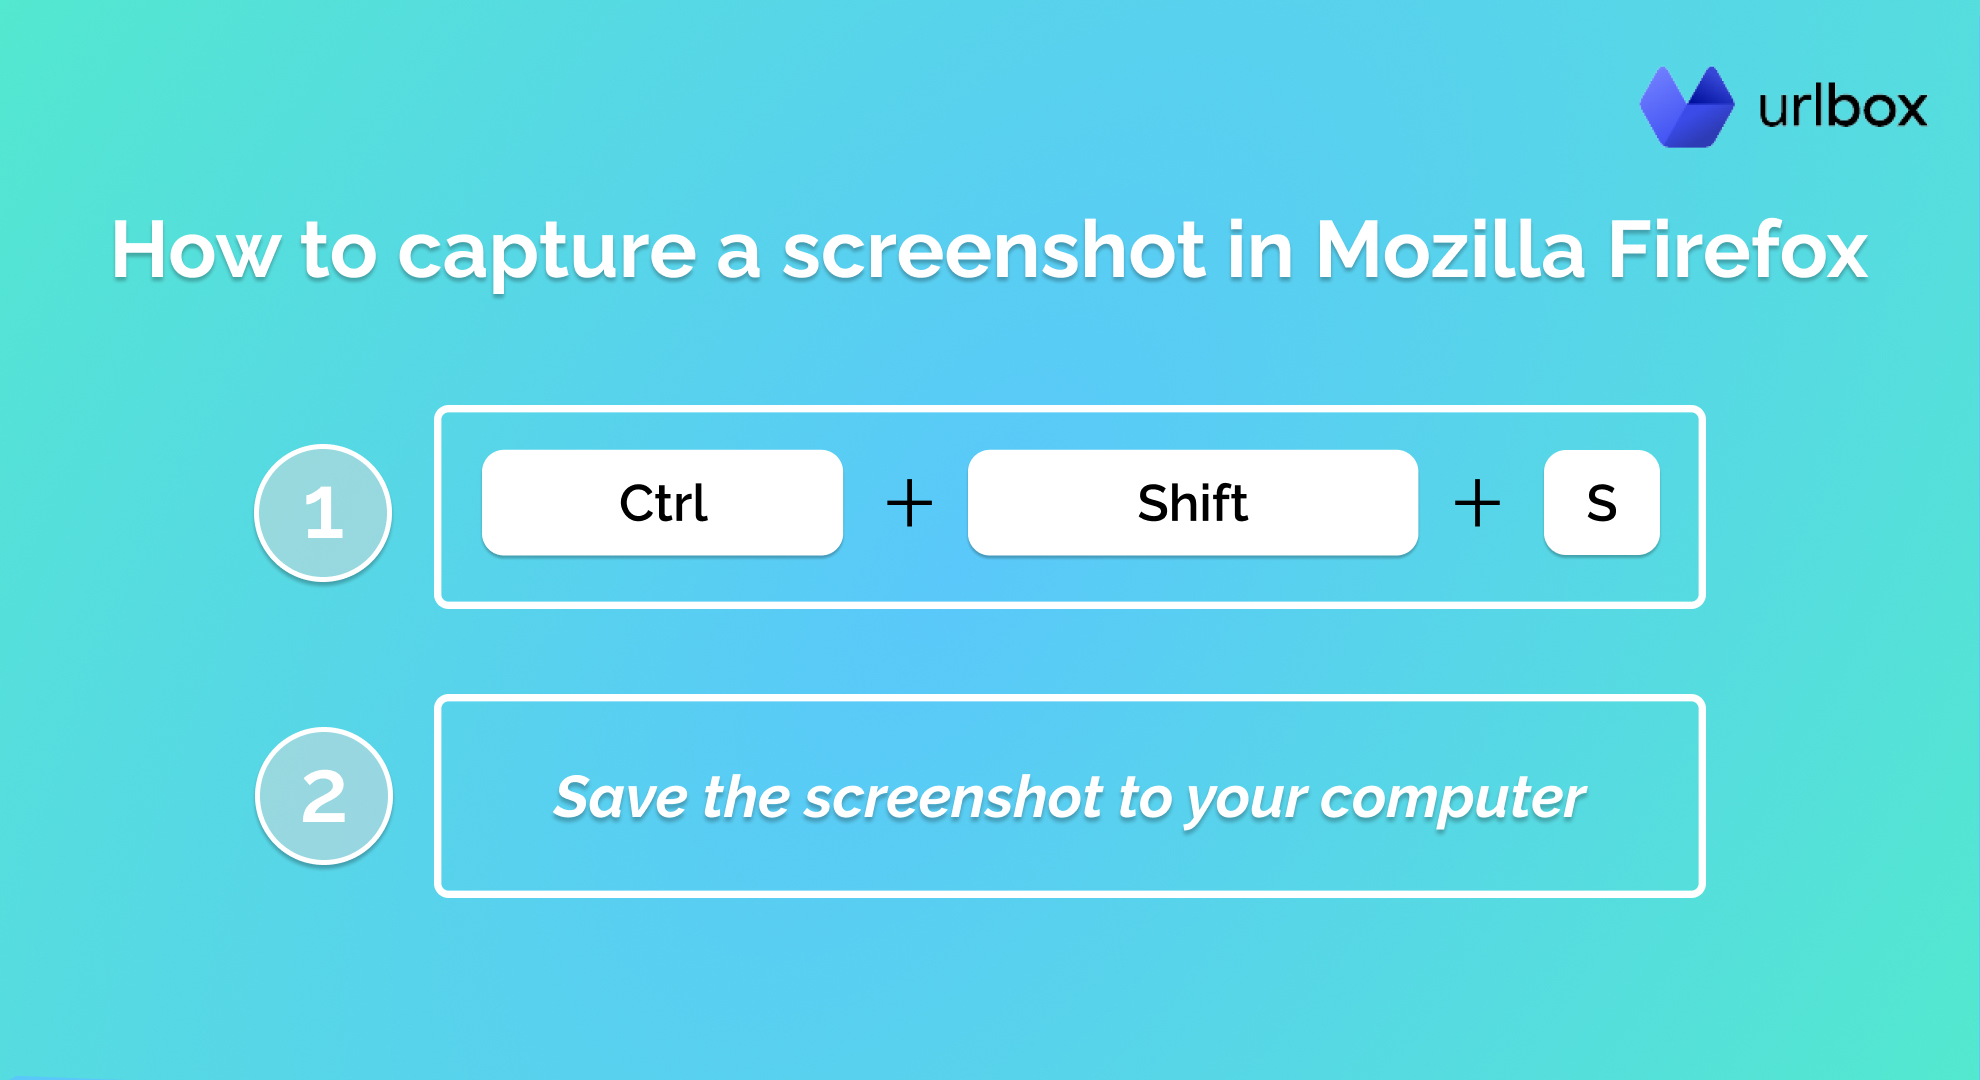
Once you are satisfied with how the screenshot looks like, you can save it locally or copy the image to your clipboard. If you go with the second option, you can paste it into a photo editing app or directly on your preferred chat app (like Slack, Discord, Messenger, WhatsApp, etc.).
How to capture a screenshot in Microsoft Edge
Microsoft Edge features the best built-in screenshot functionality of all other browsers.
To capture a snapshot of a web page, you'll have to press the "Ctrl," "Shift," and "S" keys at the same time. This will open up the screenshot menu at the top of the page, which allows you to either capture a full page screenshot or select an area of the screen.
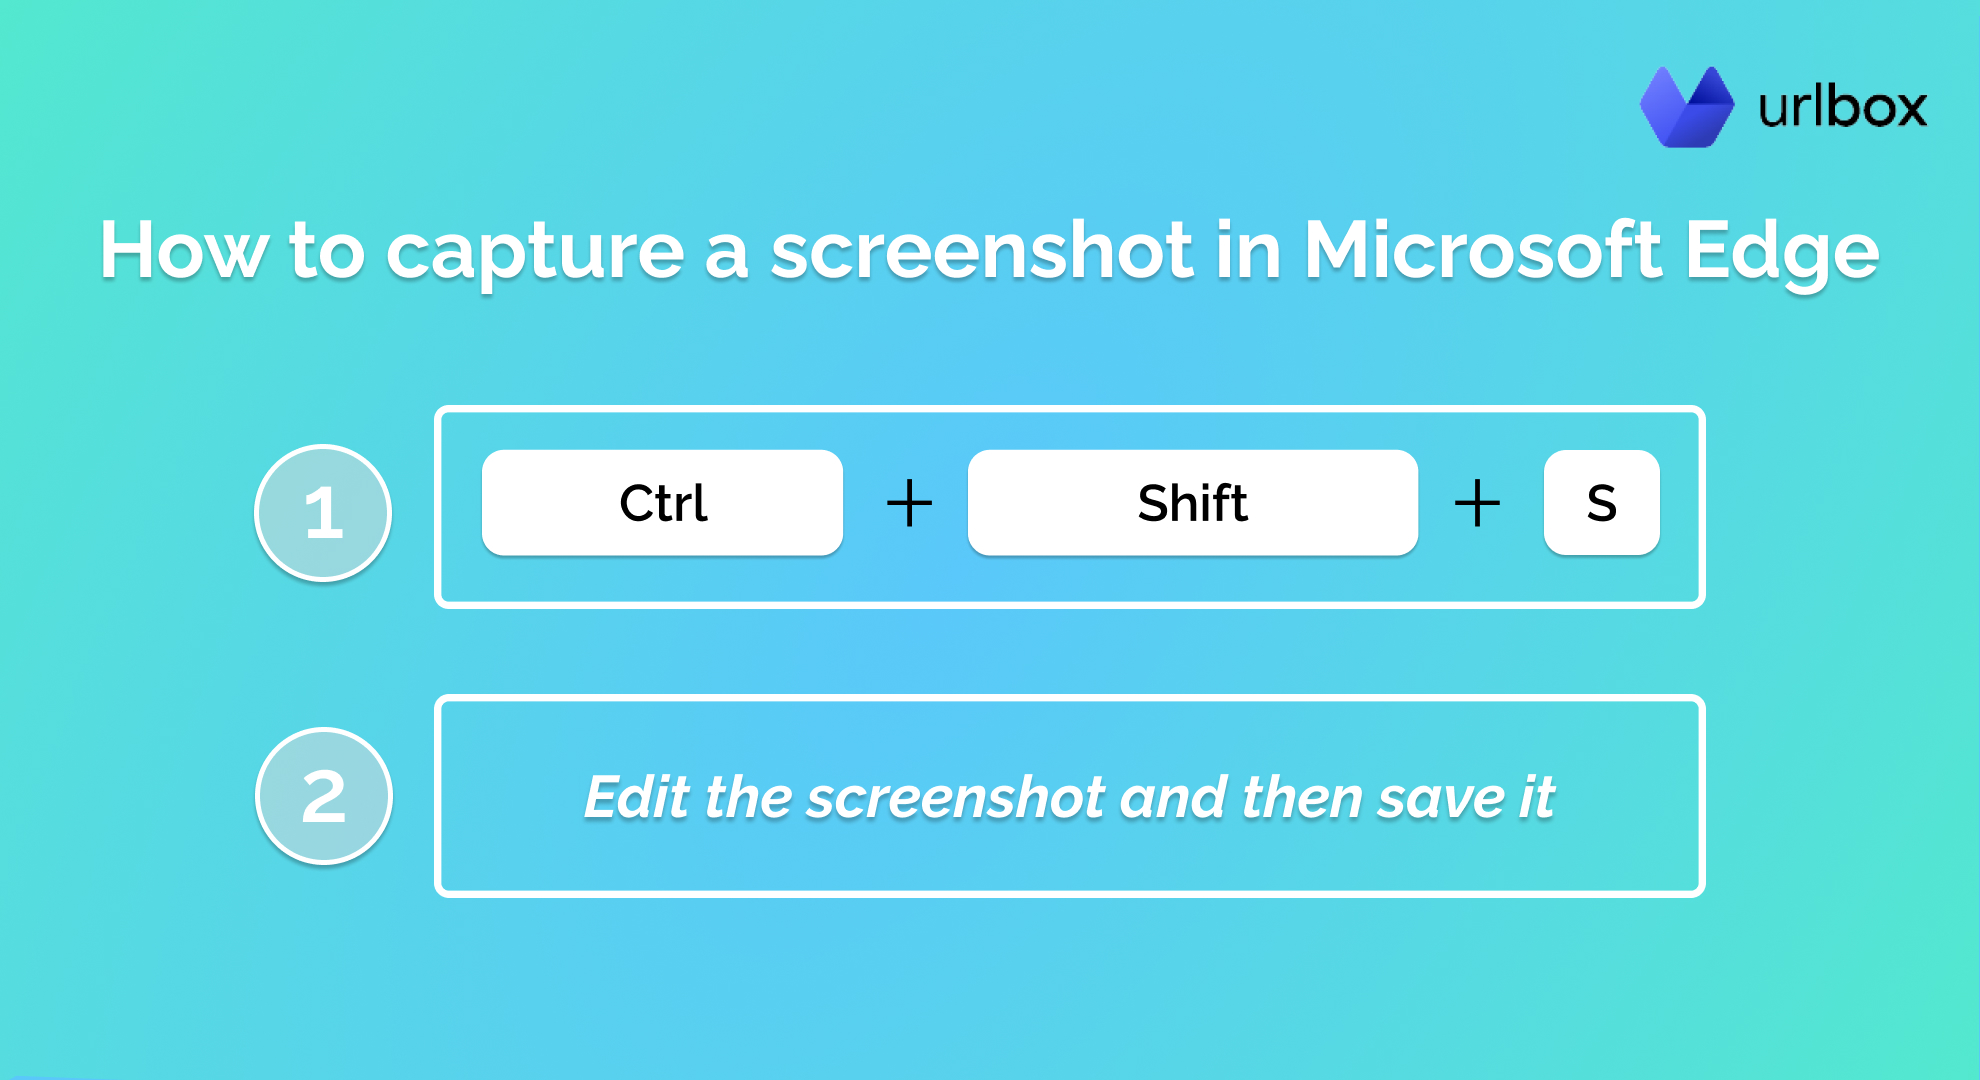
The best part is that you can write on top of the screenshot right after it has been generated. There are not many browsers that let you do this by default.
Now let's move to something a bit more advanced. The following method best suits businesses looking to automate the screenshot process.
How to automatically screenshot a web page with Zapier
You'll need a website screenshot generator to automate screenshots with Zapier. As the name suggests, a service like this simply takes in a URL or HTML file and returns a screenshot of it.
Zapier automations are called Zaps. Each Zap is comprised of a Trigger and at least one Action.
Setting up the Trigger
The Trigger is what tells the Zap to start working. This means you'll have to set up a condition that will trigger the screenshot.
Here are a few trigger examples to better put things into perspective:
-
Run the Zap every hour, day, week, or month
-
Run the Zap when you like a Tweet
-
Run the Zap when a new row has been added to a Google Sheets document.
As you can see, the primary purpose of the Trigger is to set the Zap in motion.
Here are a few use cases based on the above triggers:
-
Take a screenshot of a web page every day
-
Take a screenshot of the Tweet you liked
-
Take a screenshot of a web page found at the URL you pasted in the Google Sheets document.
Note: I've written a step-by-step guide that goes over the process of building a swipe file with Urlbox and Zapier. You can follow the steps to automatically capture screenshots of specific URLs you paste into a Google Sheet document.
It's important to mention that your trigger doesn't necessarily have to return a URL. In this case, you must sign up for one of Zapier's paid plans. This will allow you to add multiple Actions to your Zap.
Setting up the Action
This step is crucial for your Zap. You have to tell Zapier what it should do when the trigger is executed.
As described in the step-by-step guide on how to build a swipe file with Urlbox and Zapier, you must use a website screenshot generator to capture a snapshot of a URL.
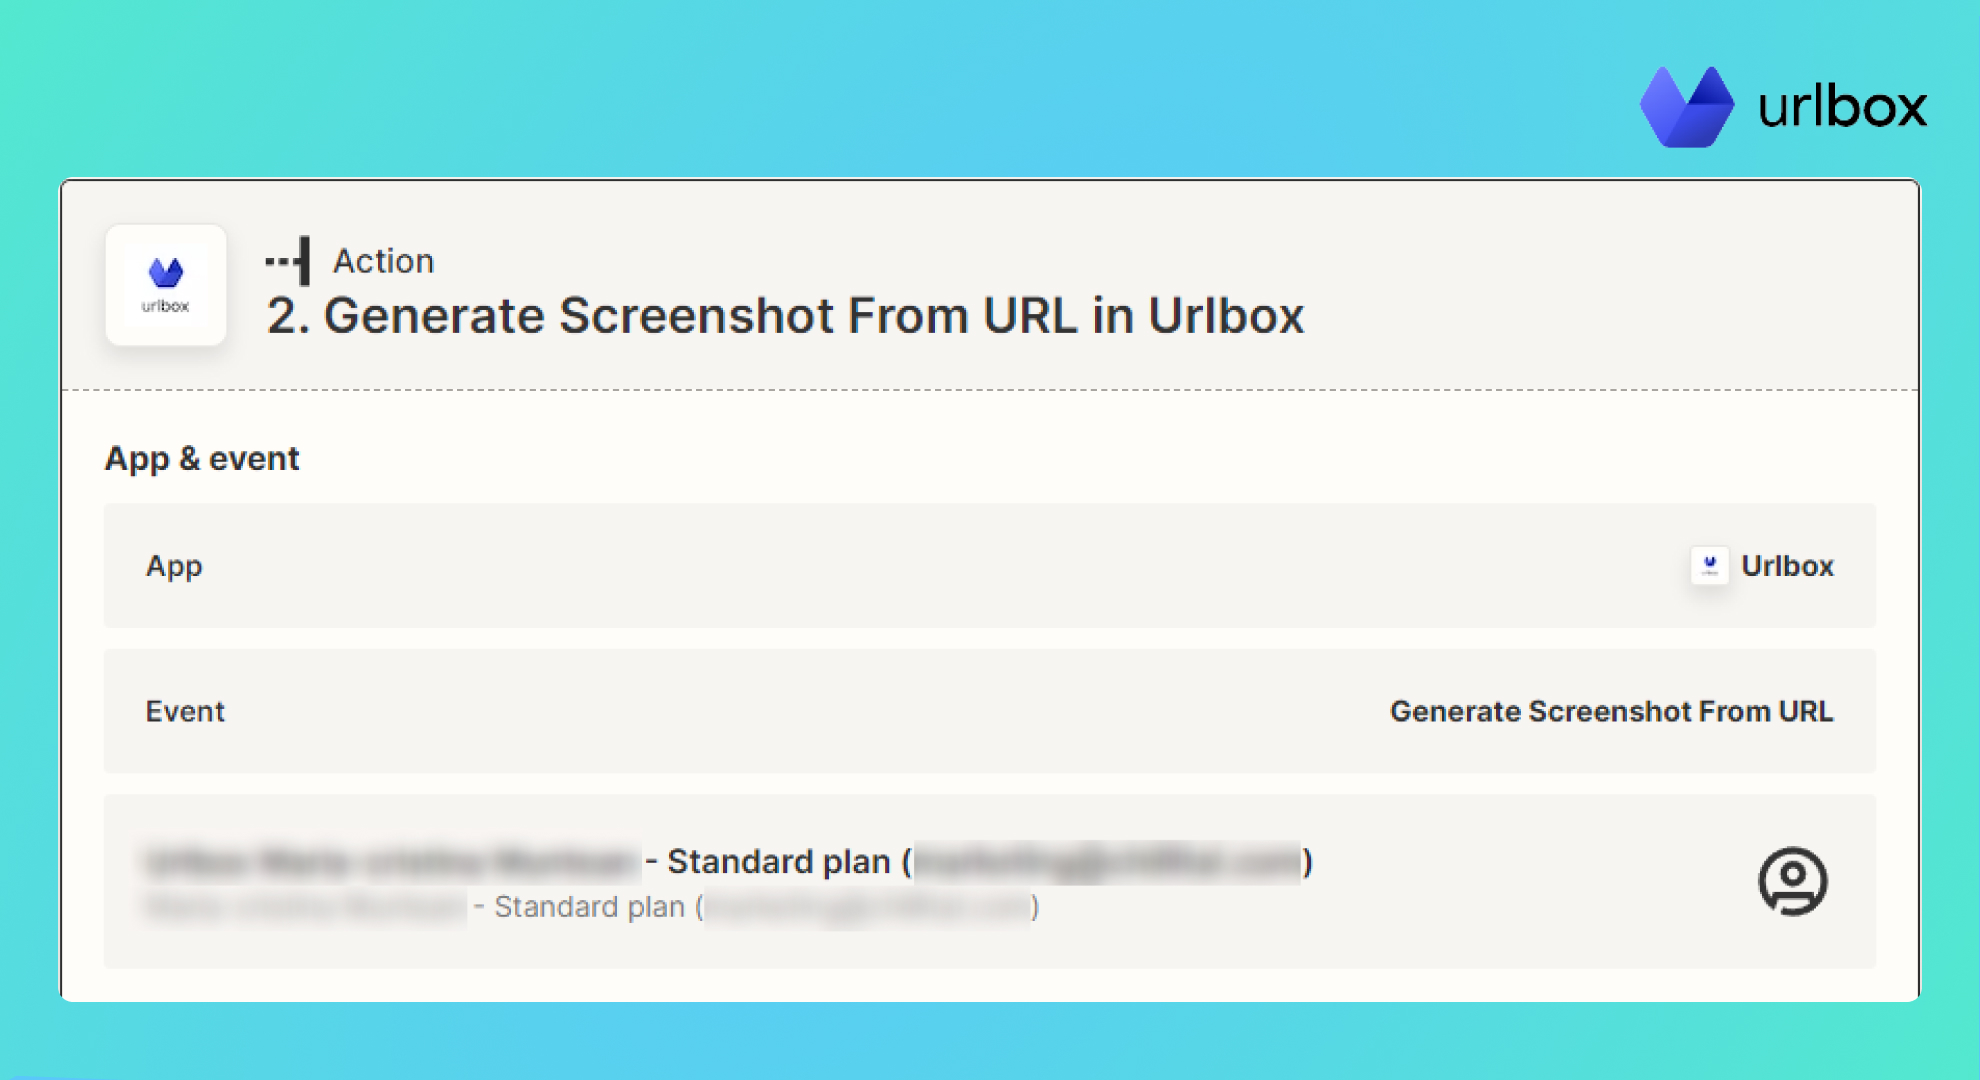
As you can see in the above screenshot, I configured Urlbox to "Generate Screenshot From URL."
You can configure the output format when the screenshot should be taken, plus many more variables.
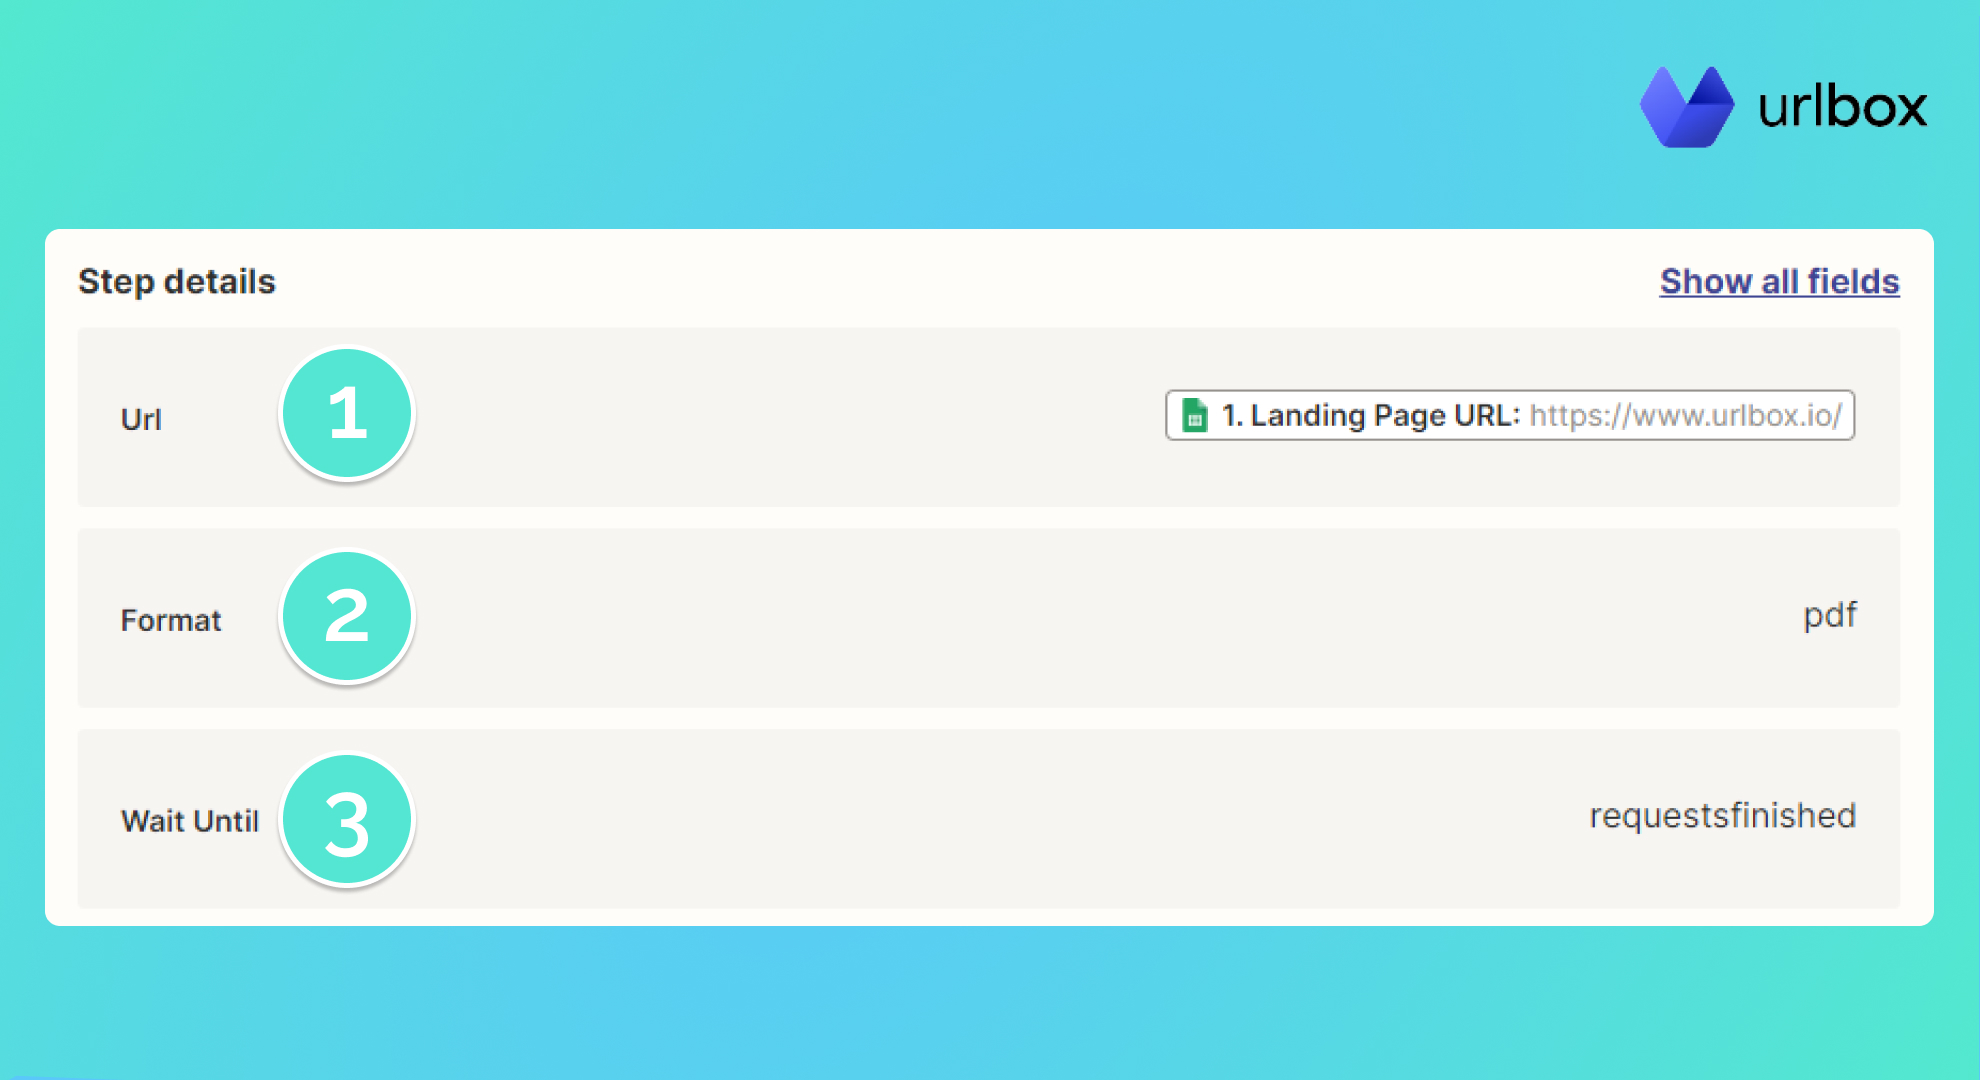
You can see in the above screenshot that:
1. I pass a dynamic URL from a Google Sheet cell;
2. I instruct Urlbox to save the screenshot as a PDF file;
3. I configured Urlbox to capture the screenshot only when all requests are finished, and the website has fully loaded.
In addition, I have also configured Urlbox to capture a full page screenshot, as I want to save it for my swipe file.
Now, you must set up a new Action if you want to save the screenshot to a cloud storage service (Google Drive, One Drive, pCloud, etc.). This is where you'll need a premium Zapier account, as the basic plan only allows you to set up a single Action.
With prices starting at $19.99, I find Zapier relatively cheap compared to how much time it can save.
You will also need a Urlbox account that goes for $19. The Starter plan allows you to take up to 2,000 screenshots each month and comes with all features (like blocking ads, retina-ready images, and much more). The best part is that you can start a seven days free trial and enjoy a 30-day money-back guarantee.
There is another way you can automate screenshots, but you either need to be a developer or get the help of one. You can learn more about it from our article that covers how to convert links to PDF at scale with screenshot APIs.
Conclusion
Capturing a screenshot of a web page is a straightforward process that can be achieved using the built-in functionality of your device or browser.
You can use a third-party app or browser extension to generate higher quality, editable screenshots.
You can also automate the process with the help of no-code tools like Zapier. Alternatively, you can get the same (or even better) result by implementing an API provided by a website screenshot service.
