
If you have a list of URLs in google sheets and want to capture screenshots of them, this guide will walk you through how to do it.
The workflow will be:
- Setting up a list of URLs in Google Sheets
- Creating a zap in Zapier which will carry out the following steps:
For each new or updated row in the google sheet:
- Read the URL from the URL column
- Capture a screenshot of the URL using the Urlbox screenshot API with various options.
- Save the returned screenshot to a folder in Google Drive.
- Update the row in the google sheet with the URL of the screenshot in Google Drive.
- Test that the zap is working, and works when we add a new URL row to the google sheet.
Table of Contents
Setting up list of URLs in Google Sheets
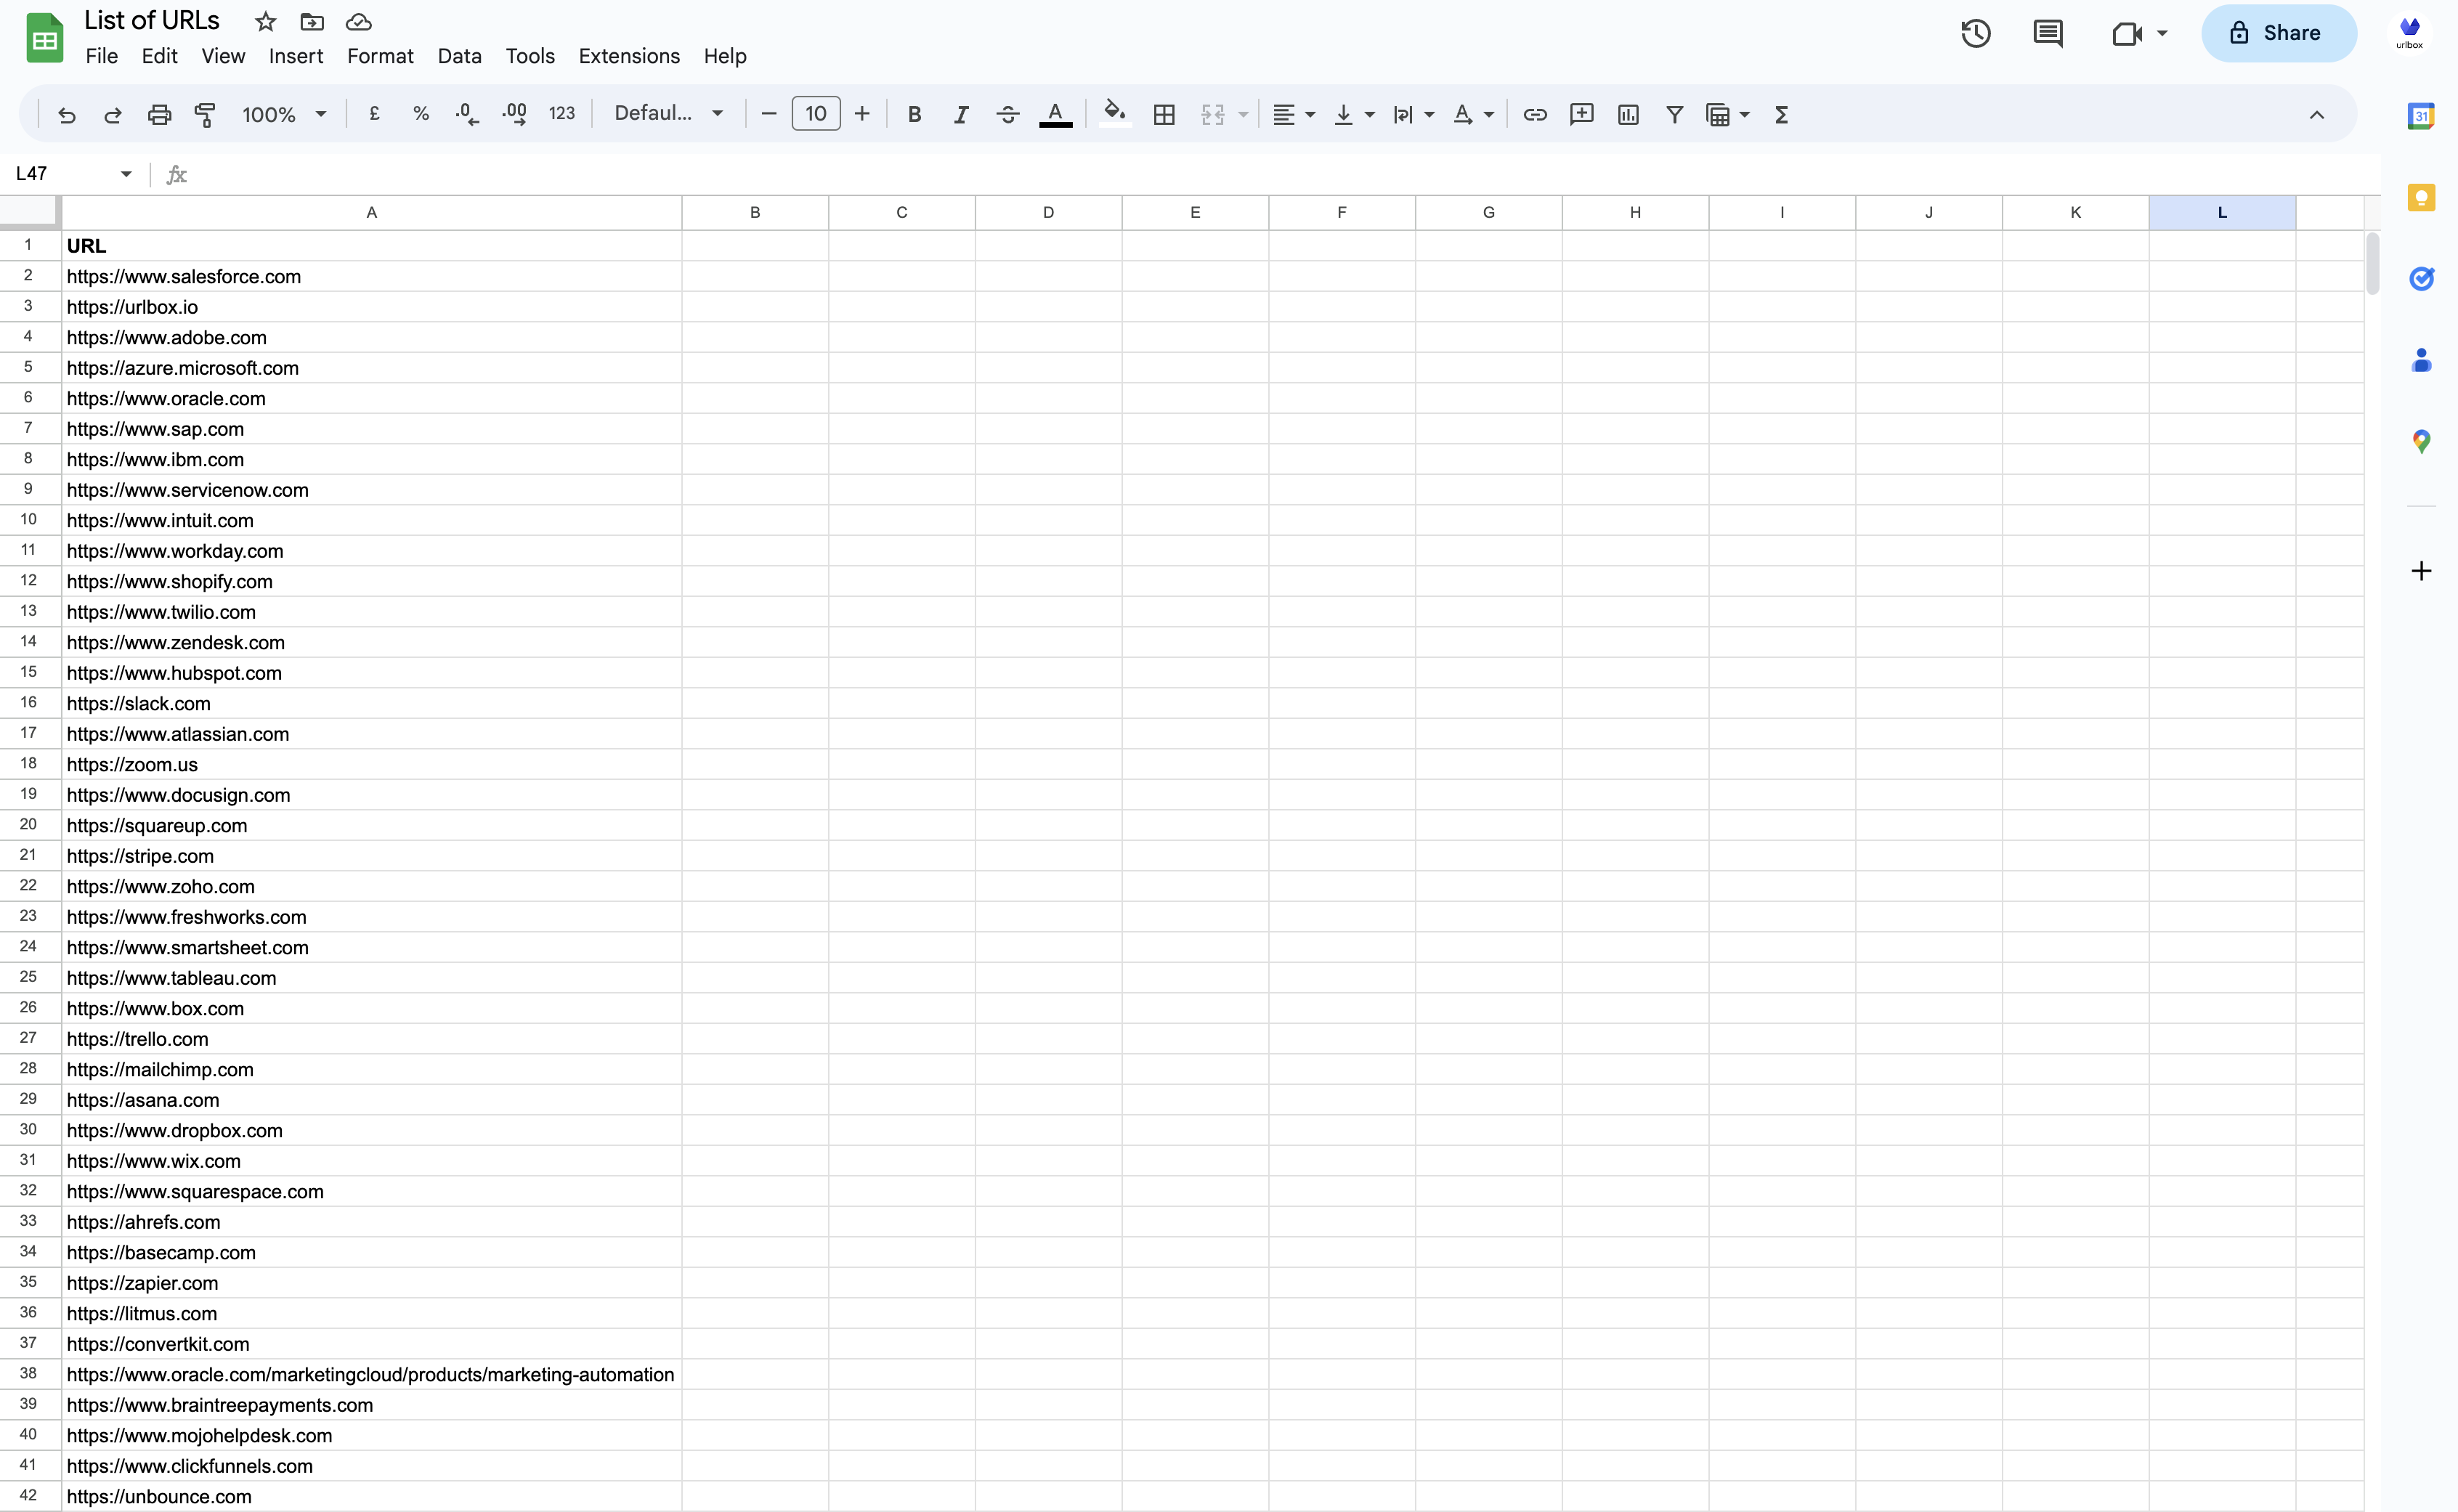
The first part is setting up a list of URLs in Google Sheets. For this example, I asked chatGPT for a list of URL's of the top Saas products, in csv format, so that I can quickly copy the URLs into a new google sheet.
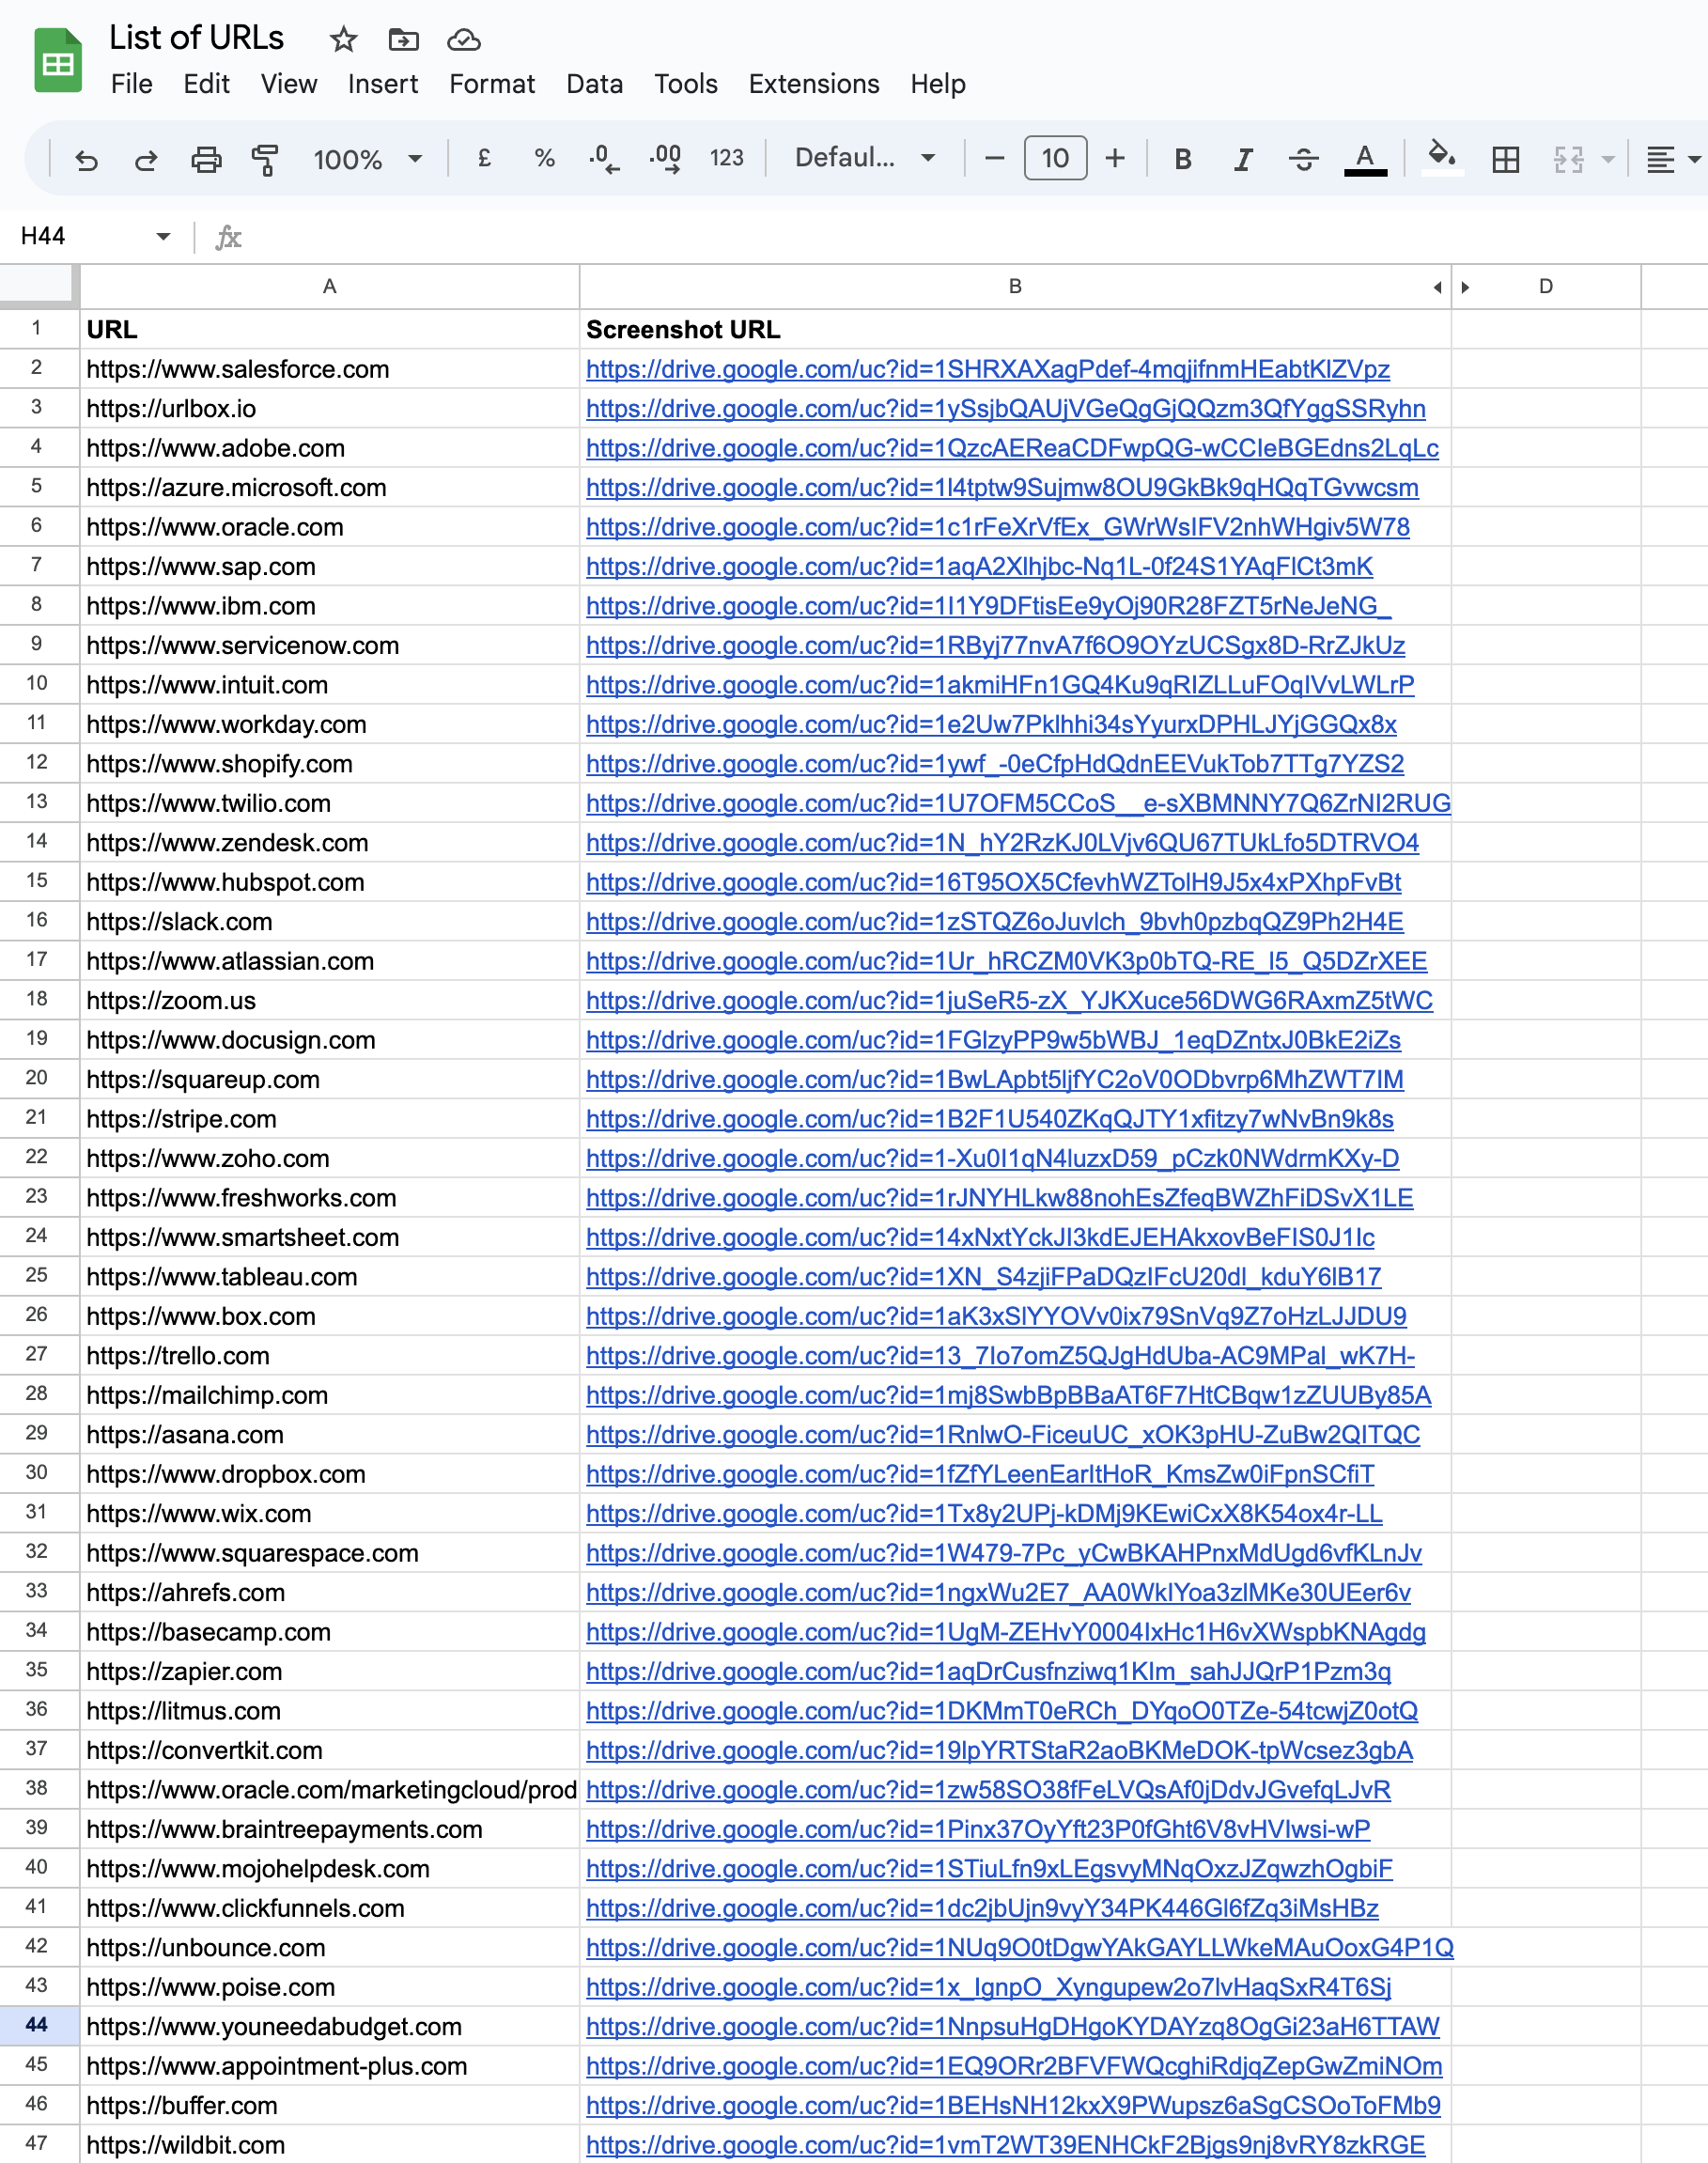
It's important to ensure that the list of URLs is in one column and each URL is on a separate row. Create a heading row at the top and label the column of URLs as "URL" as this will make it easier to reference in the zap.
Save your sheet with a name that you can remember, as we will reference it in the next step. I saved the spreadsheet as "List of URLs".
Creating the zap in zapier
The next step is to create a zap in Zapier. Zapier is a tool that allows you to connect different apps together and create automated workflows between them. In this case, we will be connecting Google Sheets and Urlbox.
The first step in the zap is the trigger, for this we will use the "New or Updated Spreadsheet Row" trigger in Google Sheets. This will trigger the zap whenever a new row is added to the google sheet, or an existing row is updated.
Next, we need to connect the zap to the google sheet. We will need to connect to the google account that owns the google sheet, and then select the google sheet and worksheet that we want to use.
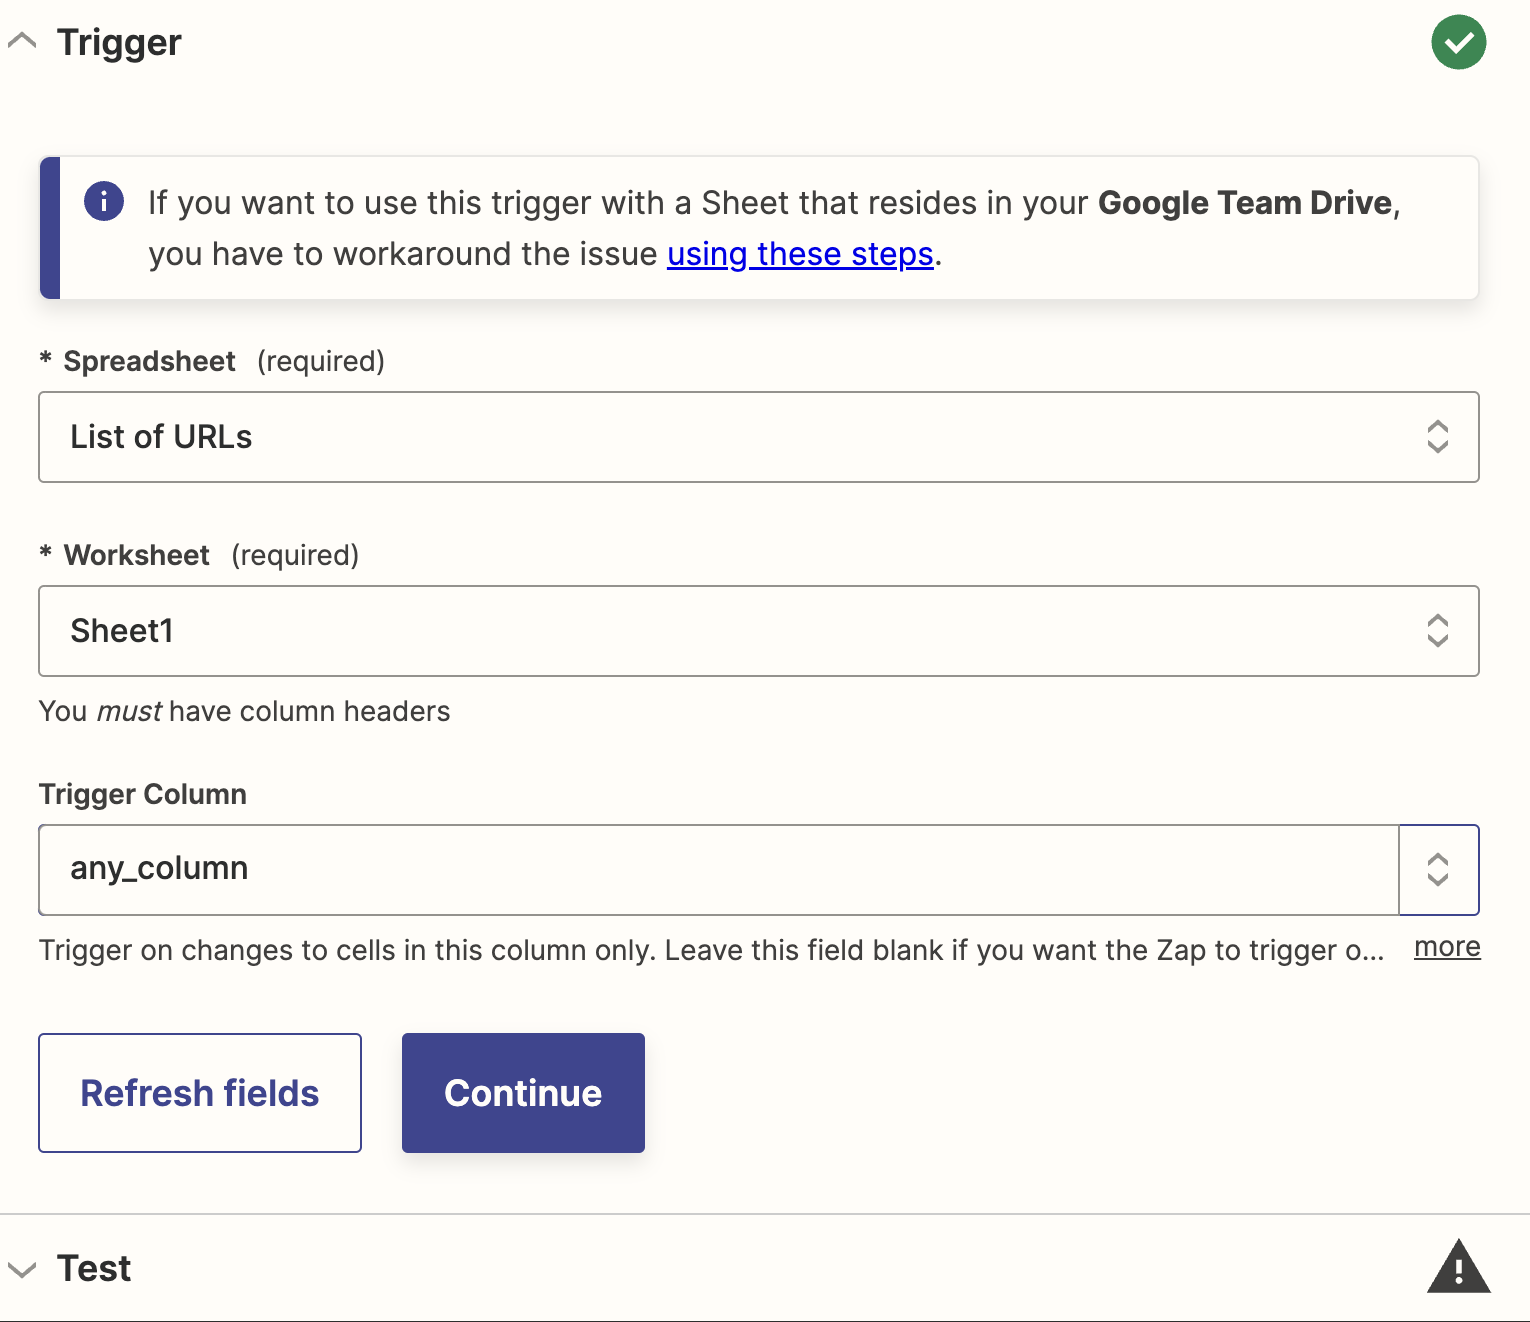
Ensure you set the correct spreadsheet and worksheet from the first step, that contains your URLs. For trigger column, you can choose to select a certain column that when updated will trigger the zap, or you can leave it as the default 'any_column', and the zap will be triggered whenever any column is updated.
Now click continue, and you will be prompted to test the trigger. Click the test trigger button, and Zapier will return a sample of rows from the sheet. You can choose one row to continue setting up the zap. Click continue with selected record.
Adding the Urlbox screenshot action
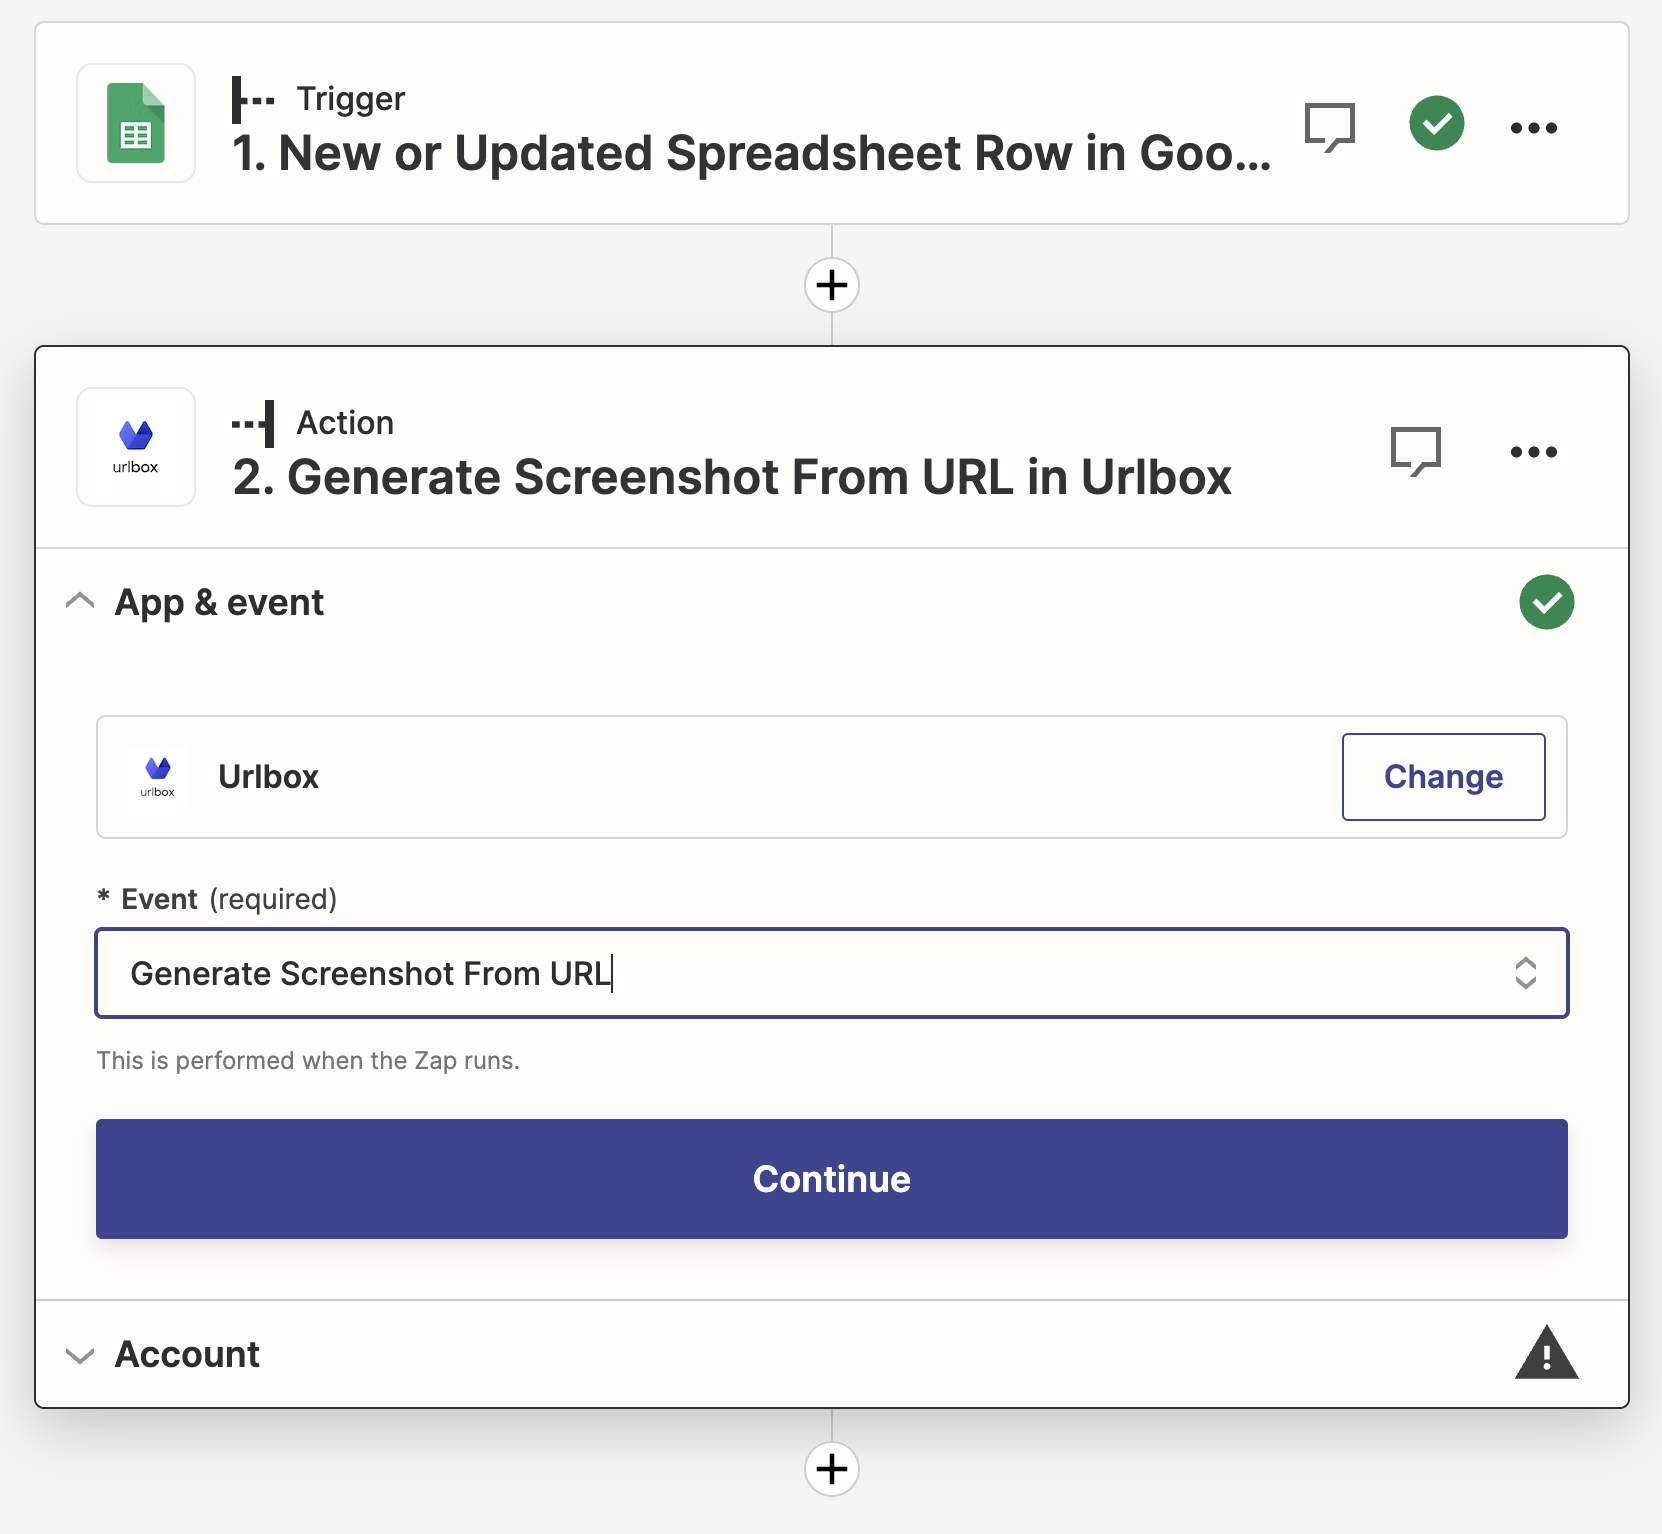
The next step is to add the Urlbox action to the zap, which will take the URL from the row in the google sheet, and capture a screenshot of it.
In the search box, type Urlbox, and select the Urlbox action, and then choose the "Generate Screenshot From URL" event.
Your zap should look like this so far:
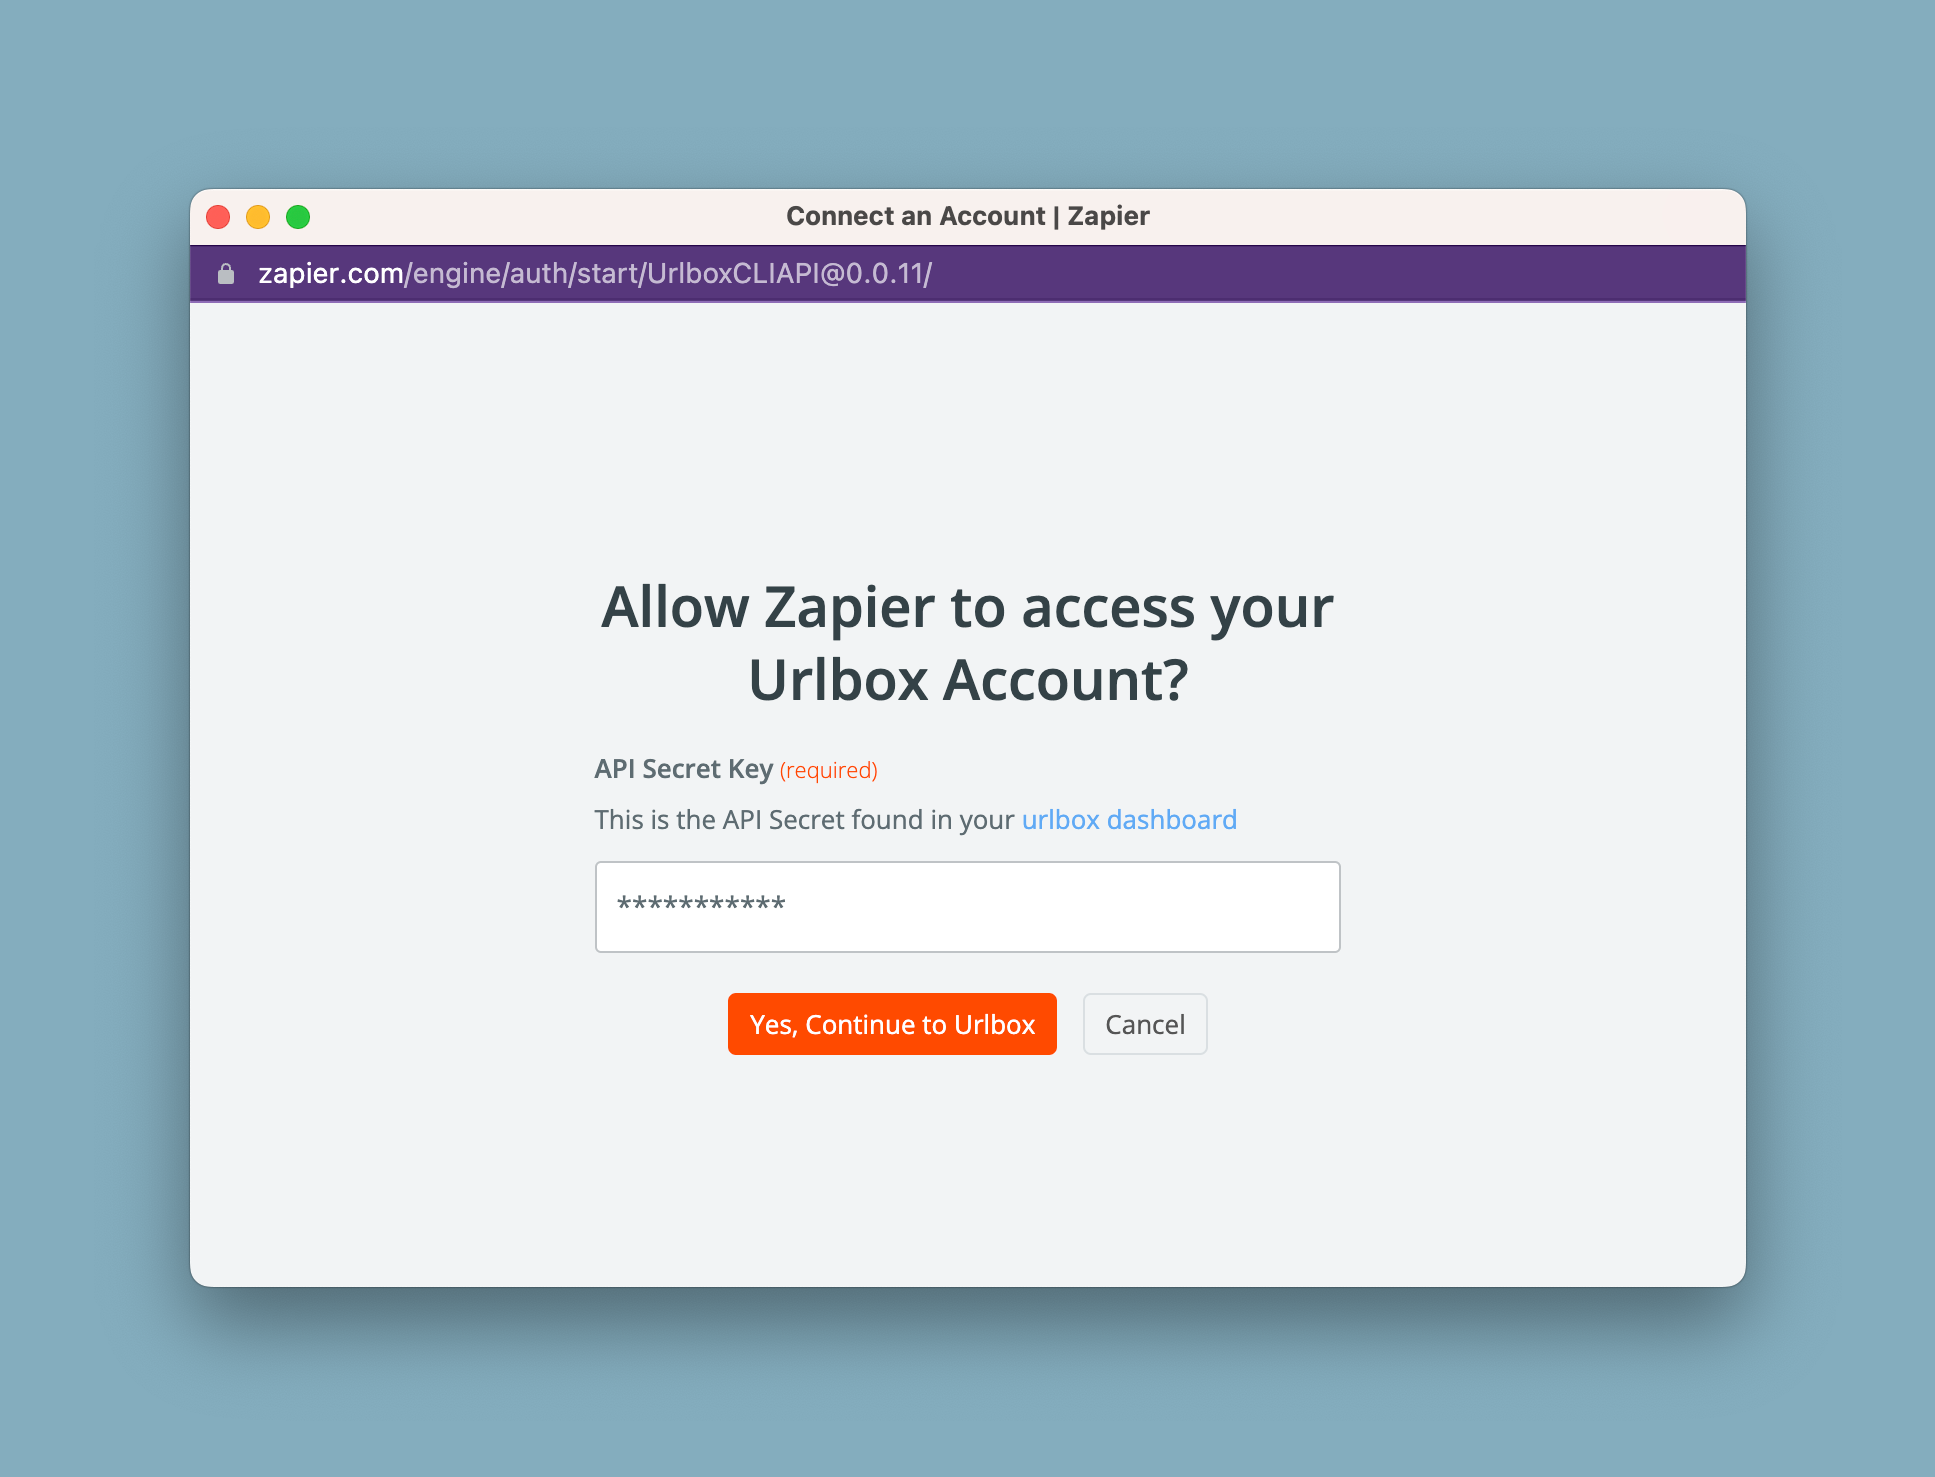
Now click continue, and link your Urlbox account. You can do this by pasting in your Urlbox Secret key into the popup form:
Click continue, now we arrive at the Urlbox screenshot options. Here we can choose the options for the screenshot, such as the url, size and format.
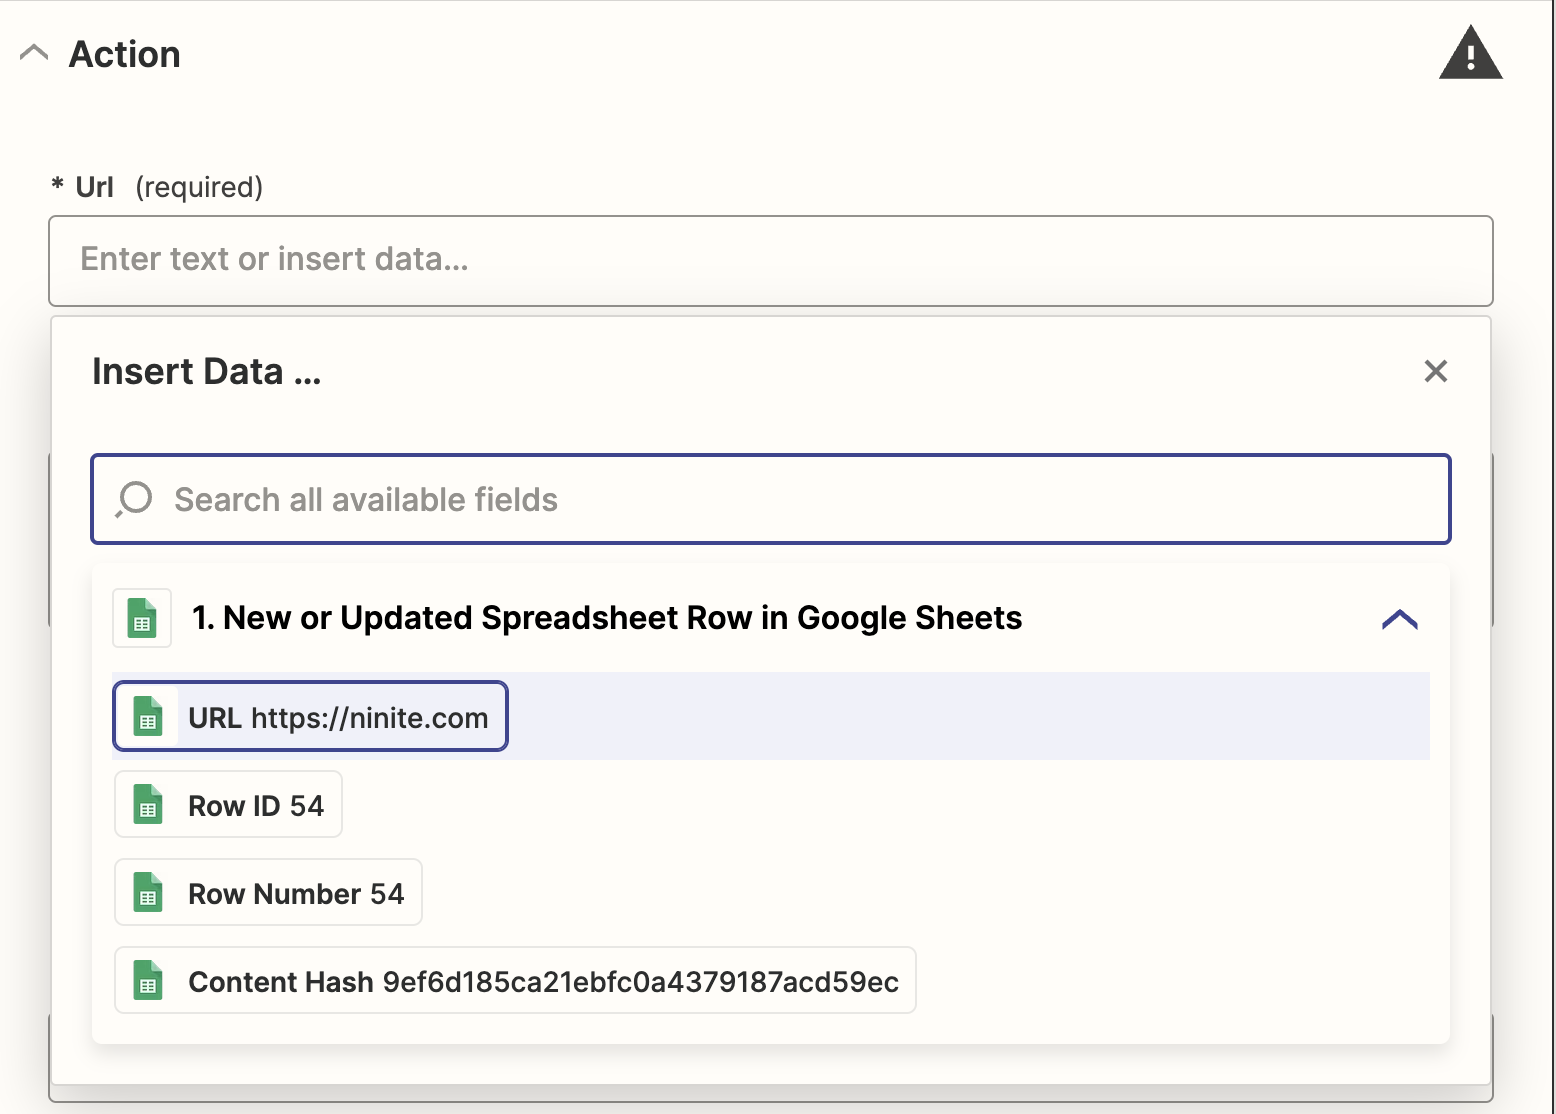
For the URL, we want to select the URL from the google sheet, so click into the URL input, and in the dropdown, select the URL column from the google sheet. Zapier will show the URL of the row from the test trigger that we did earlier, to make it more obvious which data is being selected:
We can set a whole host of other options in this screen, but we will leave them all as the default for now.
Scroll to the bottom of the urlbox options, click continue, then click 'Test action'. Zapier will now send the URL to Urlbox, and Urlbox will return a screenshot of the URL.
If everything is working correctly, you should see the following from the test action:
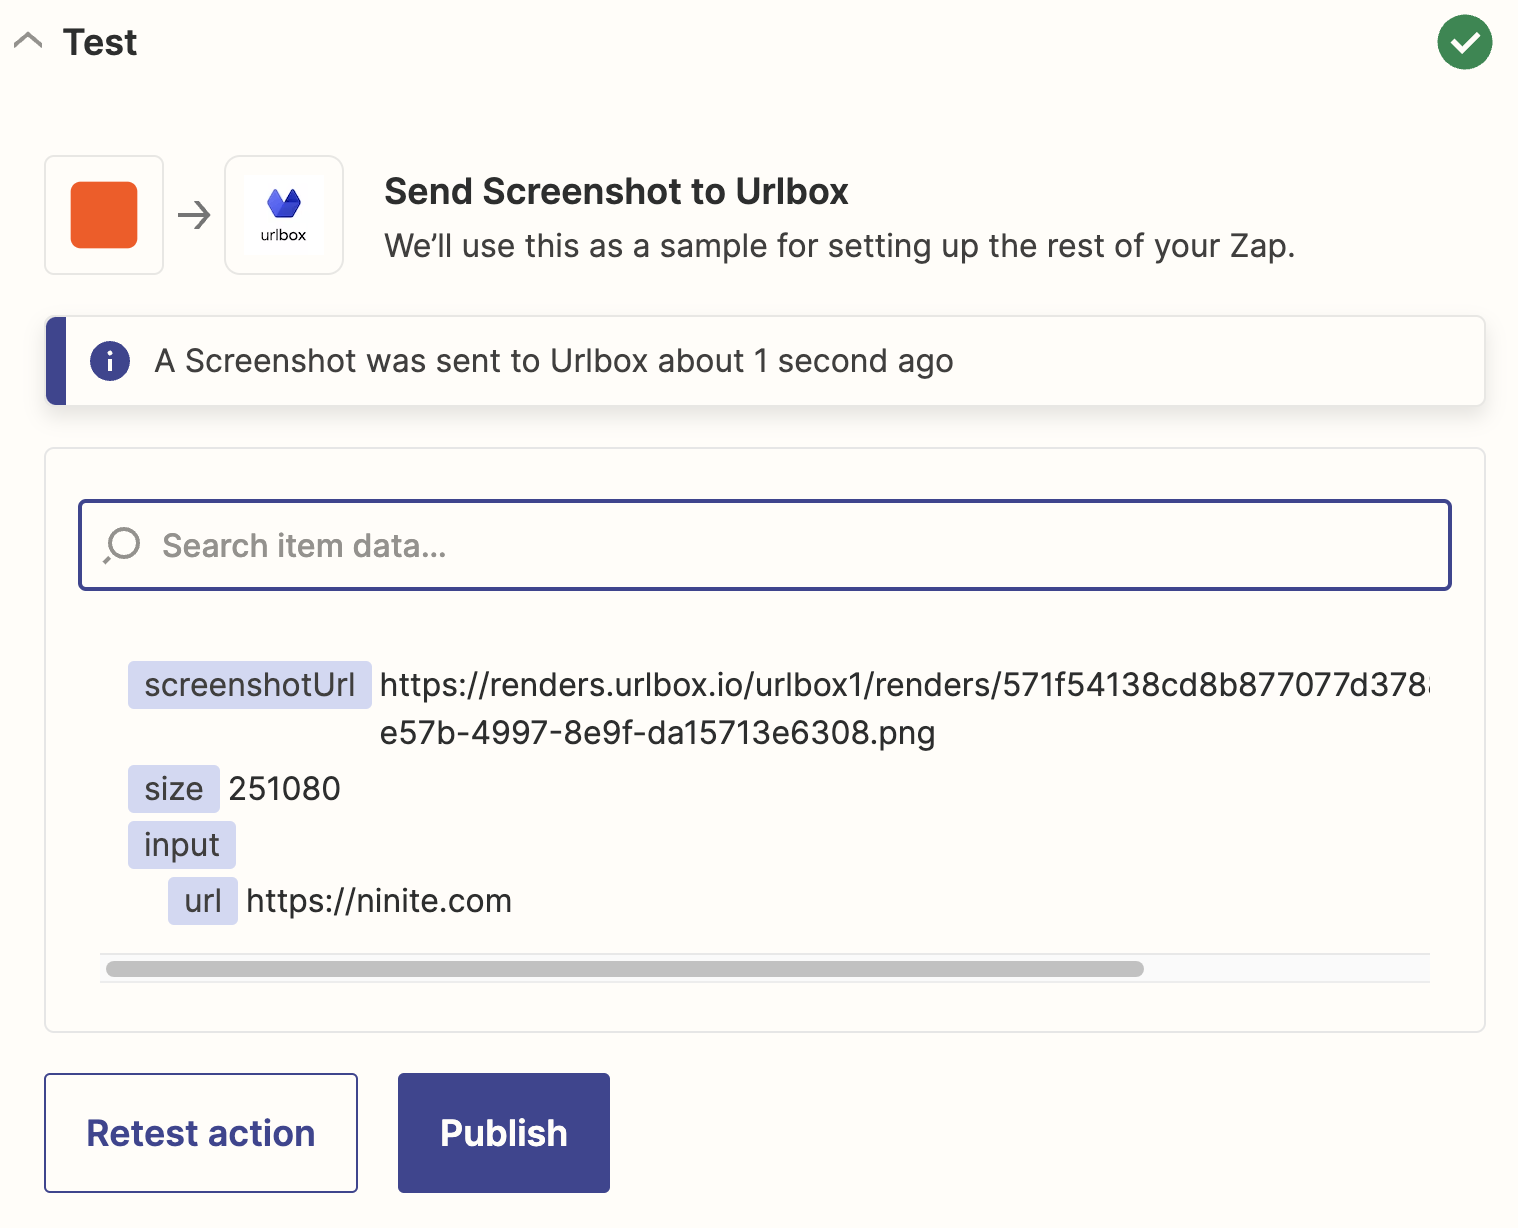
You can see that Urlbox has returned a screenshotUrl which is a link to the screenshot that was generated.
We can use this screenshotUrl in later actions in the zap.
Note: The screenshotUrl is a temporary URL and will expire after 30 days. In order to save the screenshot permanently, we need to save it to cloud storage. In this setup, we will use Google Drive, but you should be able to use any cloud storage solution such as Dropbox, or Amazon S3.
Saving the screenshot to Google Drive
Next, click the little '+' icon to add a new action to the zap. In the search box, type Google Drive, and select the Google Drive action, and then choose the "Upload File" event.
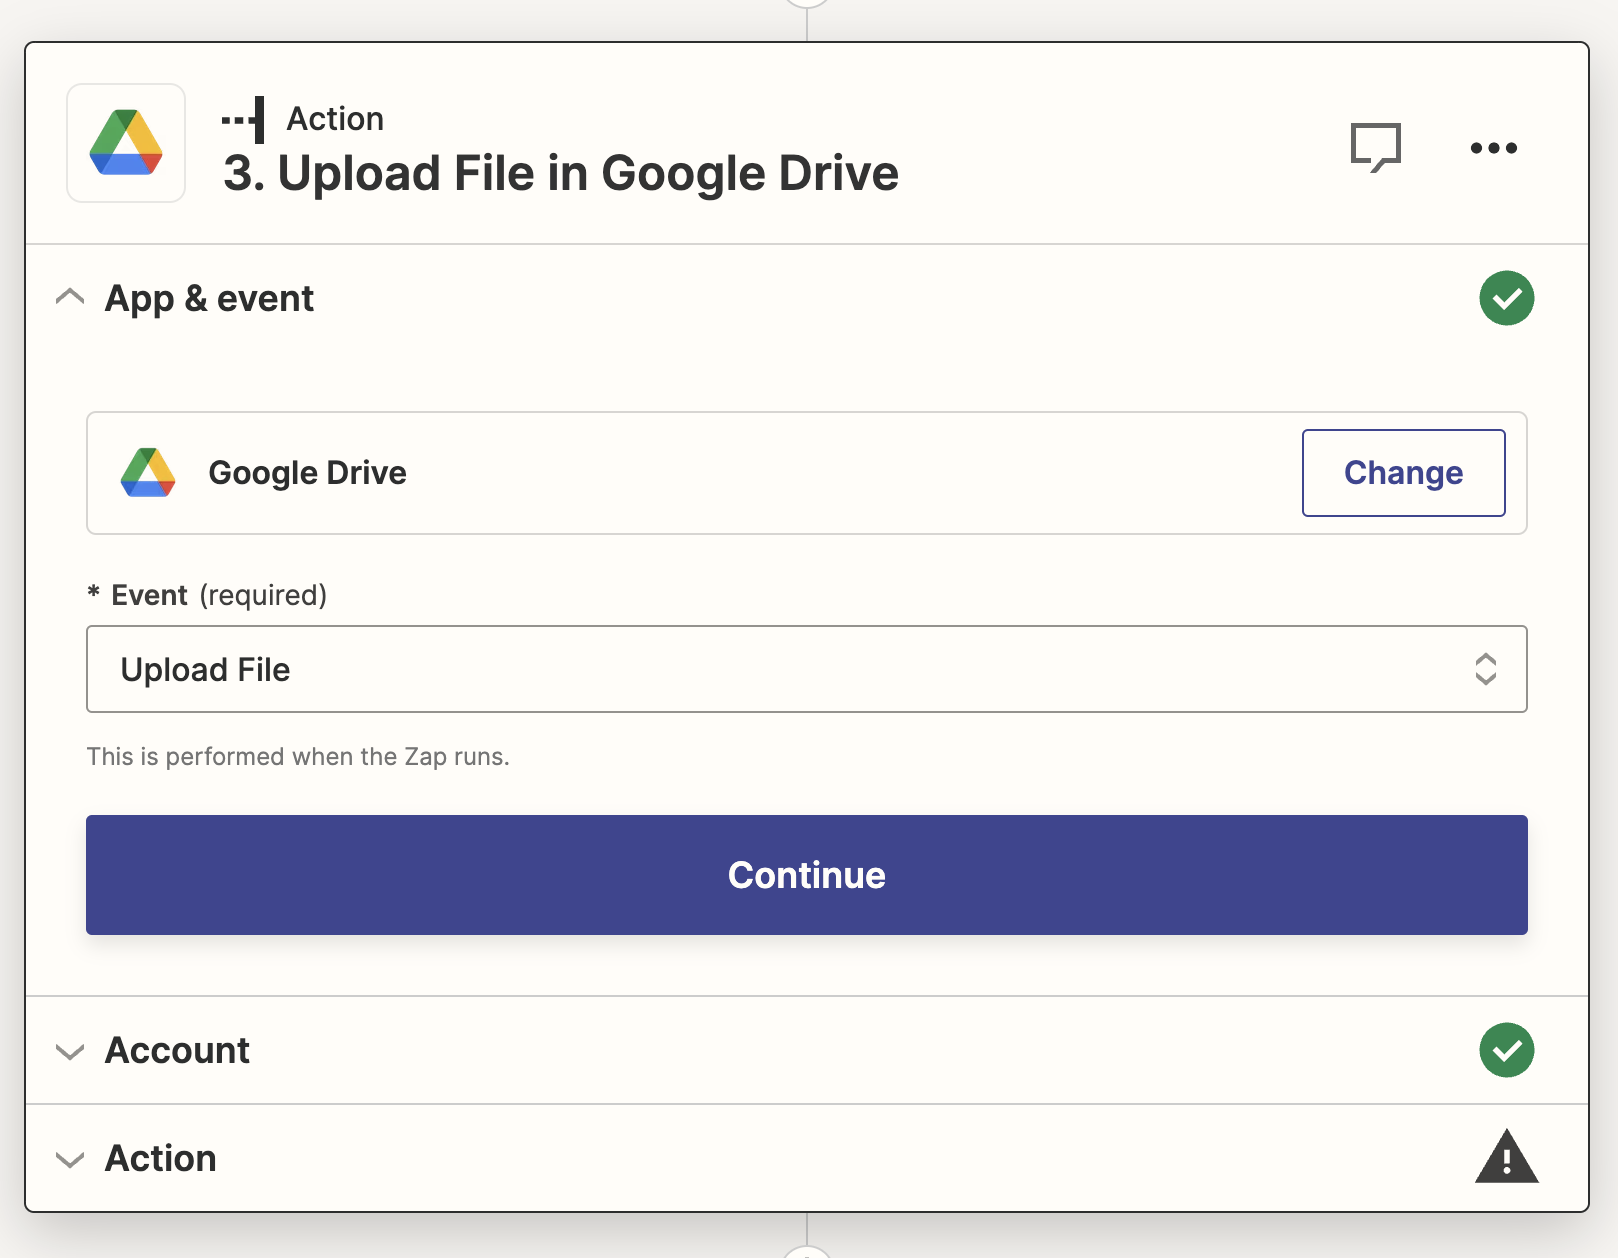
Click continue, and link your Google Drive account.
In Google Drive, you should create a folder where you want the screenshots to be stored. For this example, I named the folder "Zapier Screenshots". If you want to link to these images from a website, it is necessary to make your folder public, so that the images can be accessed by anyone. To do this, right click on the folder, and choose "Share", and then under "General Access" select "Anyone with the link".
Back in the zap setup, once you have linked your google drive account, click continue, and in the action panel, choose the drive, and appropriate folder.
In the File dropdown, this is where we pass in the screenshotUrl from the Urlbox action. Click into the File input, and in the dropdown, select the screenshotUrl from the Urlbox action.
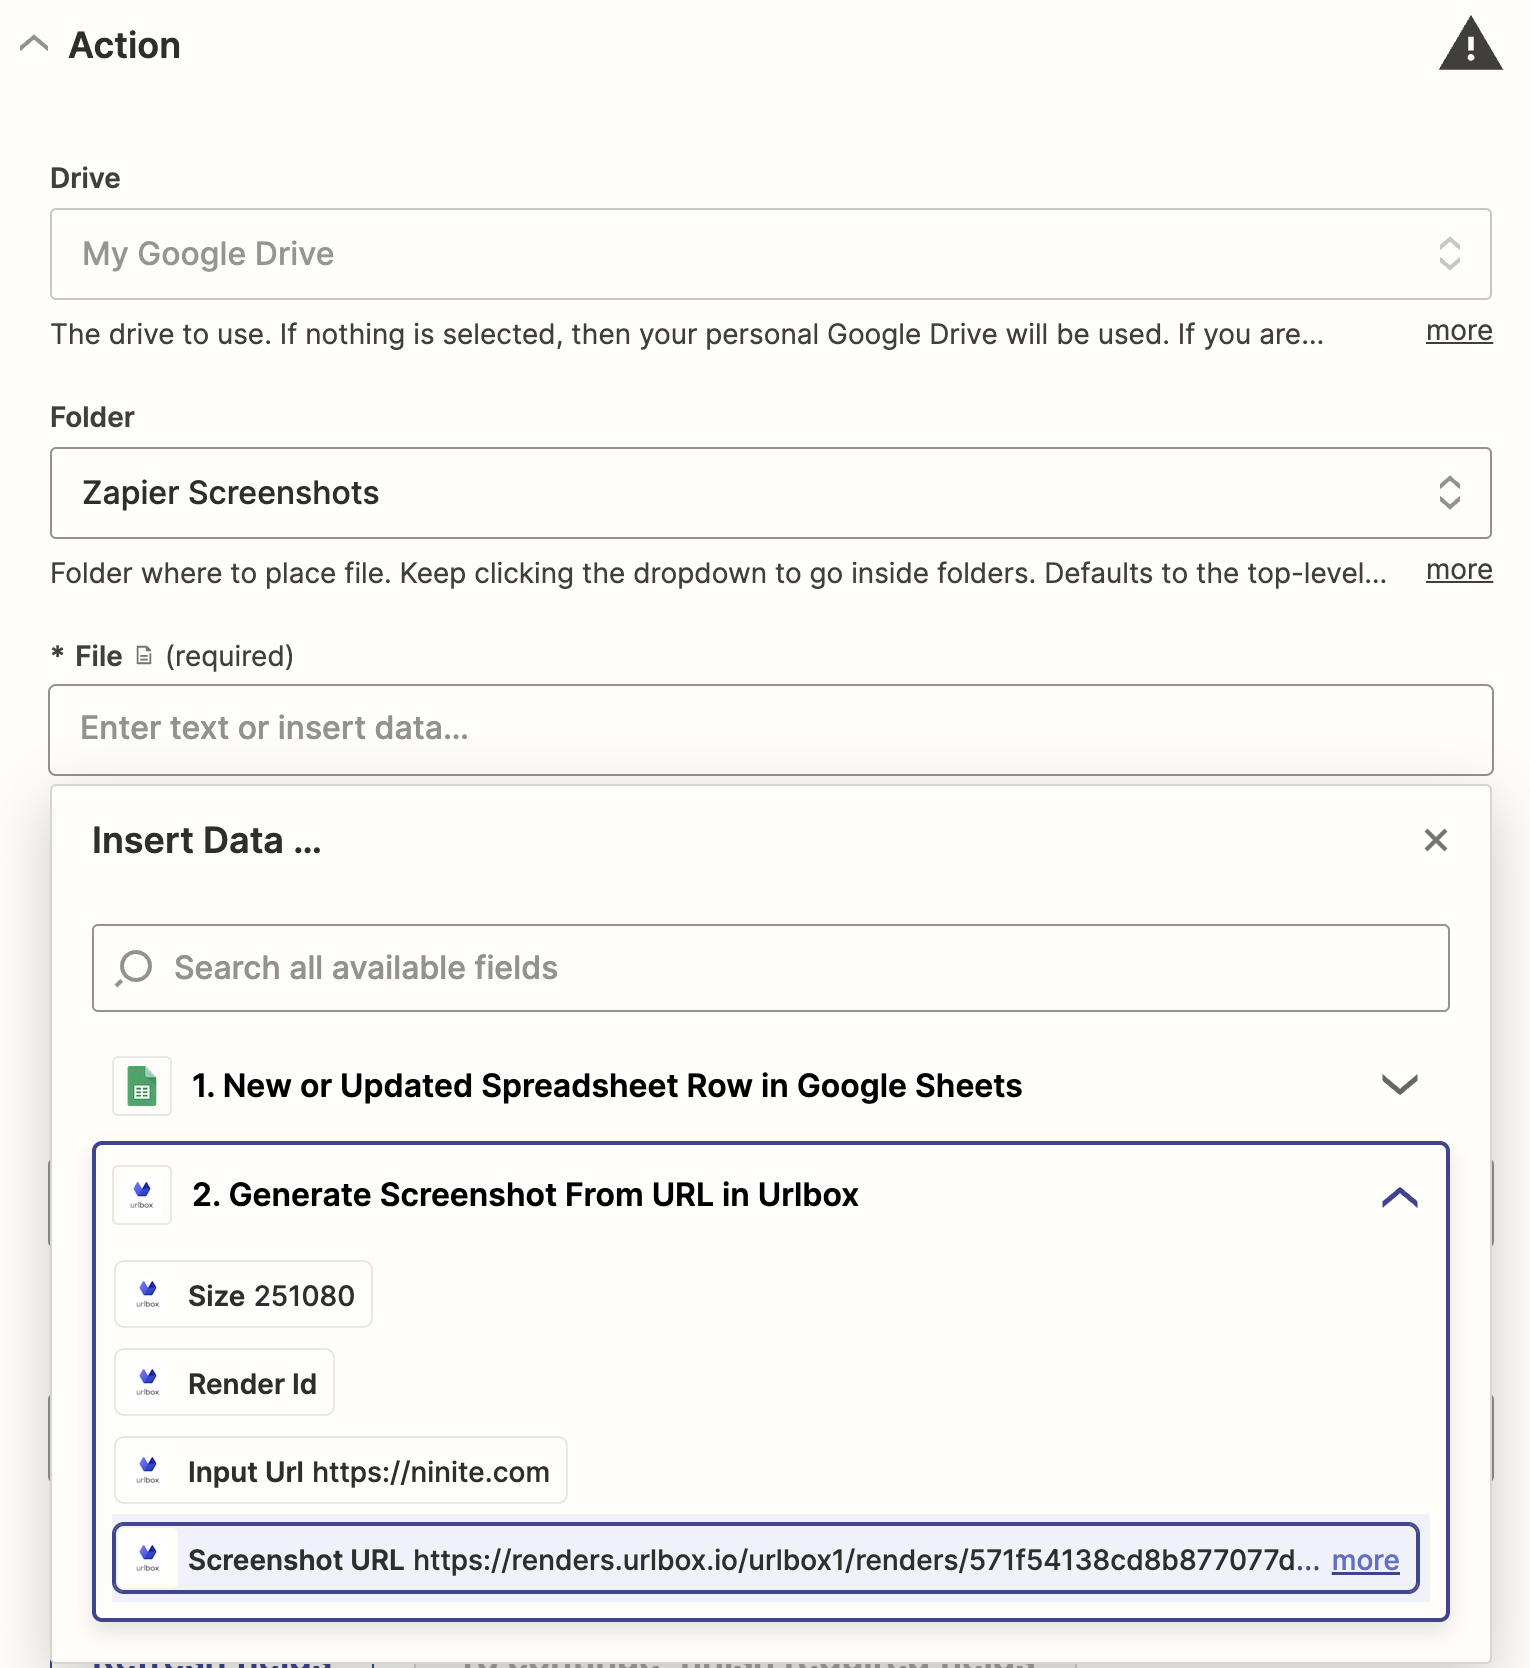
For the File Name input, you can choose to use the URL from the google sheet action, so that each screenshot in Google Drive is named according to the URL. If you have other columns in your google sheet, such as the name of the website or product, you could also use this information to name the screenshot file.
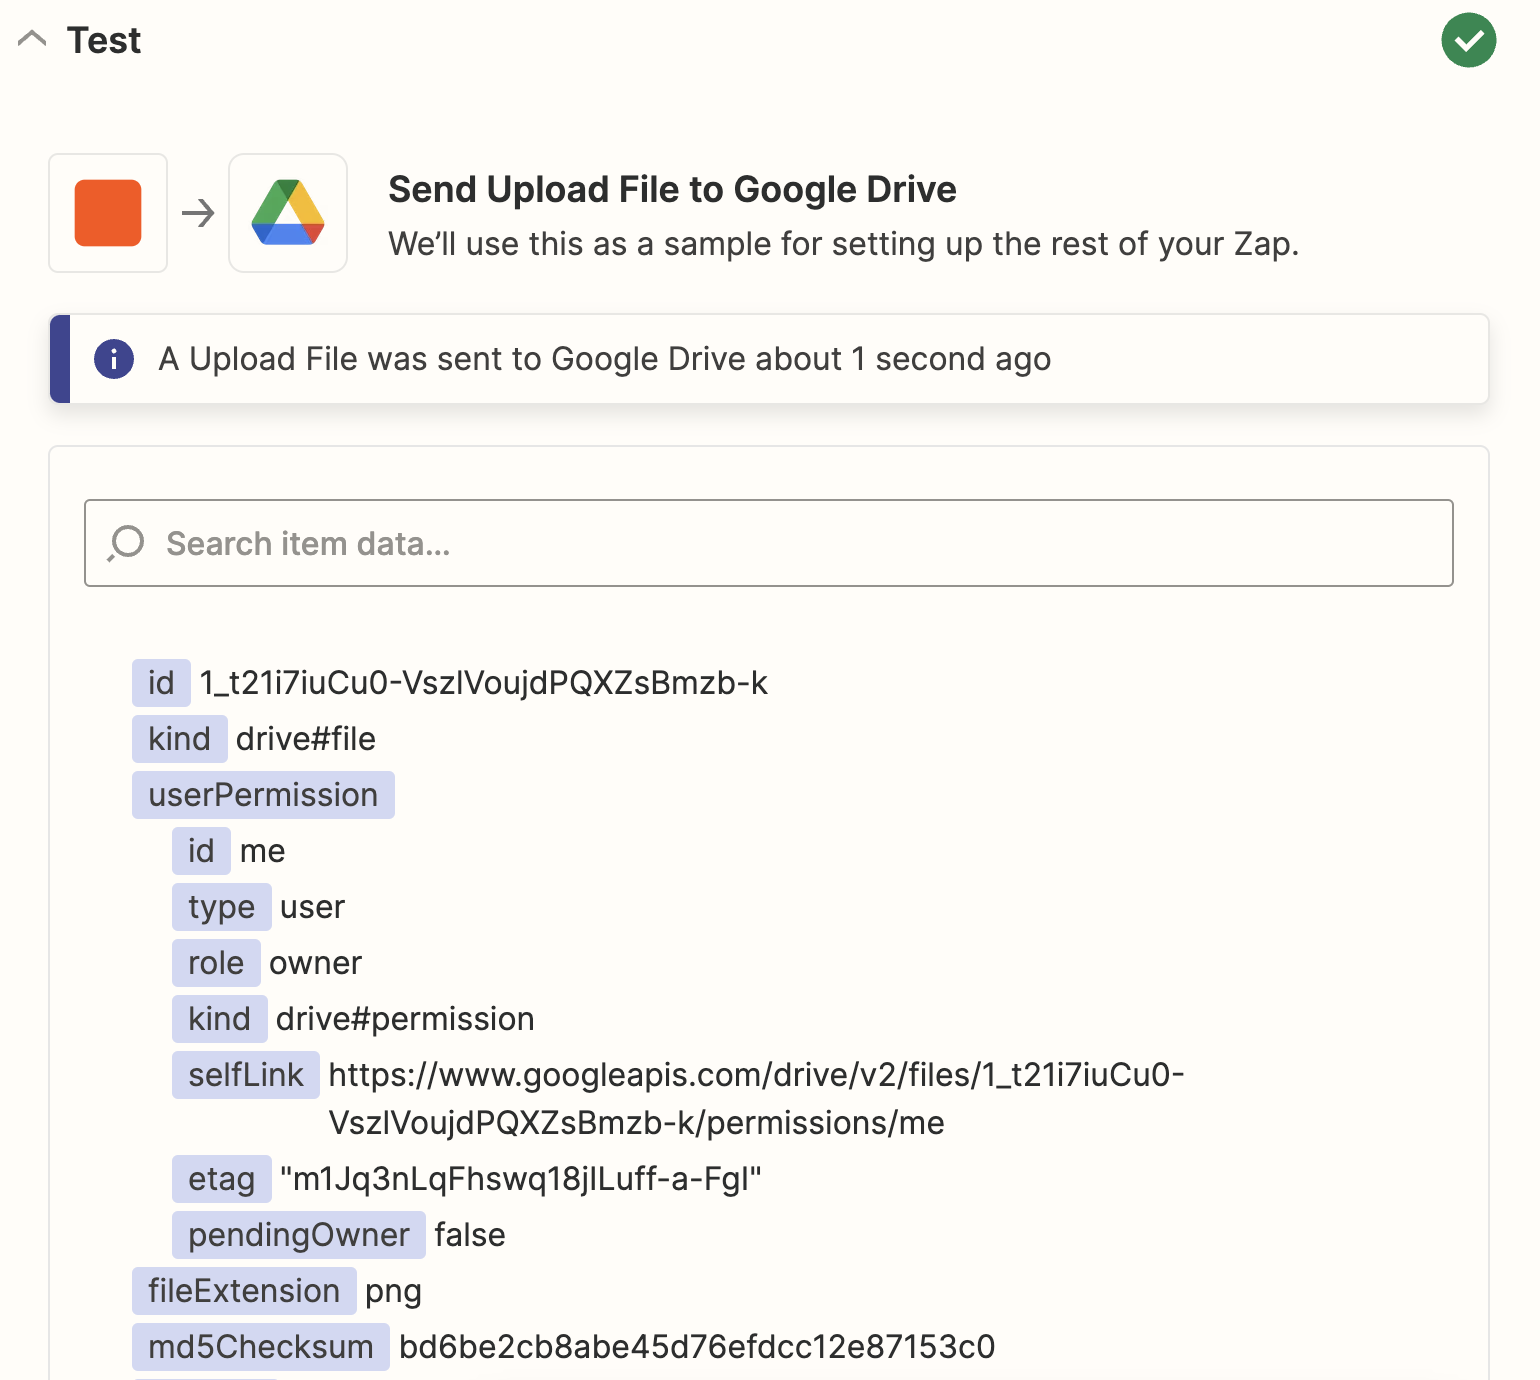
Now test the action, and all being well, the screenshot of the URL will appear in your google drive folder, and zapier will send back some information about the uploaded file:
Updating the google sheet with the screenshot URL
Great, now the last step in the zap setup is to update the google sheet, with a link to the screenshot that we just uploaded to google drive.
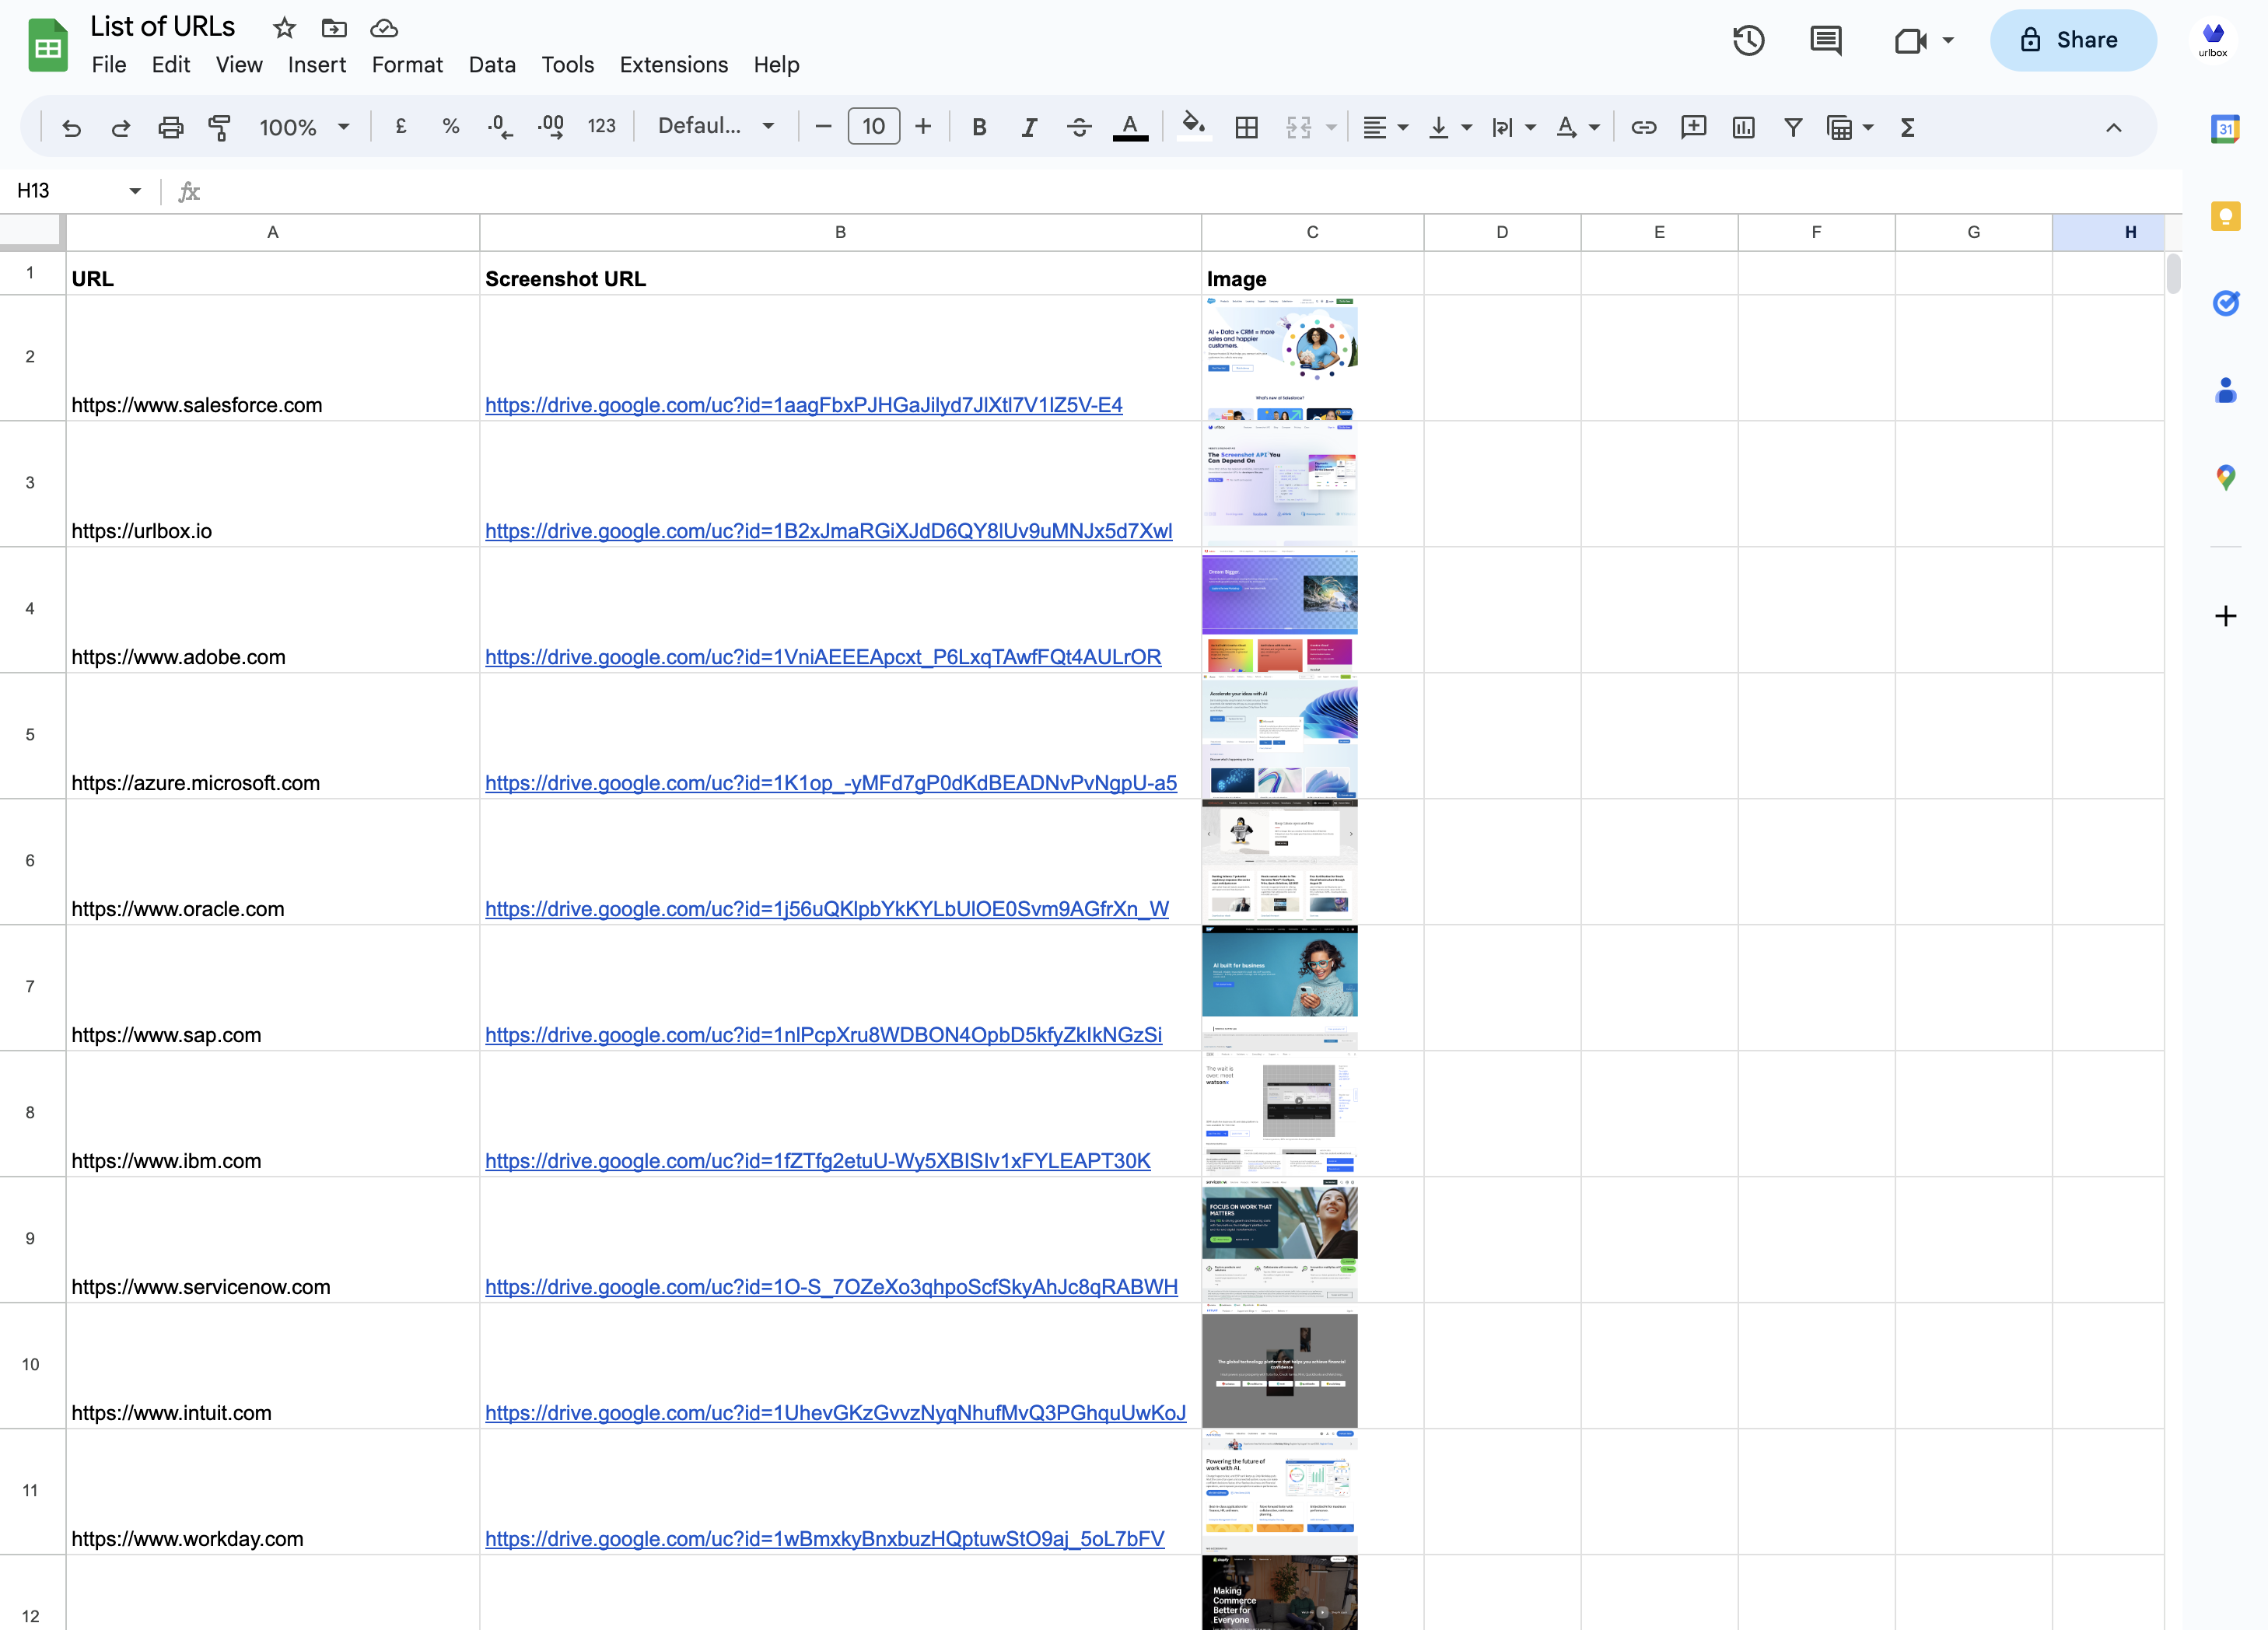
Back in your google sheet, create a new column and label it "Screenshot URL". This is where we will store the URL of the screenshot that we just uploaded to google drive.
Back in the zap setup, add another action to the zap, and search for google sheets, and select the "Update Spreadsheet Row" event.
Once again, go through the steps to link your google account, and make sure to choose the same spreadsheet and worksheet as before.
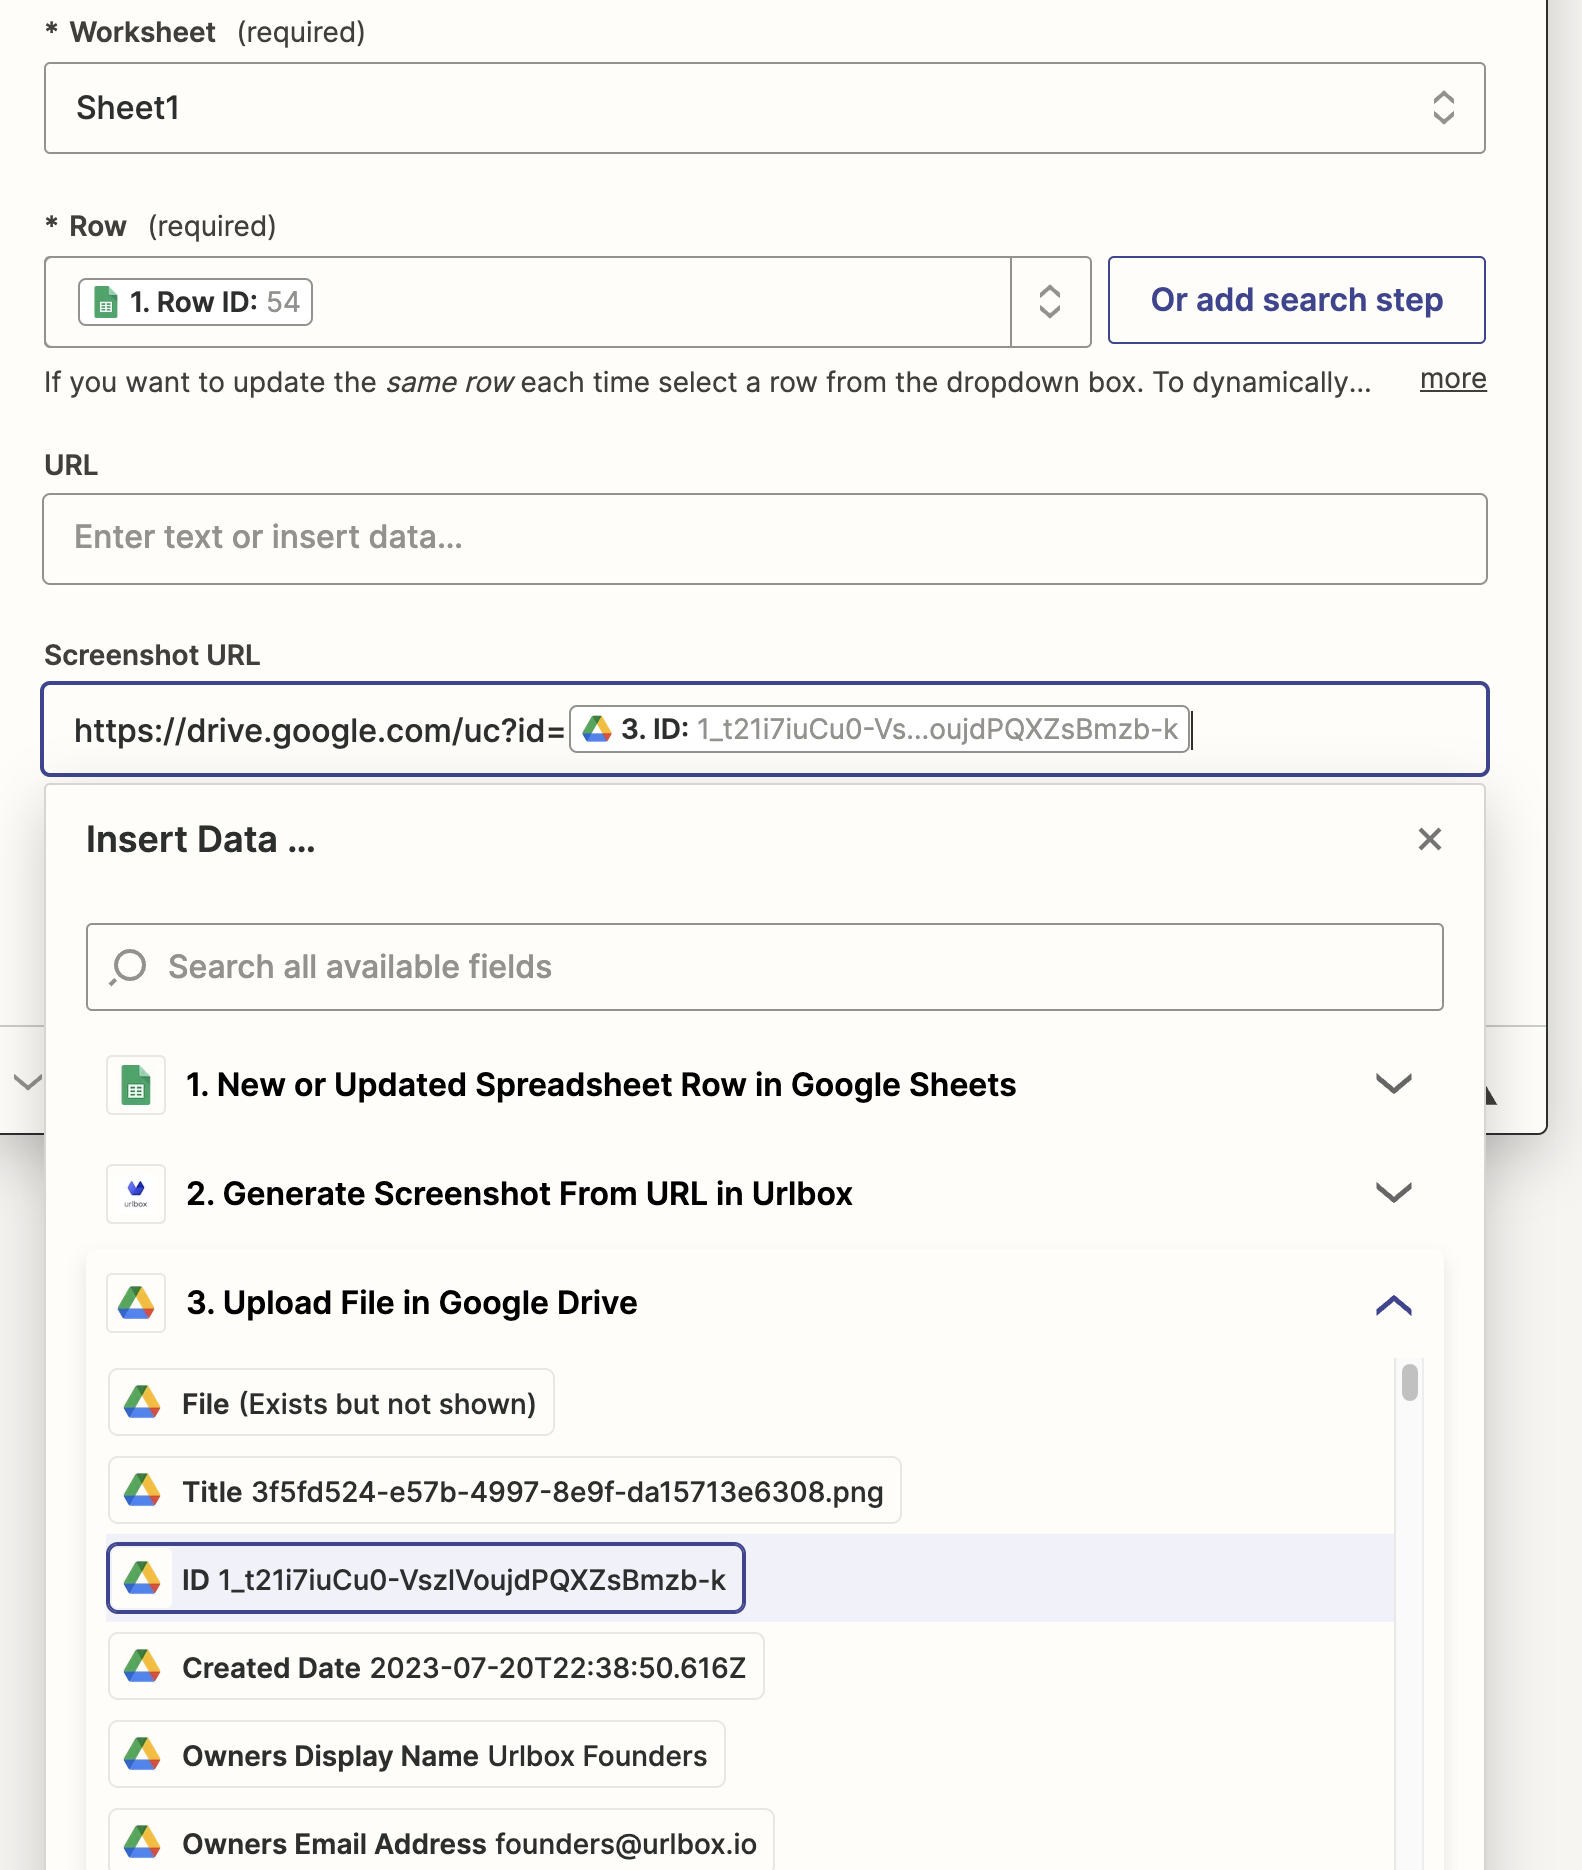
Now, the crucial part is the "Row" input. This is where we tell zapier which row in the google sheet to update.
Click into the Row input, and in the dropdown, select the "Custom" tab, then expand the "1. New or Updated Spreadsheet Row in Google Sheets" dropdown, now select the "Row ID".
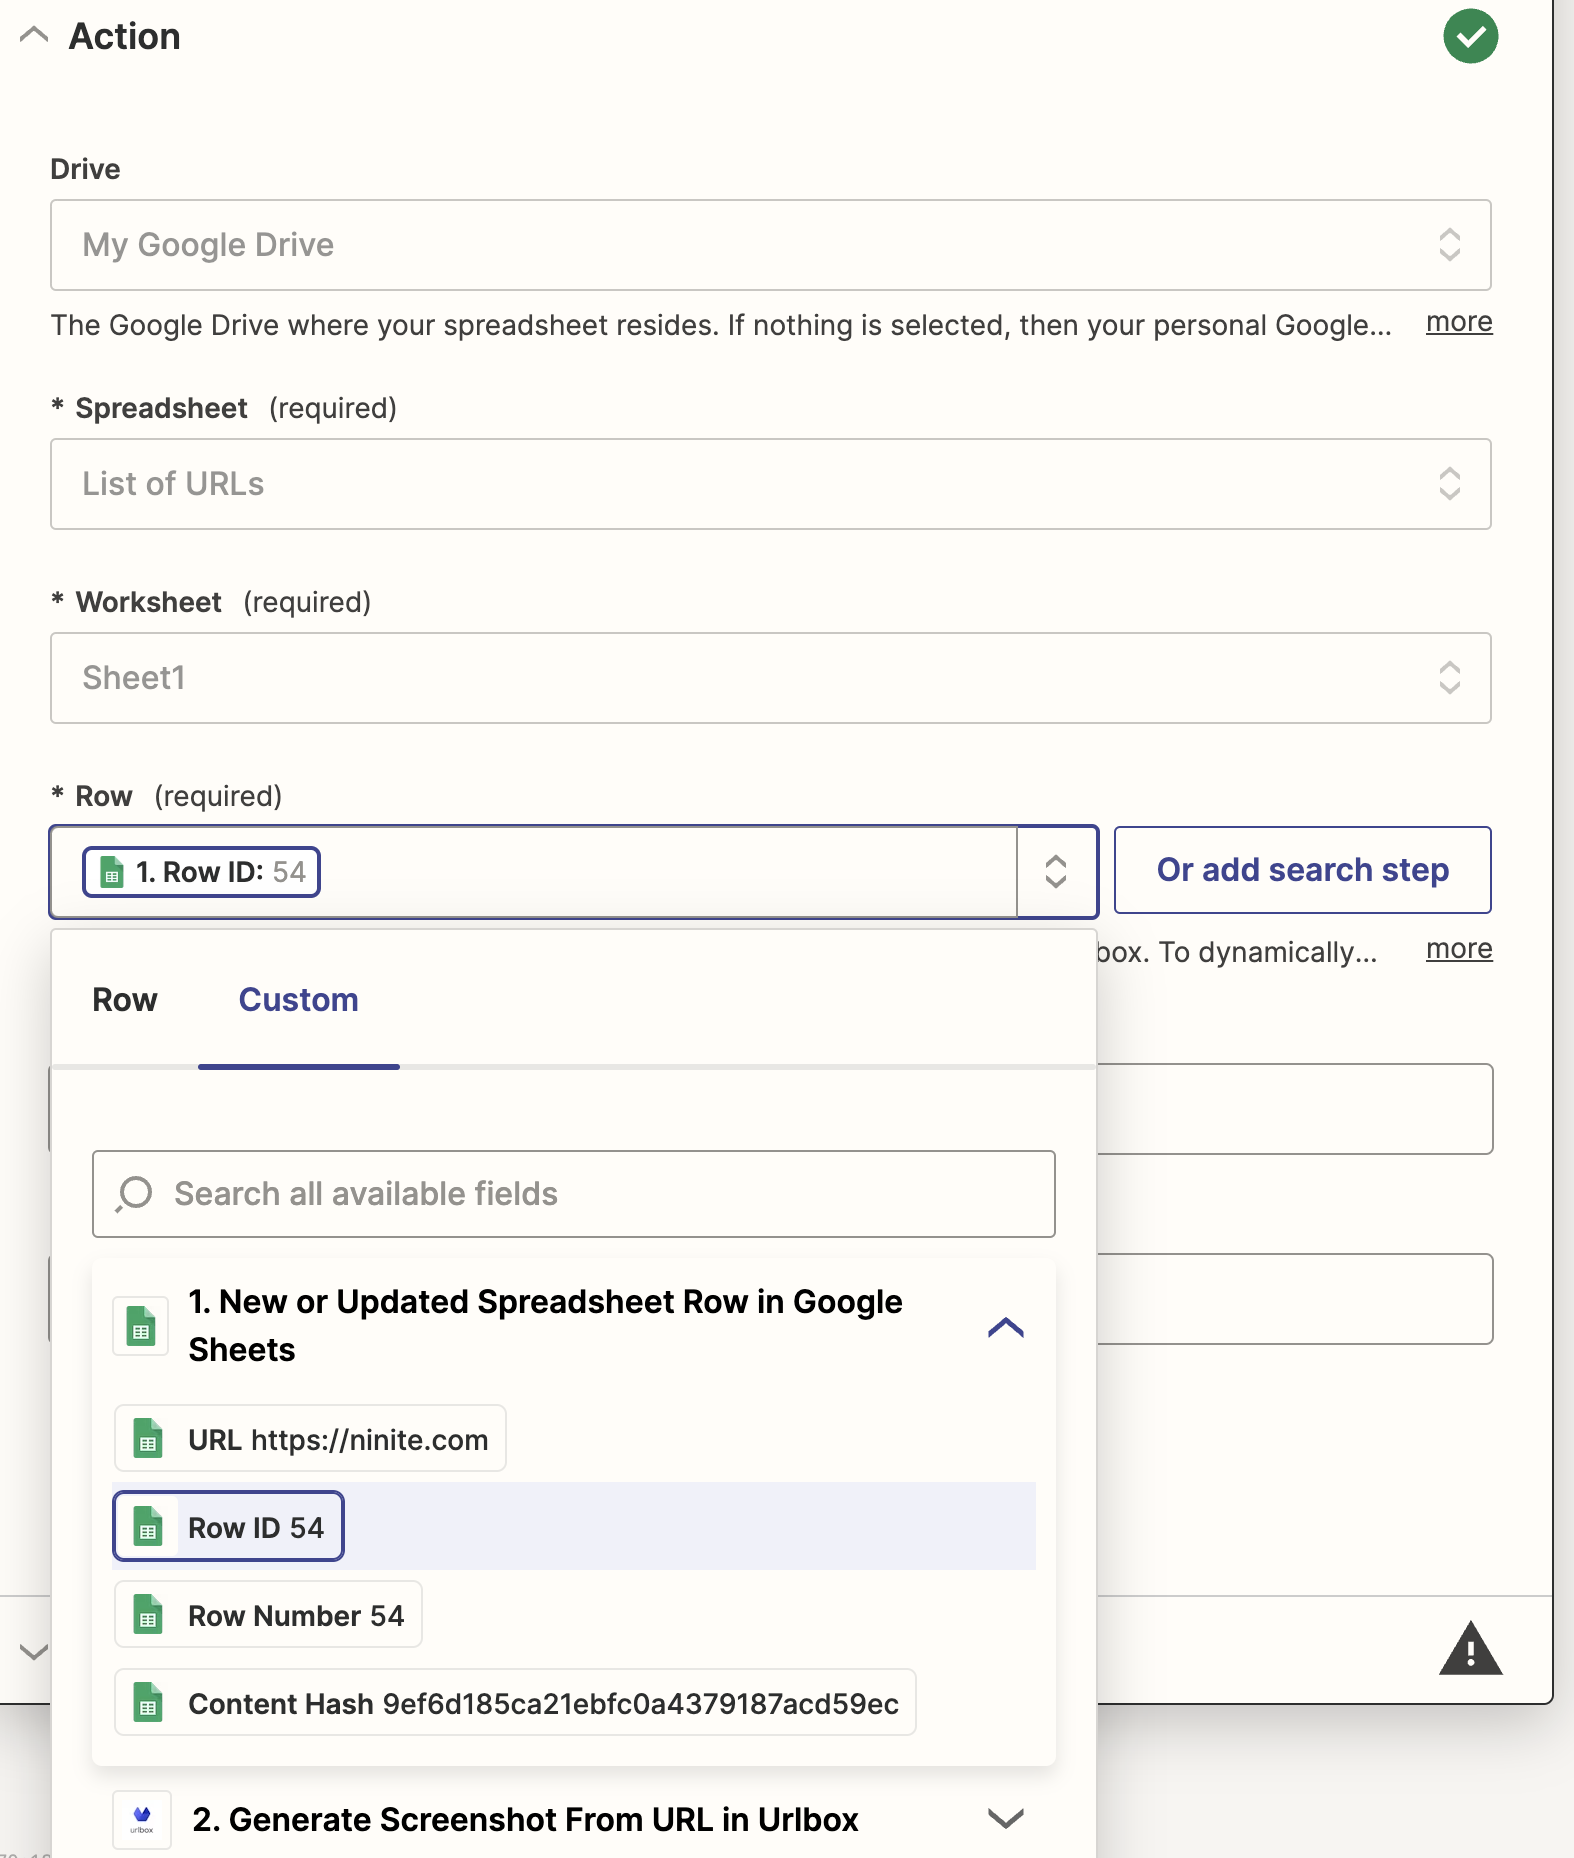
Note: The Row ID is a unique identifier for each row in the google sheet. This is how zapier knows which row to update. In more complicated cases, you might want to use zapiers lookup row function to add a lookup step to the zap, where you can ensure the correct row is looked up and updated based on some matching condition. This allows you to perform something like a Vlookup.
Now we should see more fields below corresponding to the column headings in the google sheet. For me this is "URL" and "Screenshot URL". We don't want to update the URL column, so leave that blank, but we do want to add the location of the screenshot into the Screenshot URL column, so lets update that field now.
To do this, we need to use the following URL format, in order to get a direct link to the image in Google Drive:
https://drive.google.com/uc?id=DRIVE_FILE_ID, so in the zapier dropdown, we first type: https://drive.google.com/uc?id=, and then we select the "ID" from the google drive action. It should look like this:
Click continue, and test action. If everything is working correctly, the Screenshot URL column of the corresponding row in your google sheet should update:
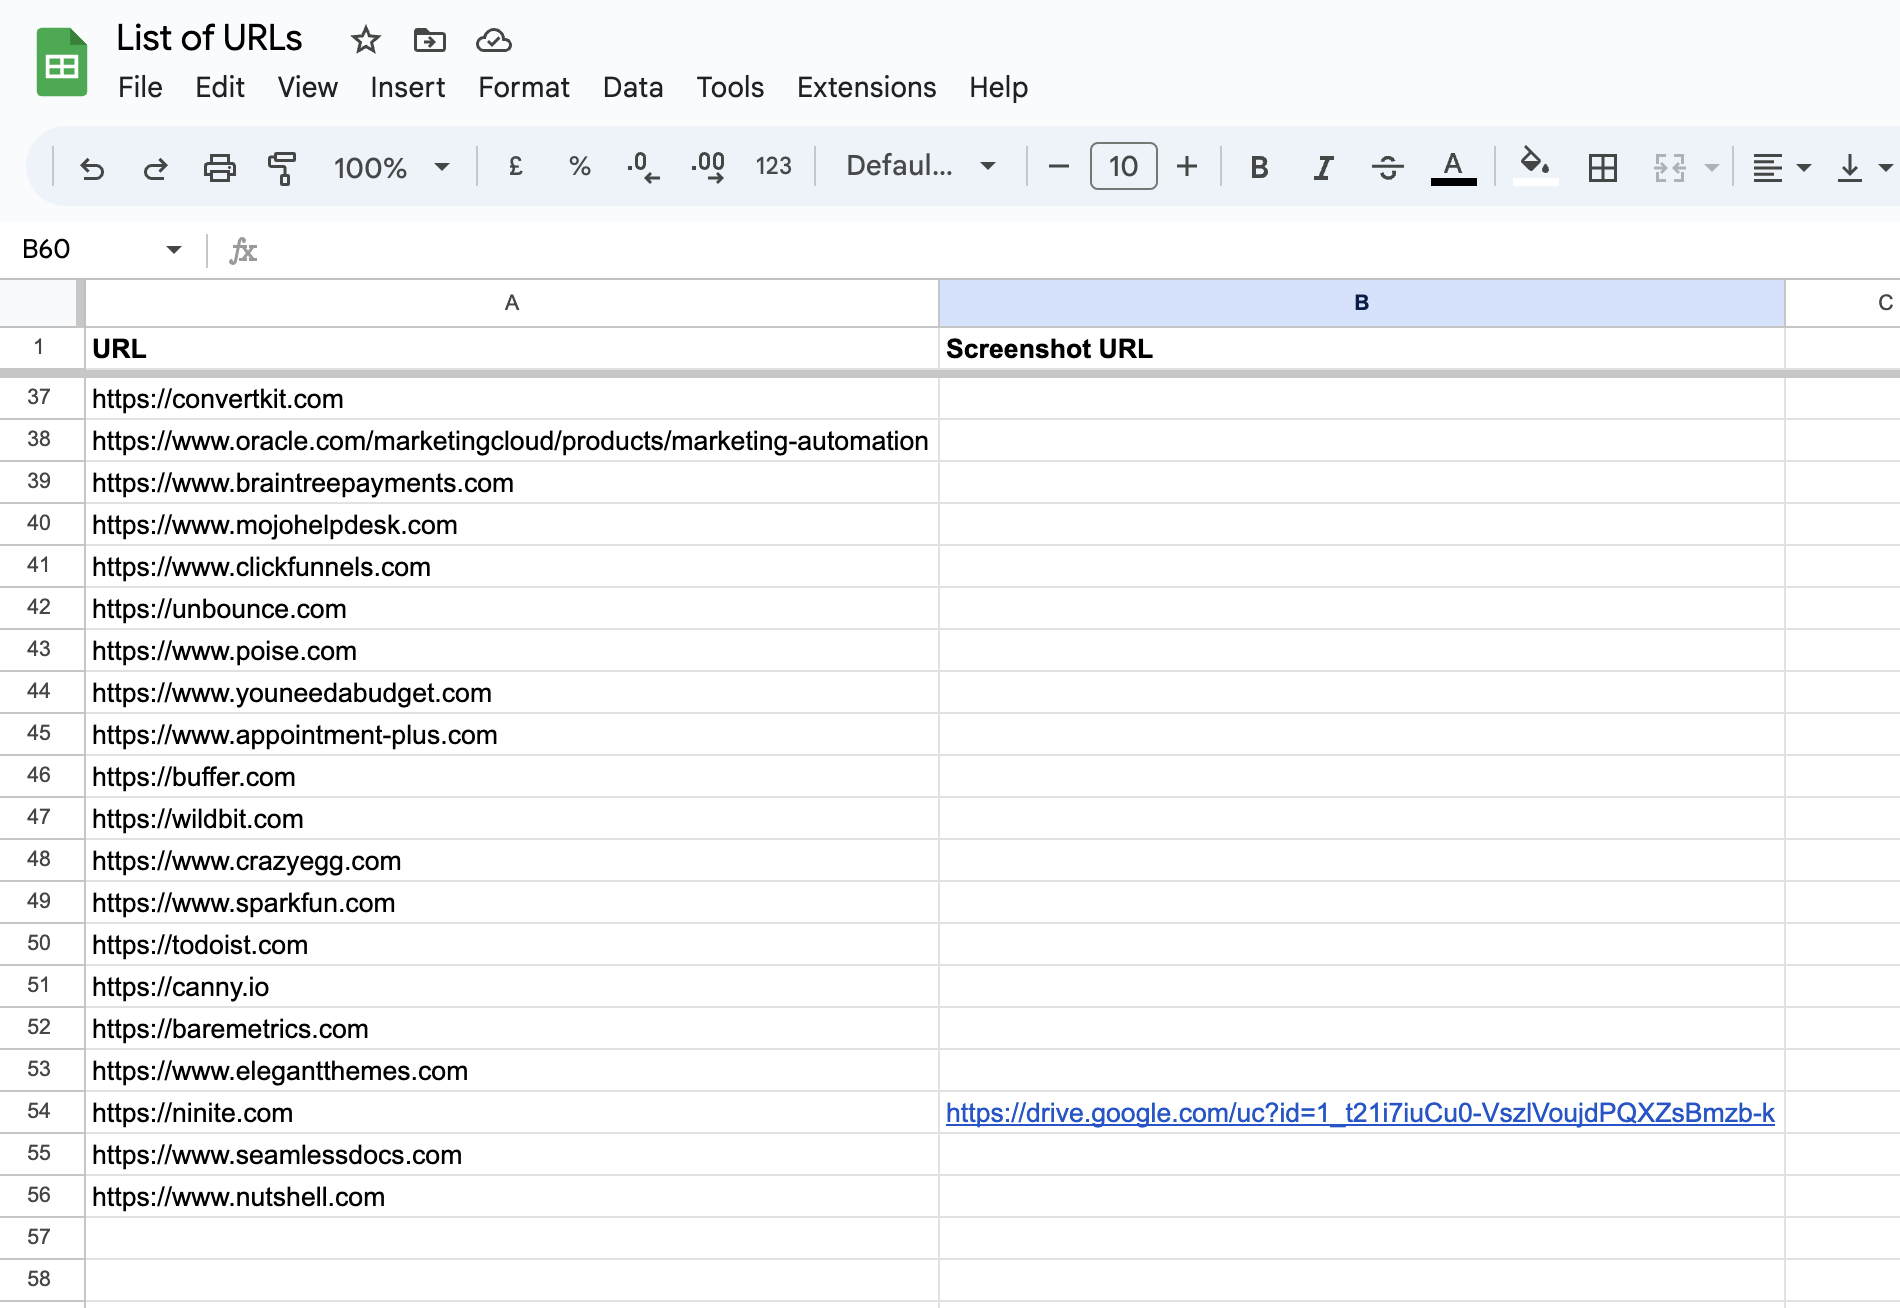
So this has setup the zap for our single test row. Now we want to make sure that this zap runs for every row in the google sheet.
Setting up the zap to run for every row in the google sheet
Click Publish and give your zap a name. I named it "Screenshot a list of URLs in Google Sheets".
Zapier will now publish your zap and turn it on, however nothing much will happen in your google sheet, because the zap will only trigger when either a NEW row is added to the sheet, OR a row is updated.
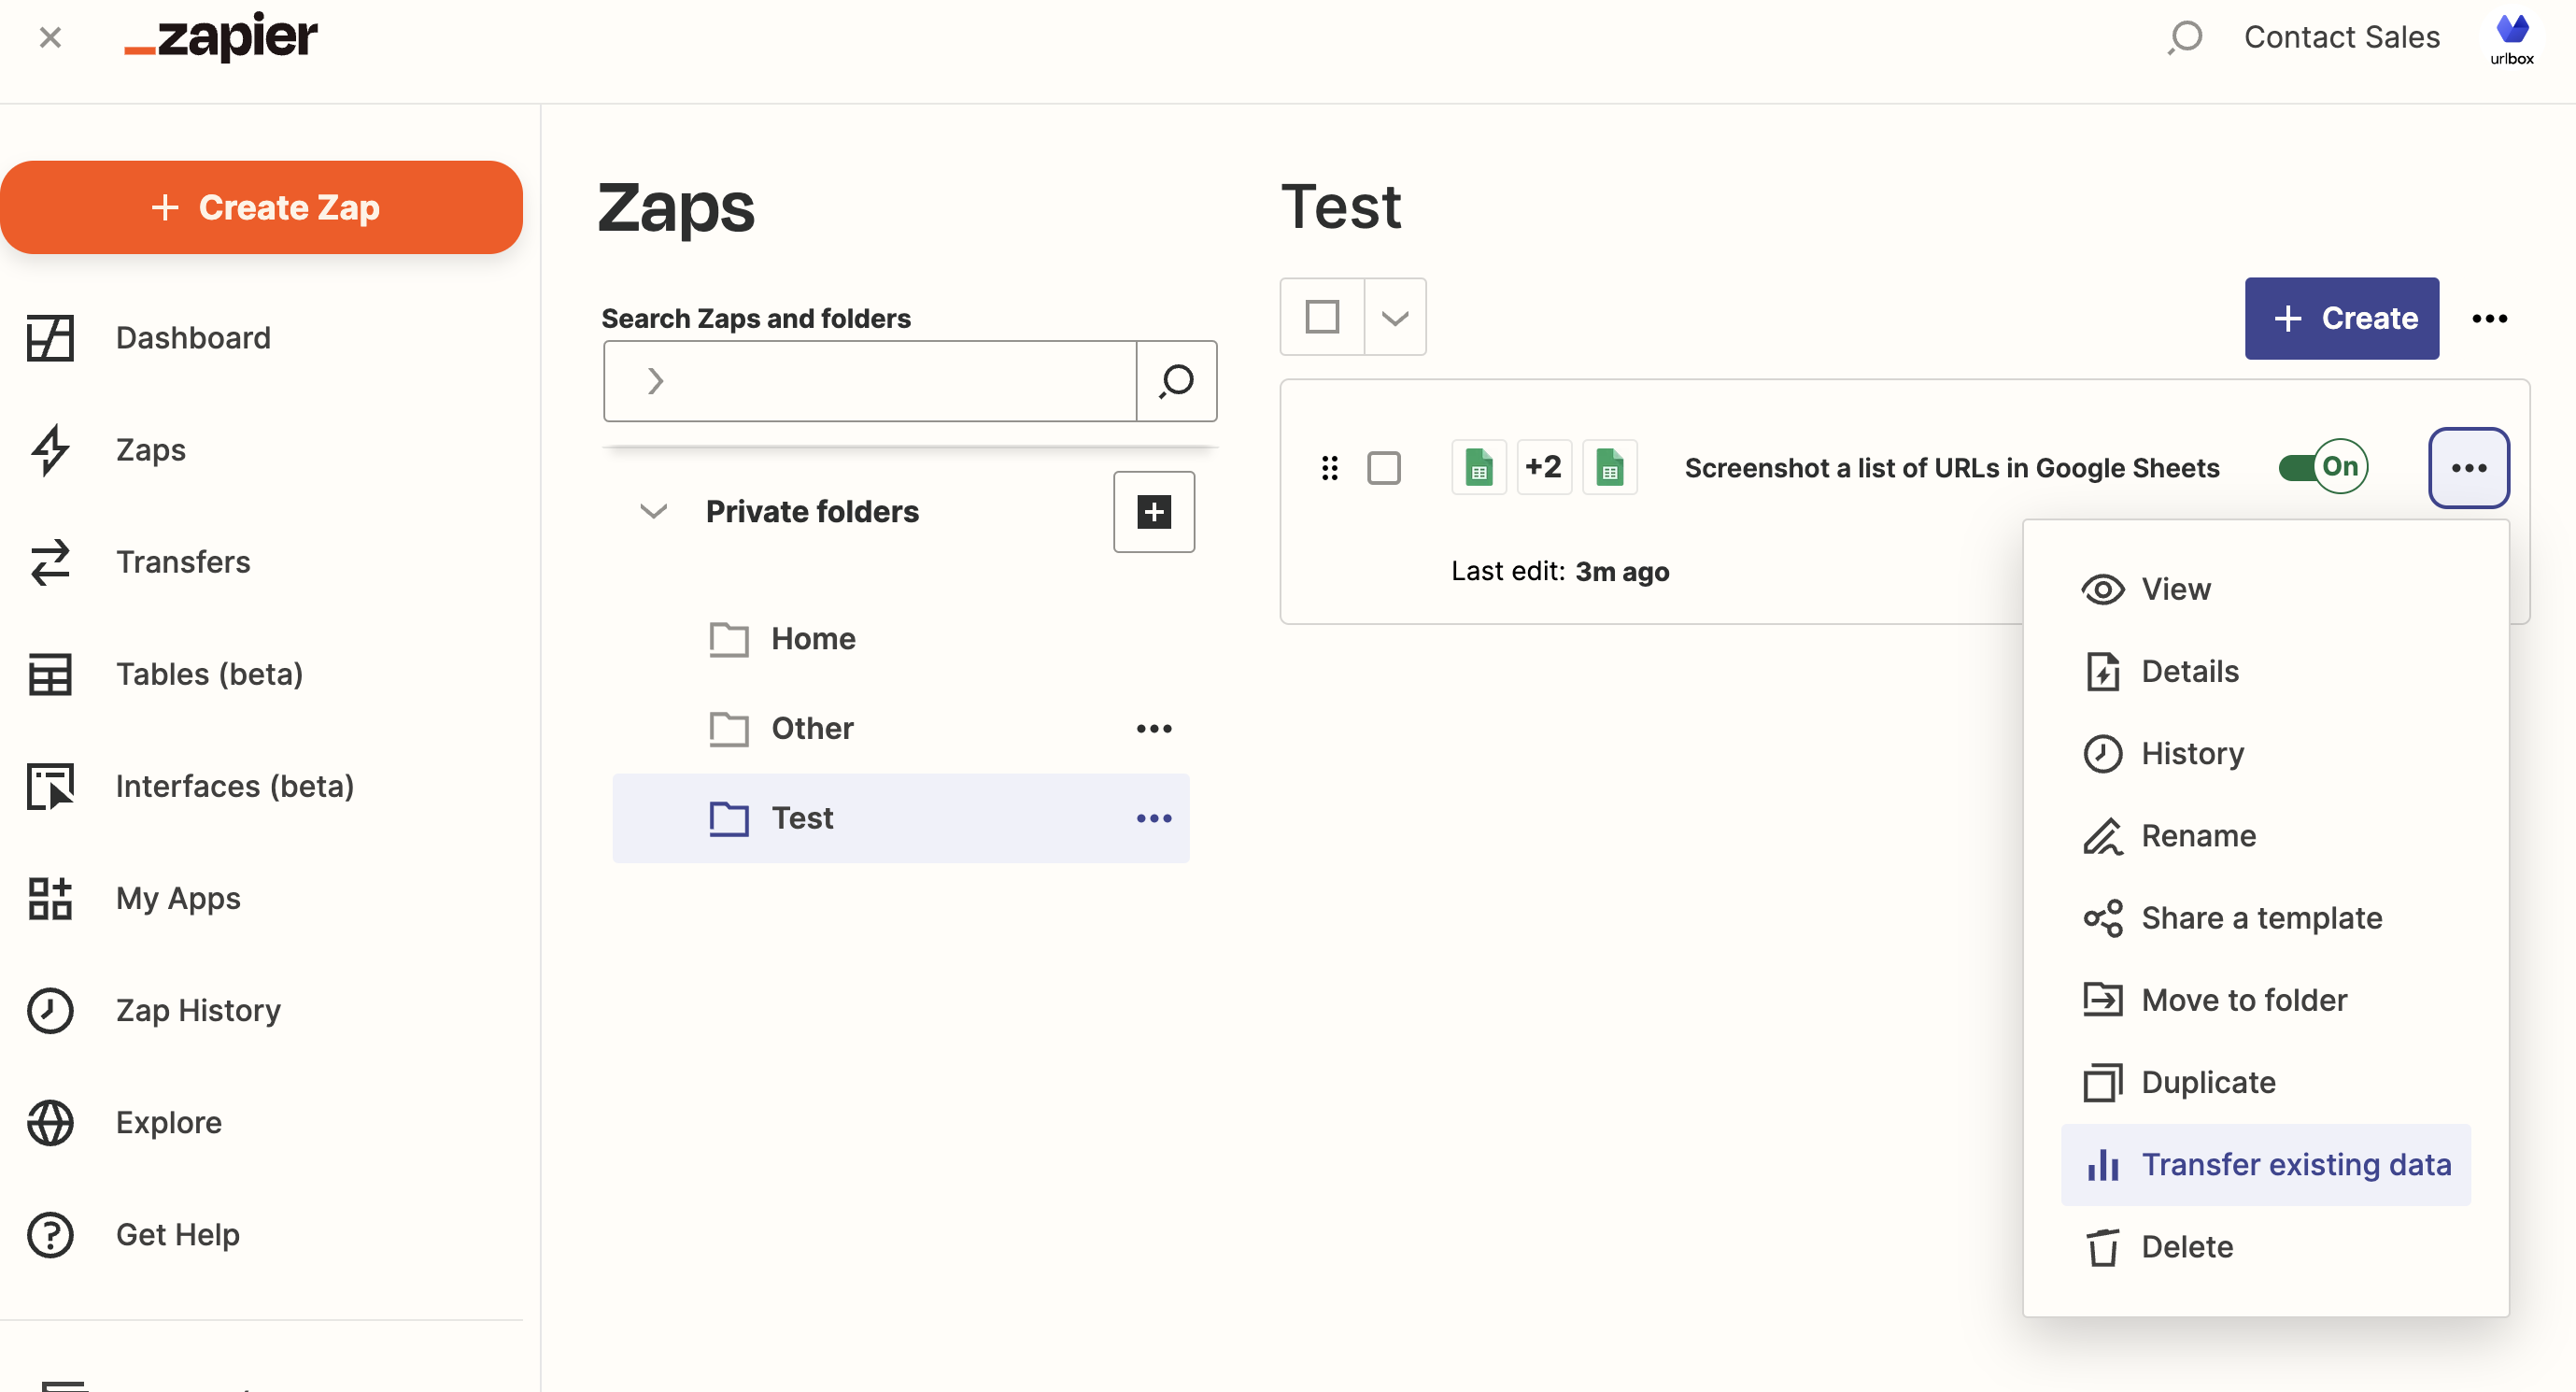
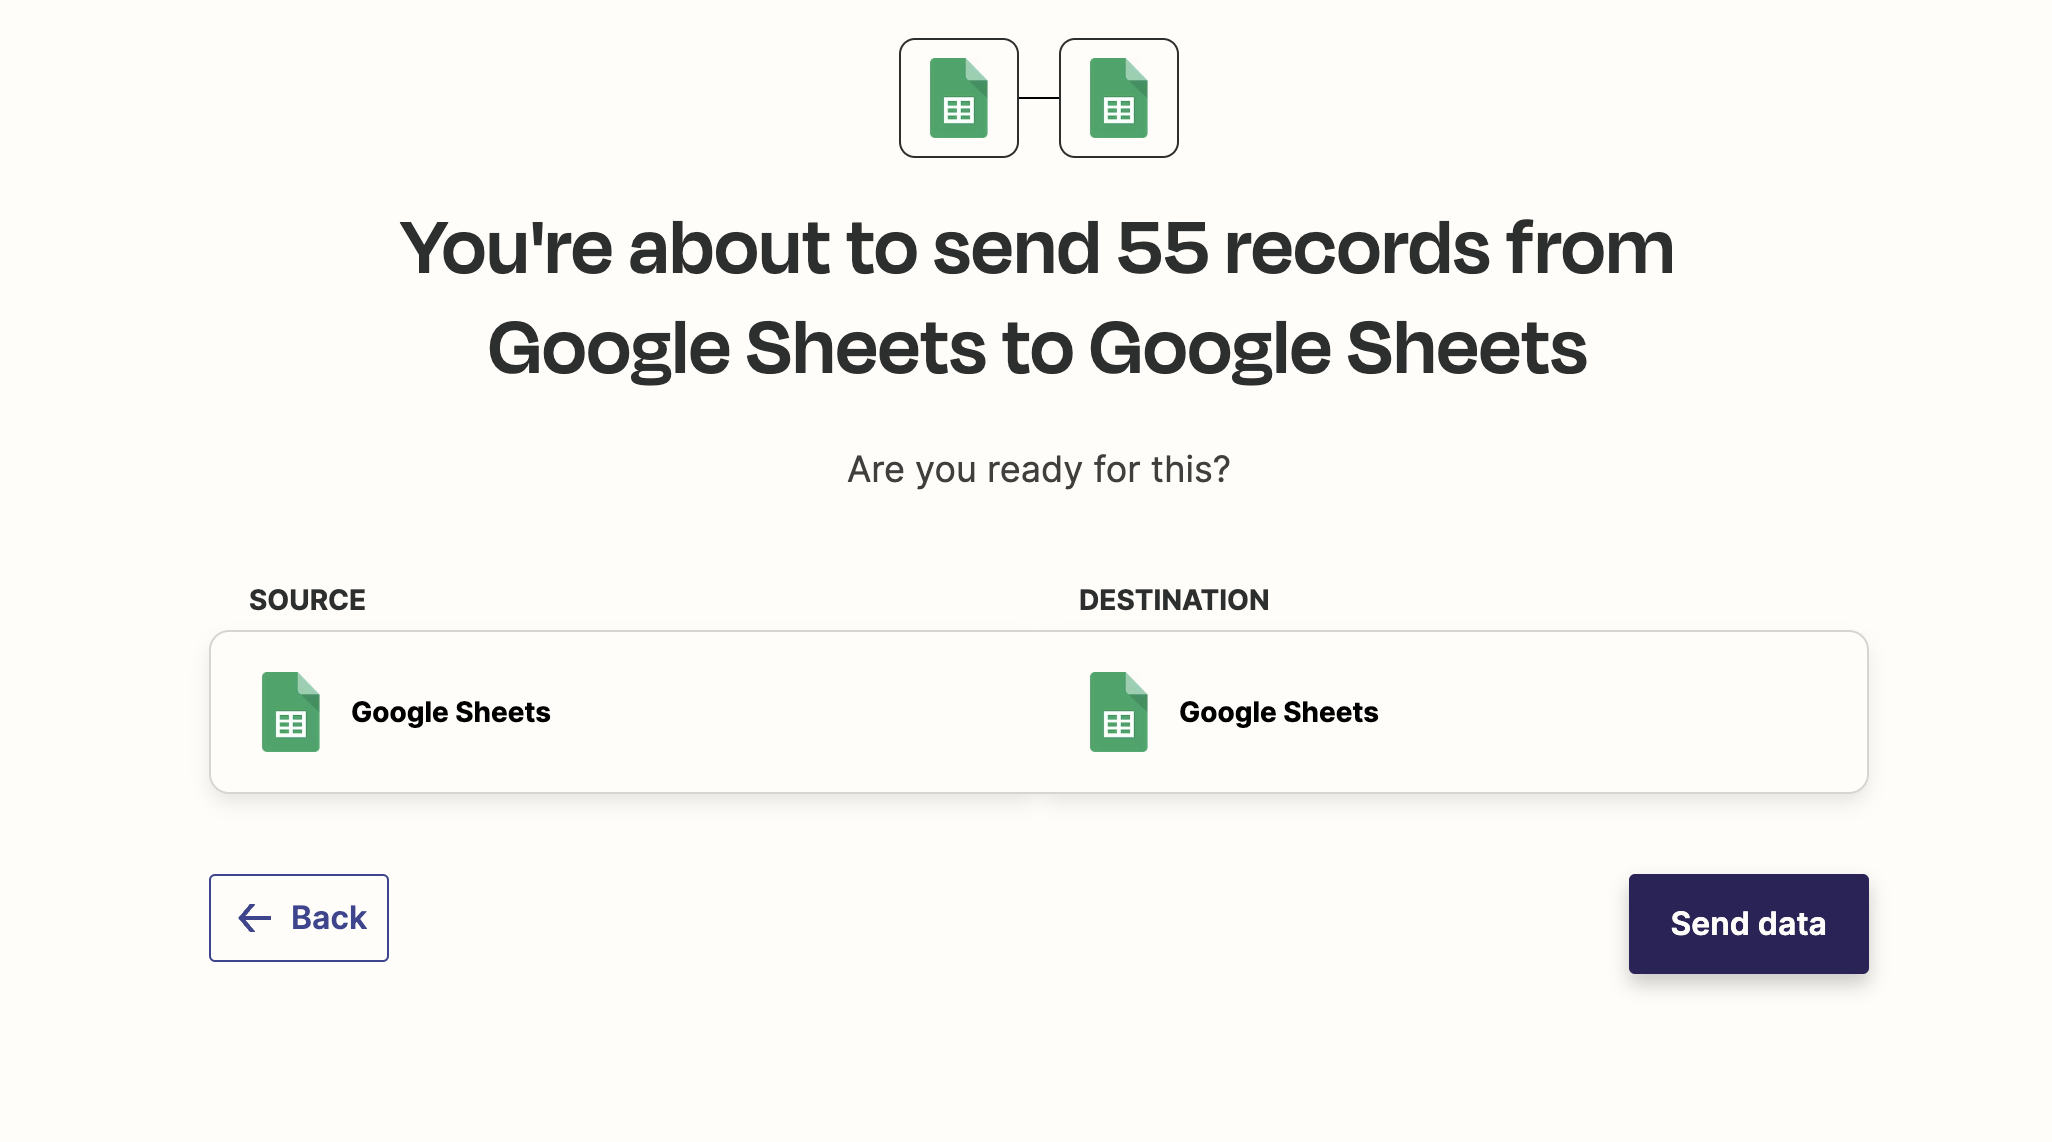
However, it is possible to run the zap for the existing URL's in your sheet. To do this, we go to the 'zaps' item in zapier, find our zap, and click on the 3 dots to open the dropdown. Then we choose "Transfer Existing Data" in order to trigger the zap on our existing data in the google sheet.
Now zapier will pull in all the rows from your google sheet. You can click "select all", to select all the rows to run the zap for. Then click next.
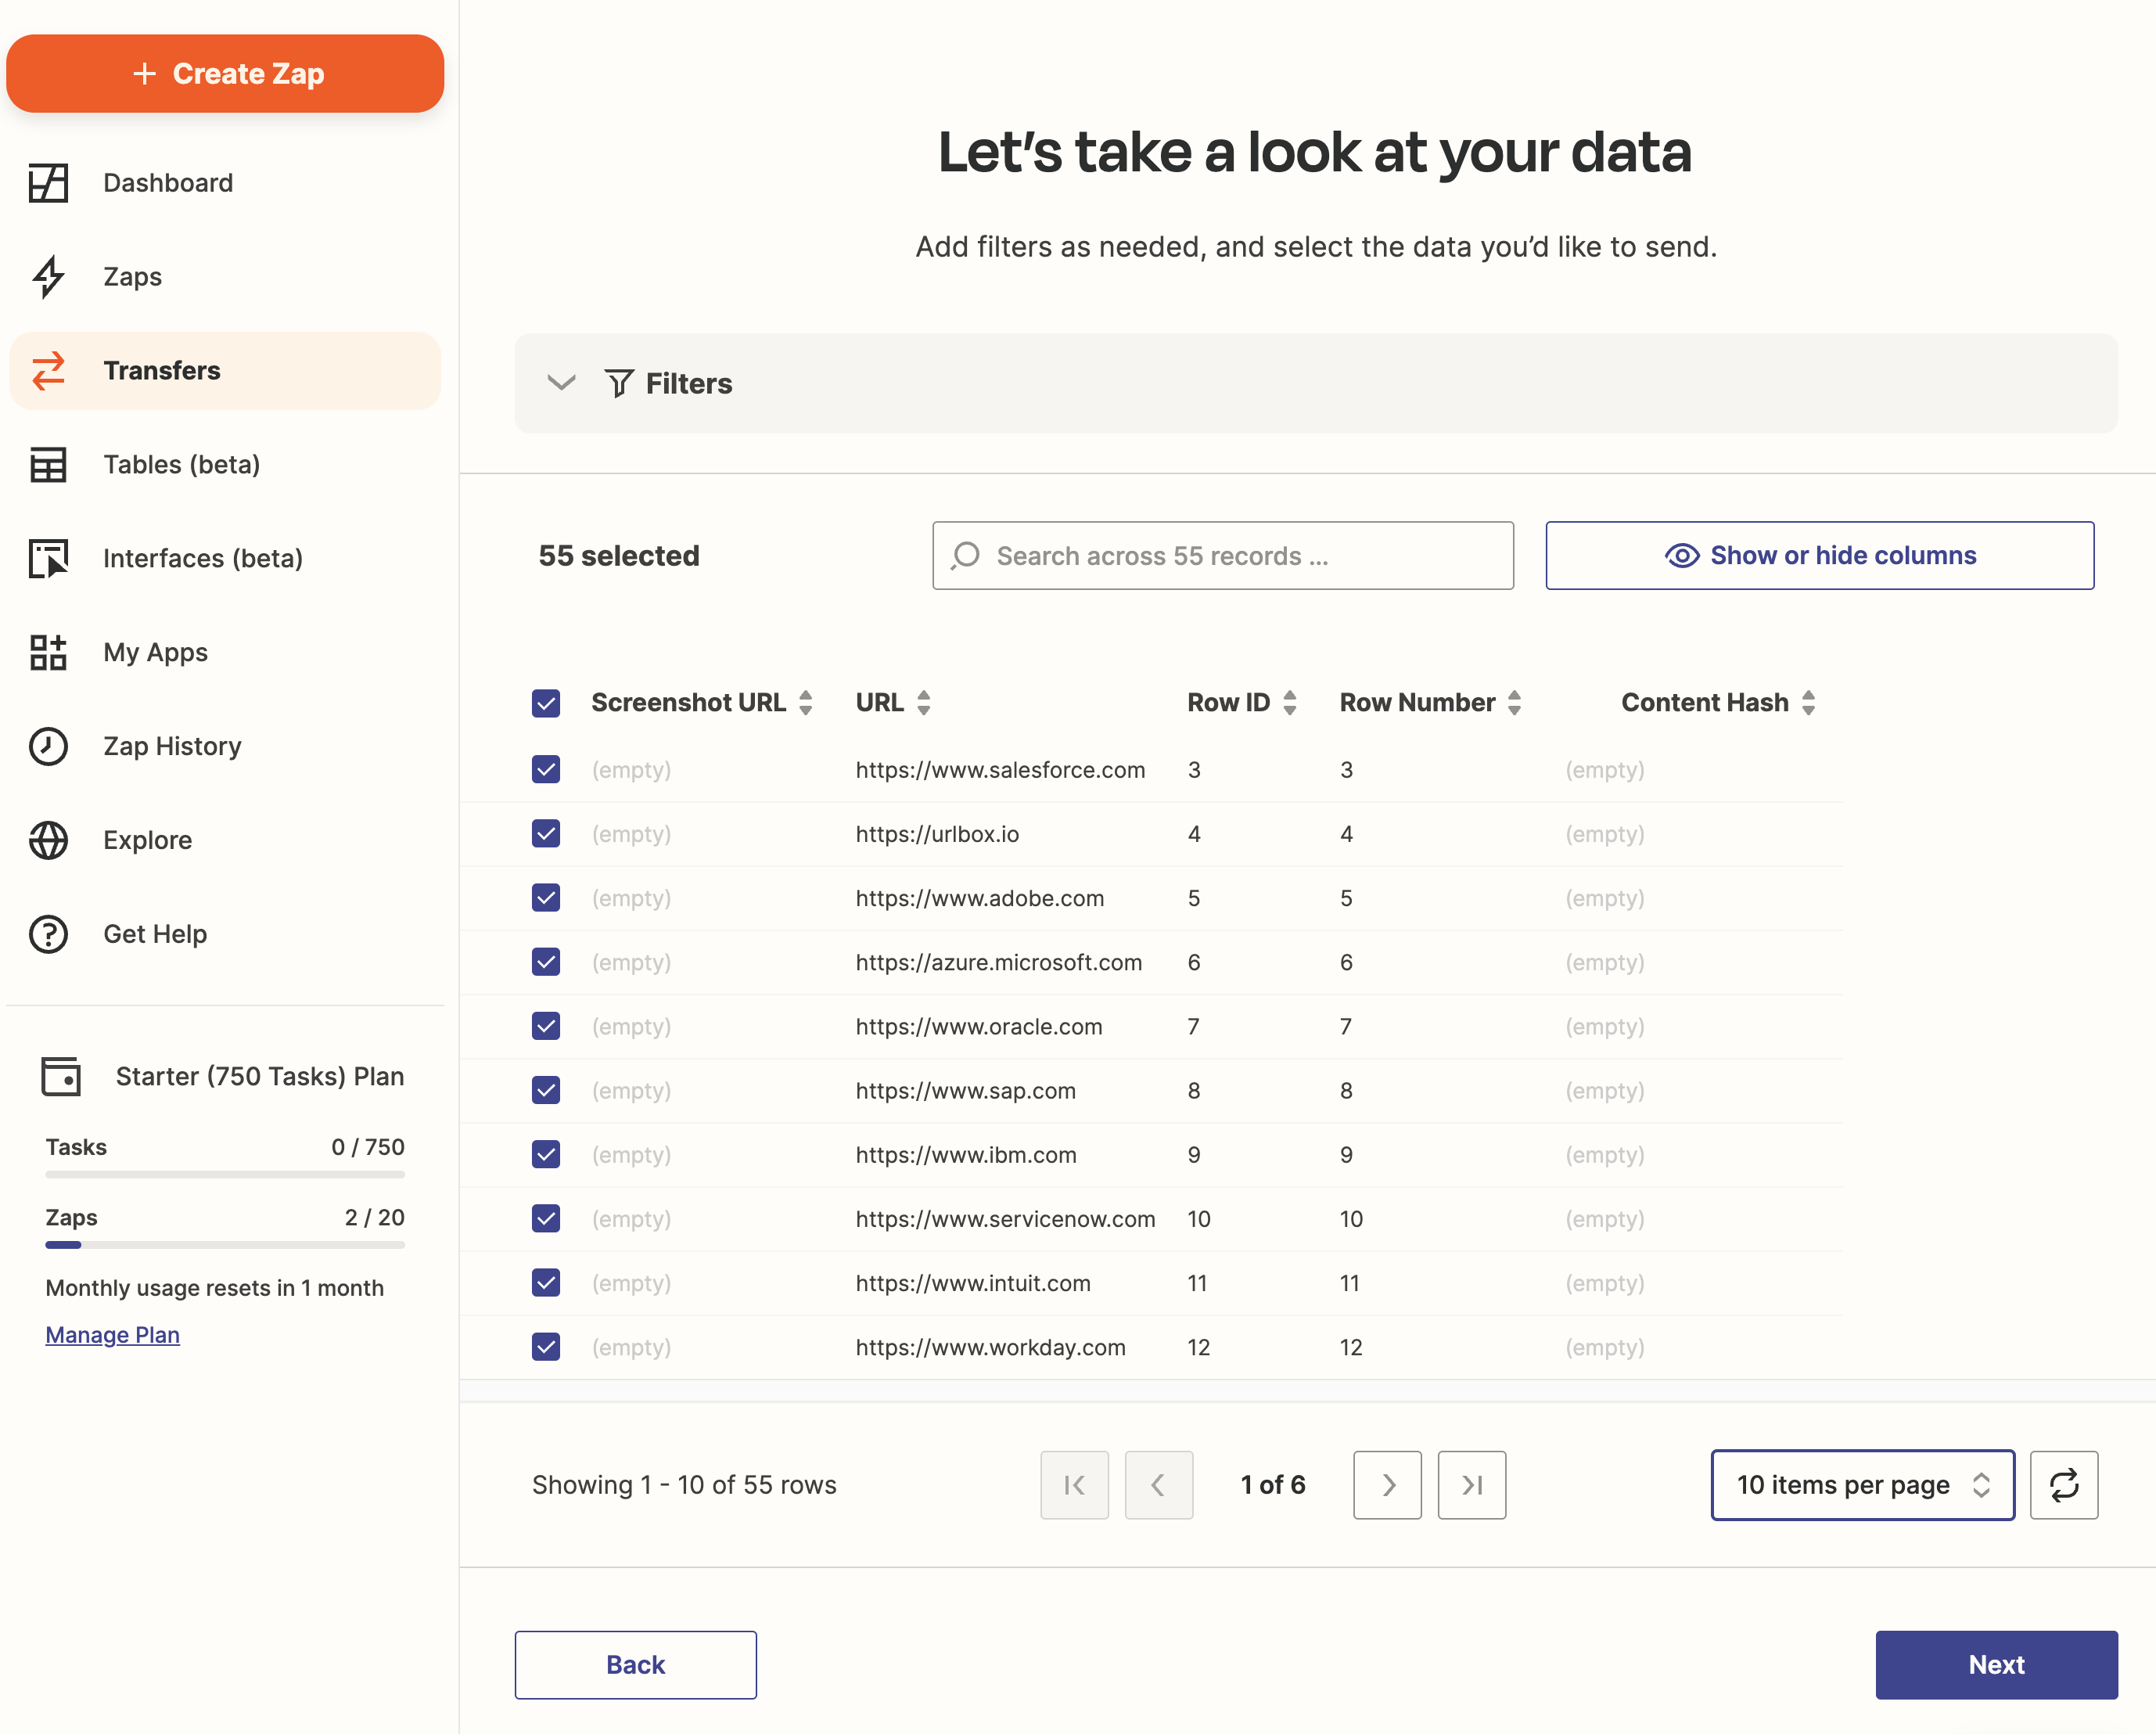
Zapier will then show 'you're about to send x records from Google Sheets to Google Sheets' and you can click Send Data to run the zap.
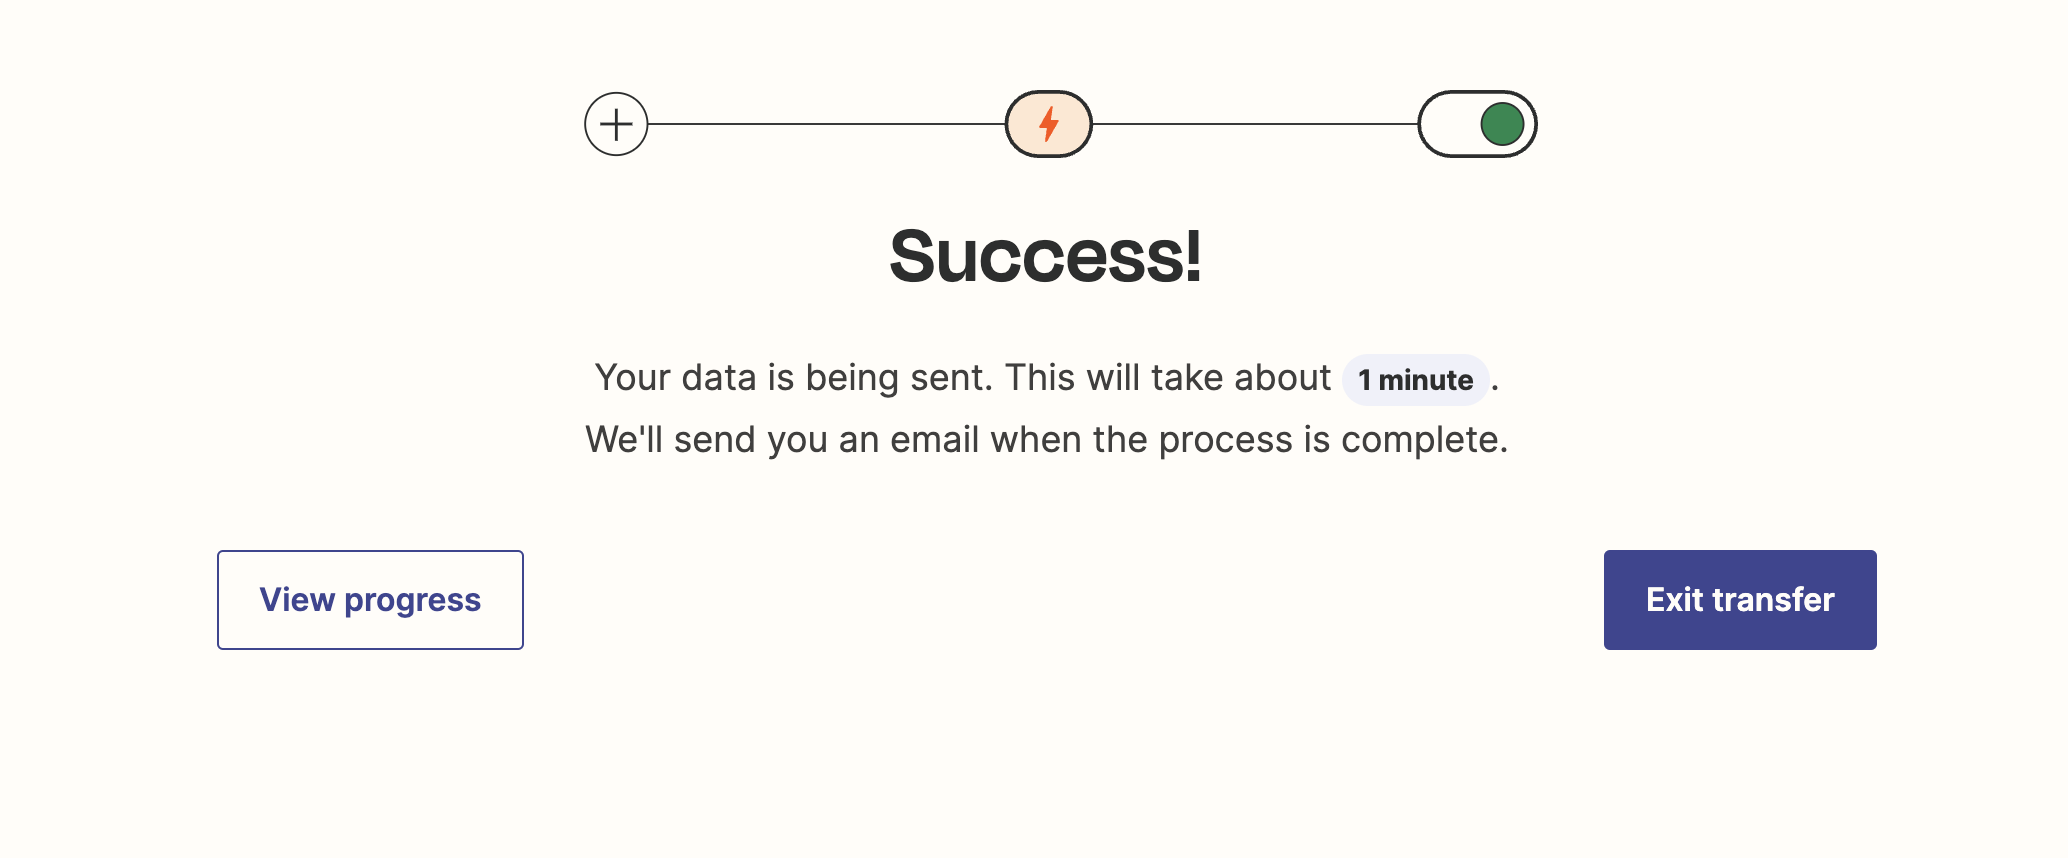
After a short while, your google sheet will have updated and you should see the screenshot URL's in the Screenshot URL column.
Now, if you want to also show a preview of the screenshot, right inside your google sheet, you can create a new column and label it "Image", then use the following formula in the cell next to the screenshot URL:
=IMAGE("B2")
where B is the column name of your "Screenshot URL" column. Now copy the formula down the column, and you'll see a little preview of the screenshot:
Adding or updating a new URL to the google sheet
Now that the zap is setup, you can add new URL's to the google sheet, and the zap will automatically run and capture a screenshot of the new URL, and update the google sheet with the screenshot URL.
Note: Although the zap says it is 'instant', according to Zapier, the zap usually takes up to three minutes to run after your sheet has been updated, so if you don't see the screenshot URL in your sheet straight away, don't worry, it should appear after a few minutes.
It usually works best when you append new rows to the bottom of the sheet, instead of inserting them in the middle of the sheet.
If you're experiencing any problems getting your zap to run, this helpful article from Zapier lists some common problems and how to overcome them, when working with Google Sheets.
Conclusion
In this guide, we showed you how to use zapier to loop through a list of URLs stored in google sheets, capture a screenshot of each URL, upload it to Google Drive, and then update the google sheet with the URL of the screenshot file in Google Drive.
If you run into any issues with setting up zapier, please contact us using the chat widget on our website, and we'll be happy to help.
