
Ever wanted to check a website every hour, day, week or month? Using Urlbox screenshot API with our new Zapier integration, you can automate website screenshots and schedule them hourly, daily, weekly or to be taken at a specific time.
This article will take you through the necessary steps to get started automating screenshots with Urlbox and Zapier.
In this example we will schedule hourly screenshots of bbc.com and push them to a Google Drive folder.
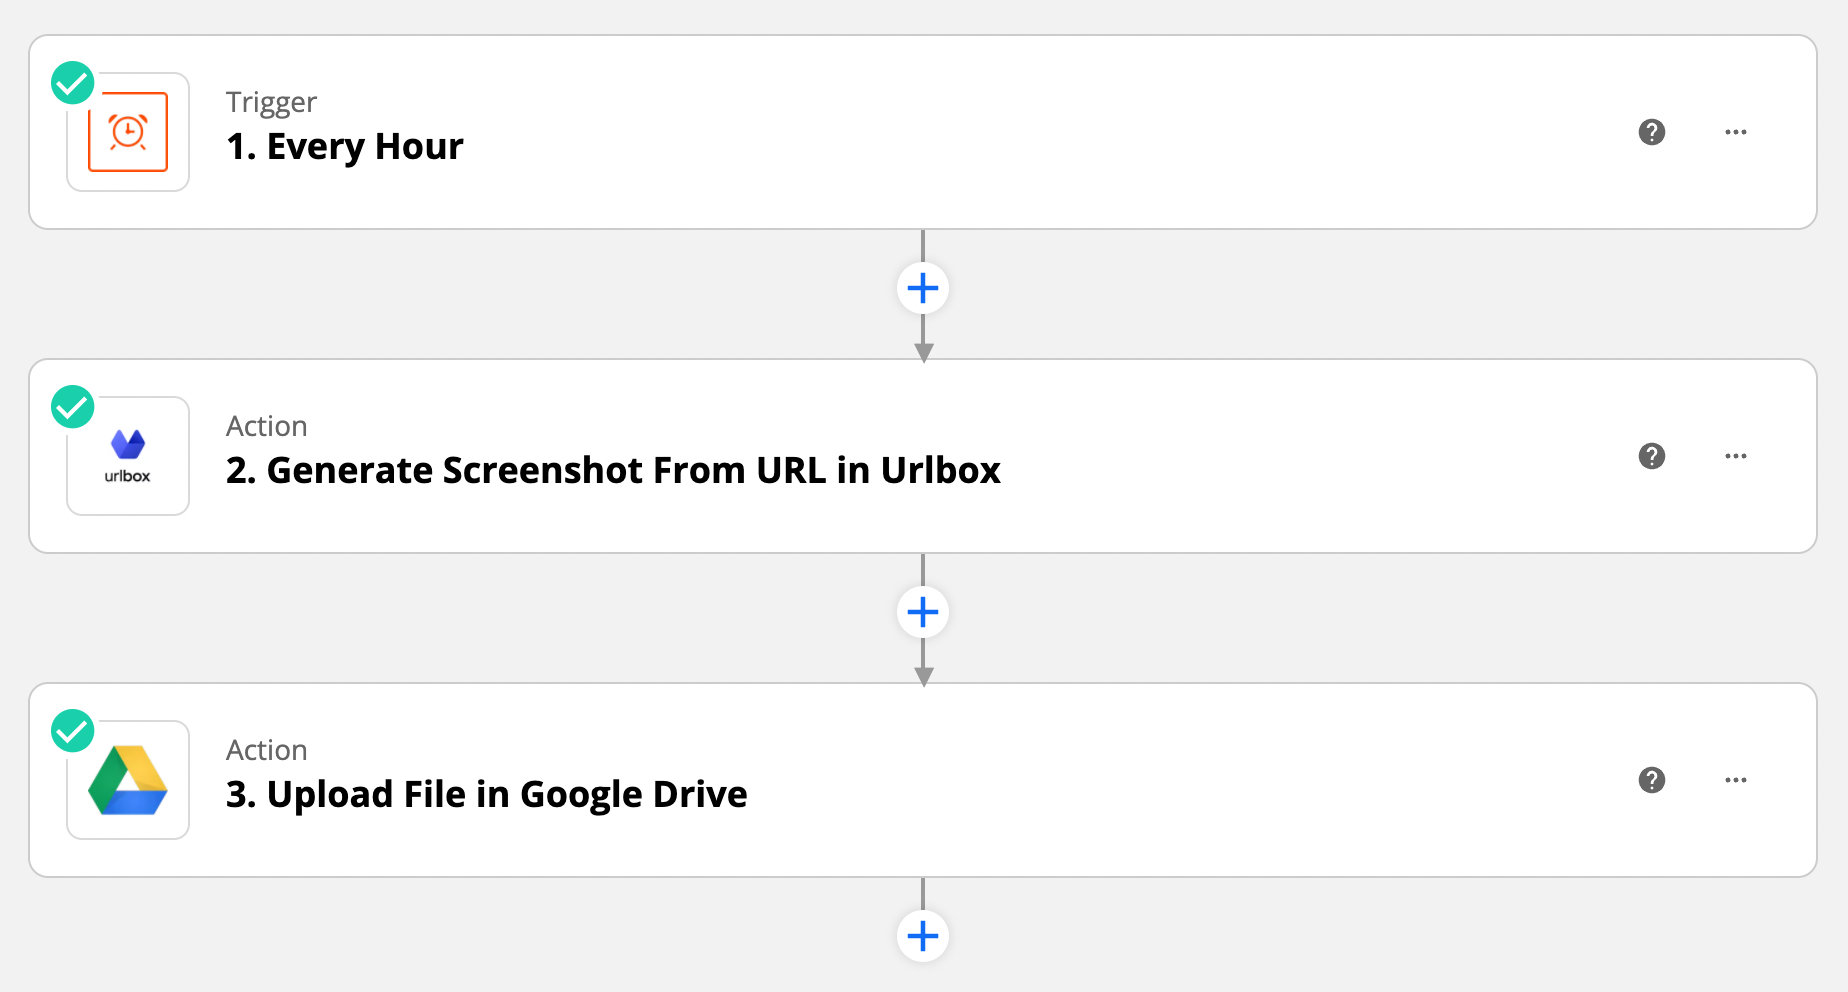
Table of Contents
Why schedule screenshots?
Perhaps you want to track the price of a certain product over time, or the performance of some stock, or you want to check the google SERP results for some keywords periodically.
Maybe taking a screenshot of your competitors website each week may give some insights into what direction they are taking.
Another typical use-case of scheduling website screenshots is for archival purposes. For example, you might want to take a screenshot of a website every hour, every day, every week, or every month.
What is Zapier? Zapier is a platform that allows you to connect API's such as Urlbox's website screenshot API with 1000's of other platforms and API's to create powerful automations and workflows. You do this by creating Zap's which we will see an example of below.
How to schedule screenshots?
The easiest way to schedule website screenshots is to use a website screenshot API like urlbox.
Using the Urlbox Zapier integration, alongside Zapier's schedule zap, you can schedule screenshots to be taken hourly, daily, weekly and at specific times.
Apart from scheduling, Zapier also allows you to make screenshot requests from other triggers. For example, when a new blog post is published to a CMS, you could trigger a new screenshot request. Or when a new row is added to a spreadsheet in Google Sheets or Airtable.
Prerequisites
In order to follow the rest of the article, you'll need:
- A Urlbox account, for taking the screenshots
- A Zapier account, for scheduling the screenshots
- Optionally, a Google account to upload the scheduled screenshots to a Google Drive folder
- You can also push the screenshots to a Dropbox, Amazon S3 or any other cloud storage account that integrates with Zapier.
Getting started with scheduled screenshots
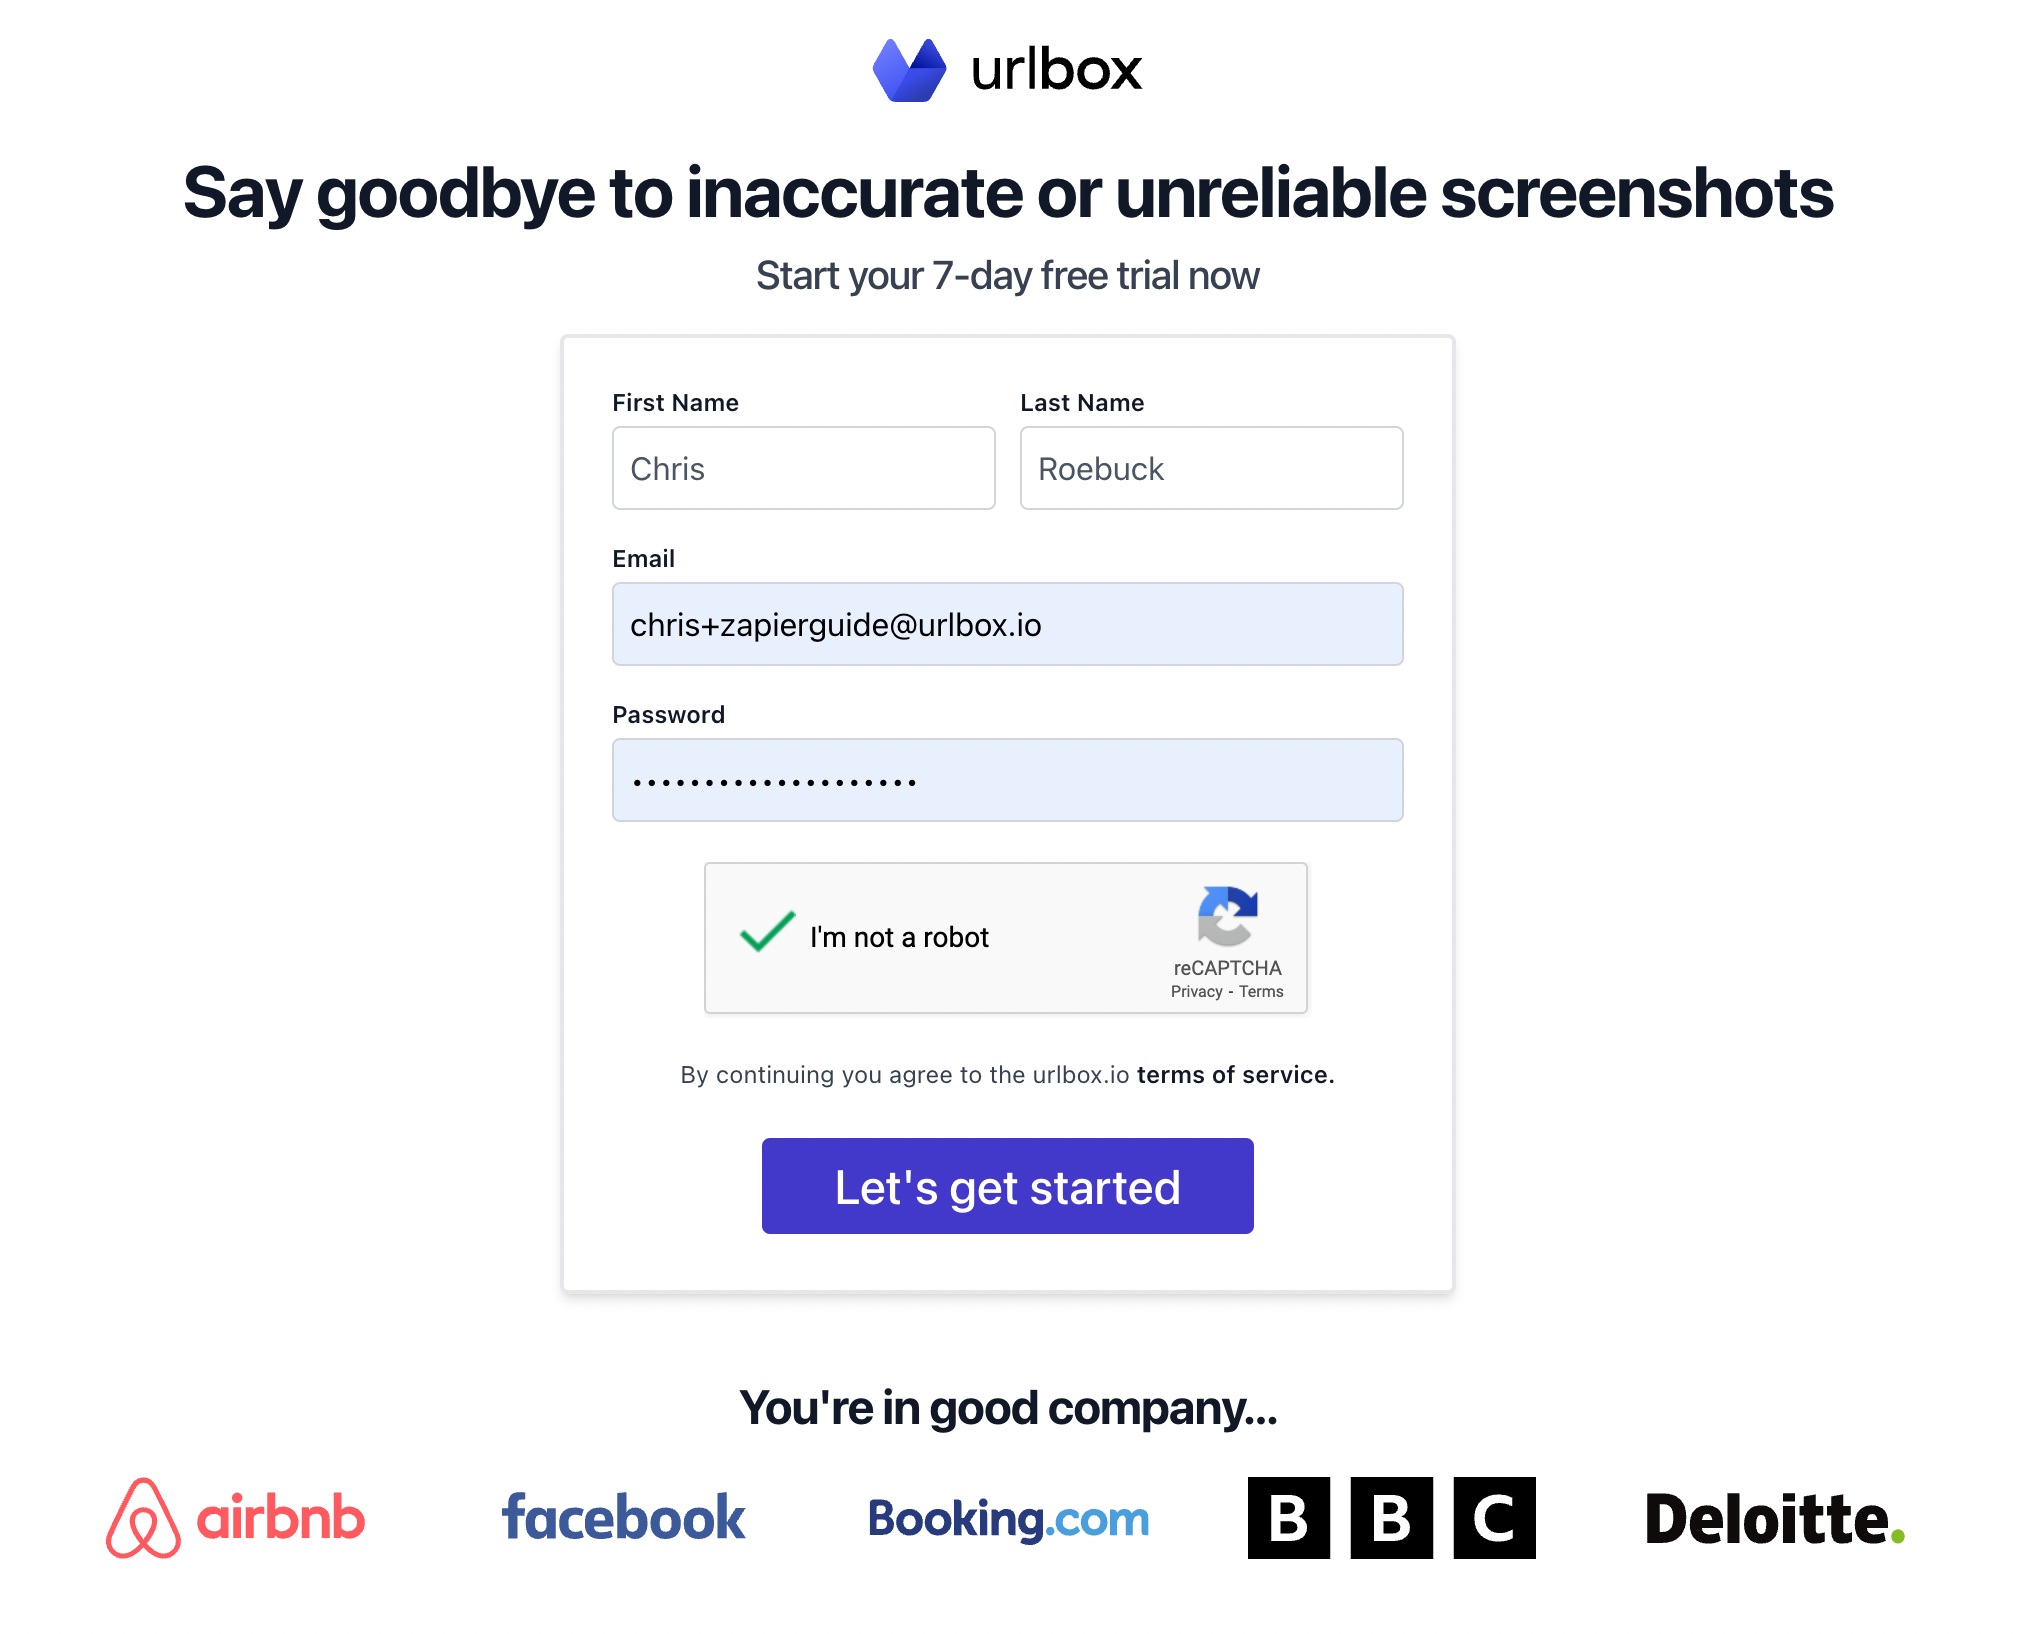
To get started, first sign up to Urlbox and create an account. Plans start at $19/month and include 2,000 successful screenshots and Zapier integration.
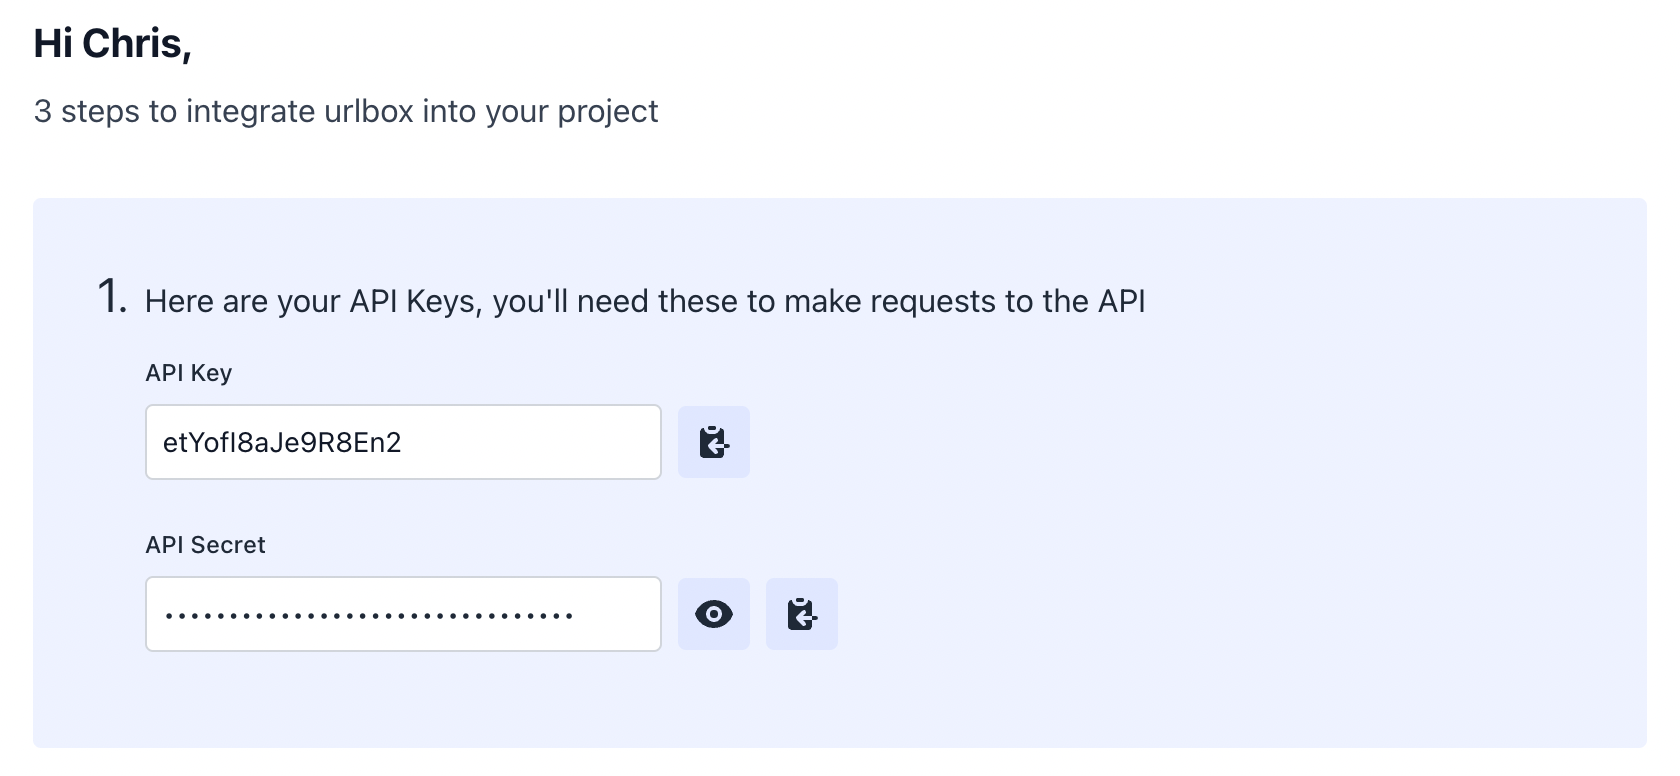
Once you have signed up with Urlbox, you should take a note of your API key and API secret:
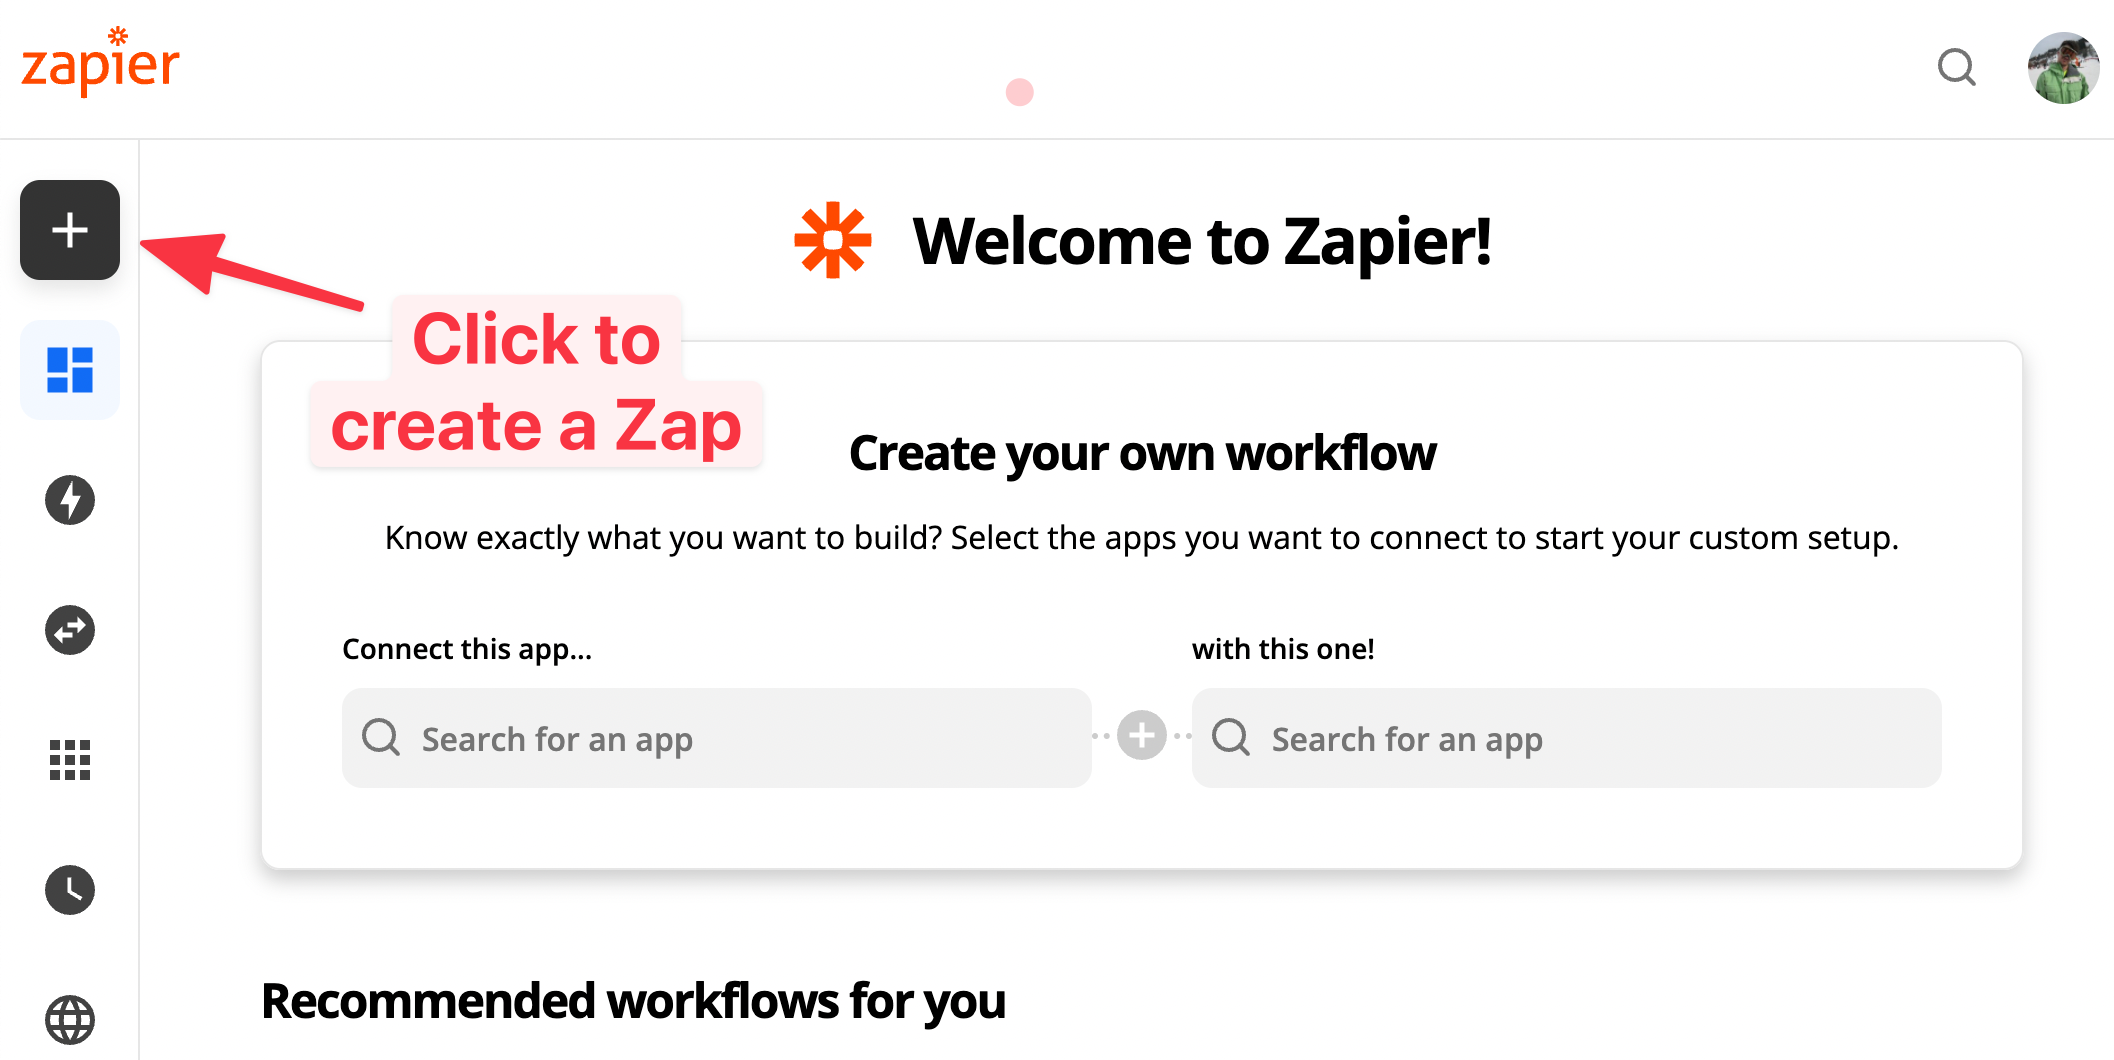
Then, signup or login to your Zapier account, and once on the Zapier dashboard, click the big plus icon to create a zap.
Create a scheduled screenshot zap
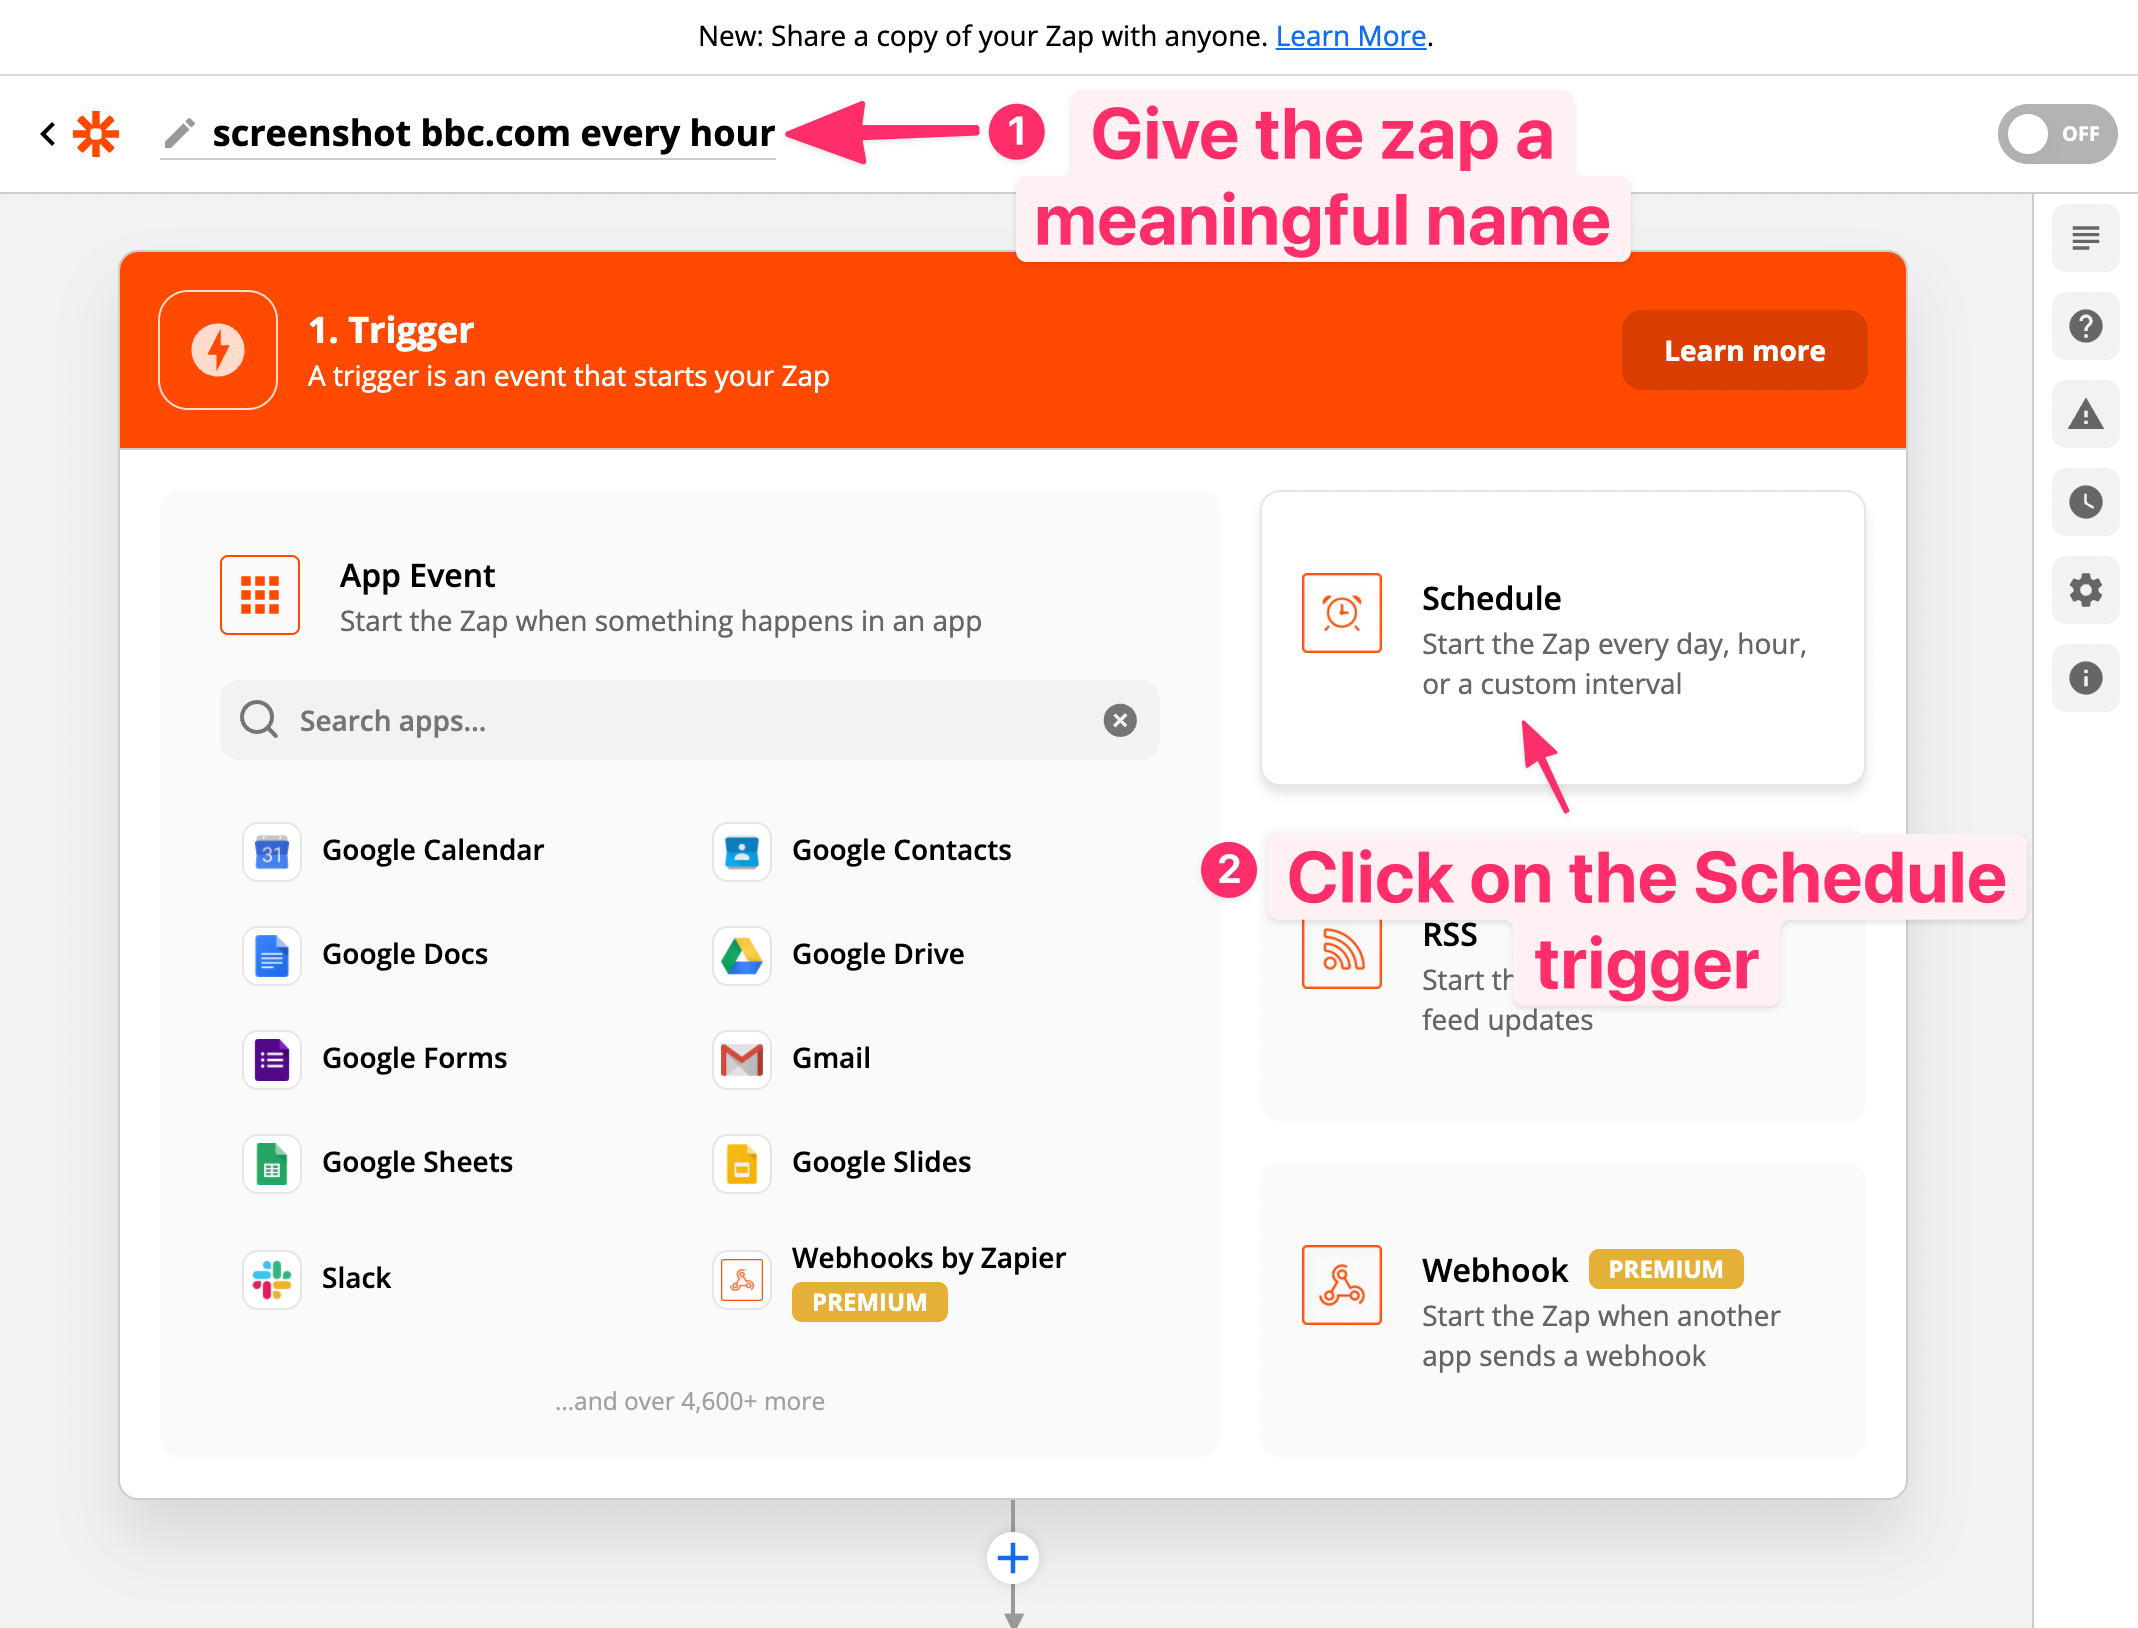
Great, now we should see the zap editor open. First of all let's name our zap, let's go with something like 'Screenshot bbc.com every hour'.
Every zap needs a 'trigger', something which will initiate the zap and cause it to run. For this, we'll use the zapier built-in 'schedule' trigger:
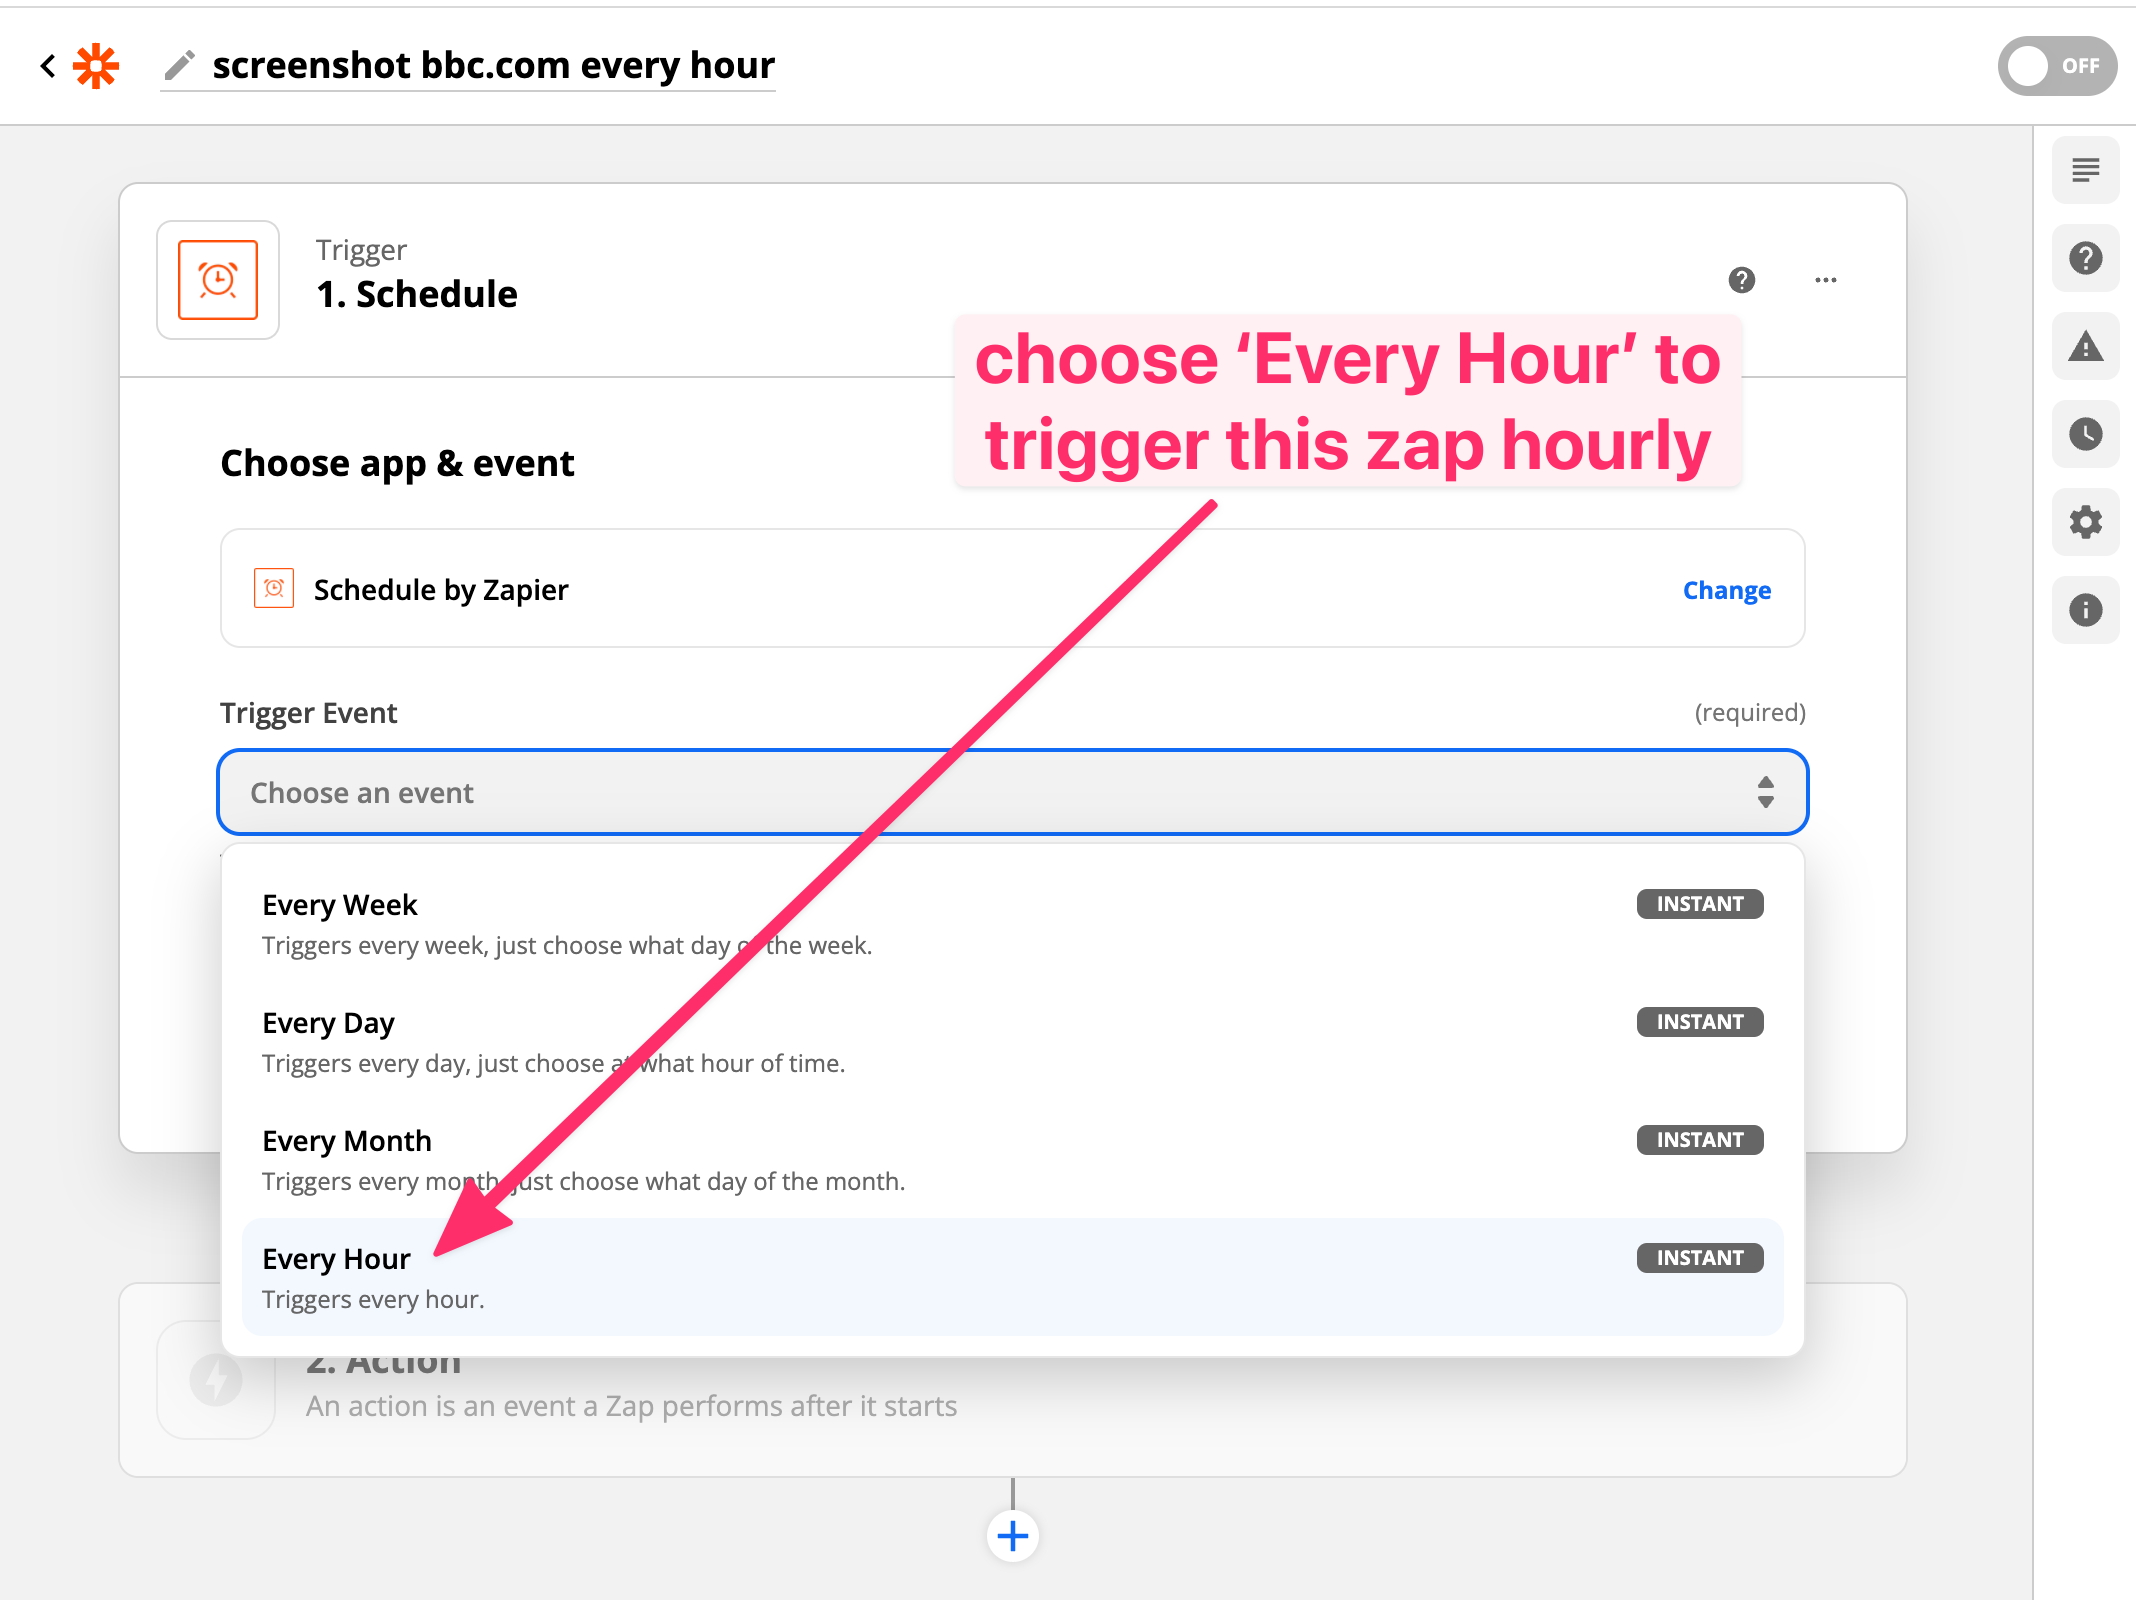
Now in the trigger options, select 'Every Hour' from the Trigger Event dropdown:
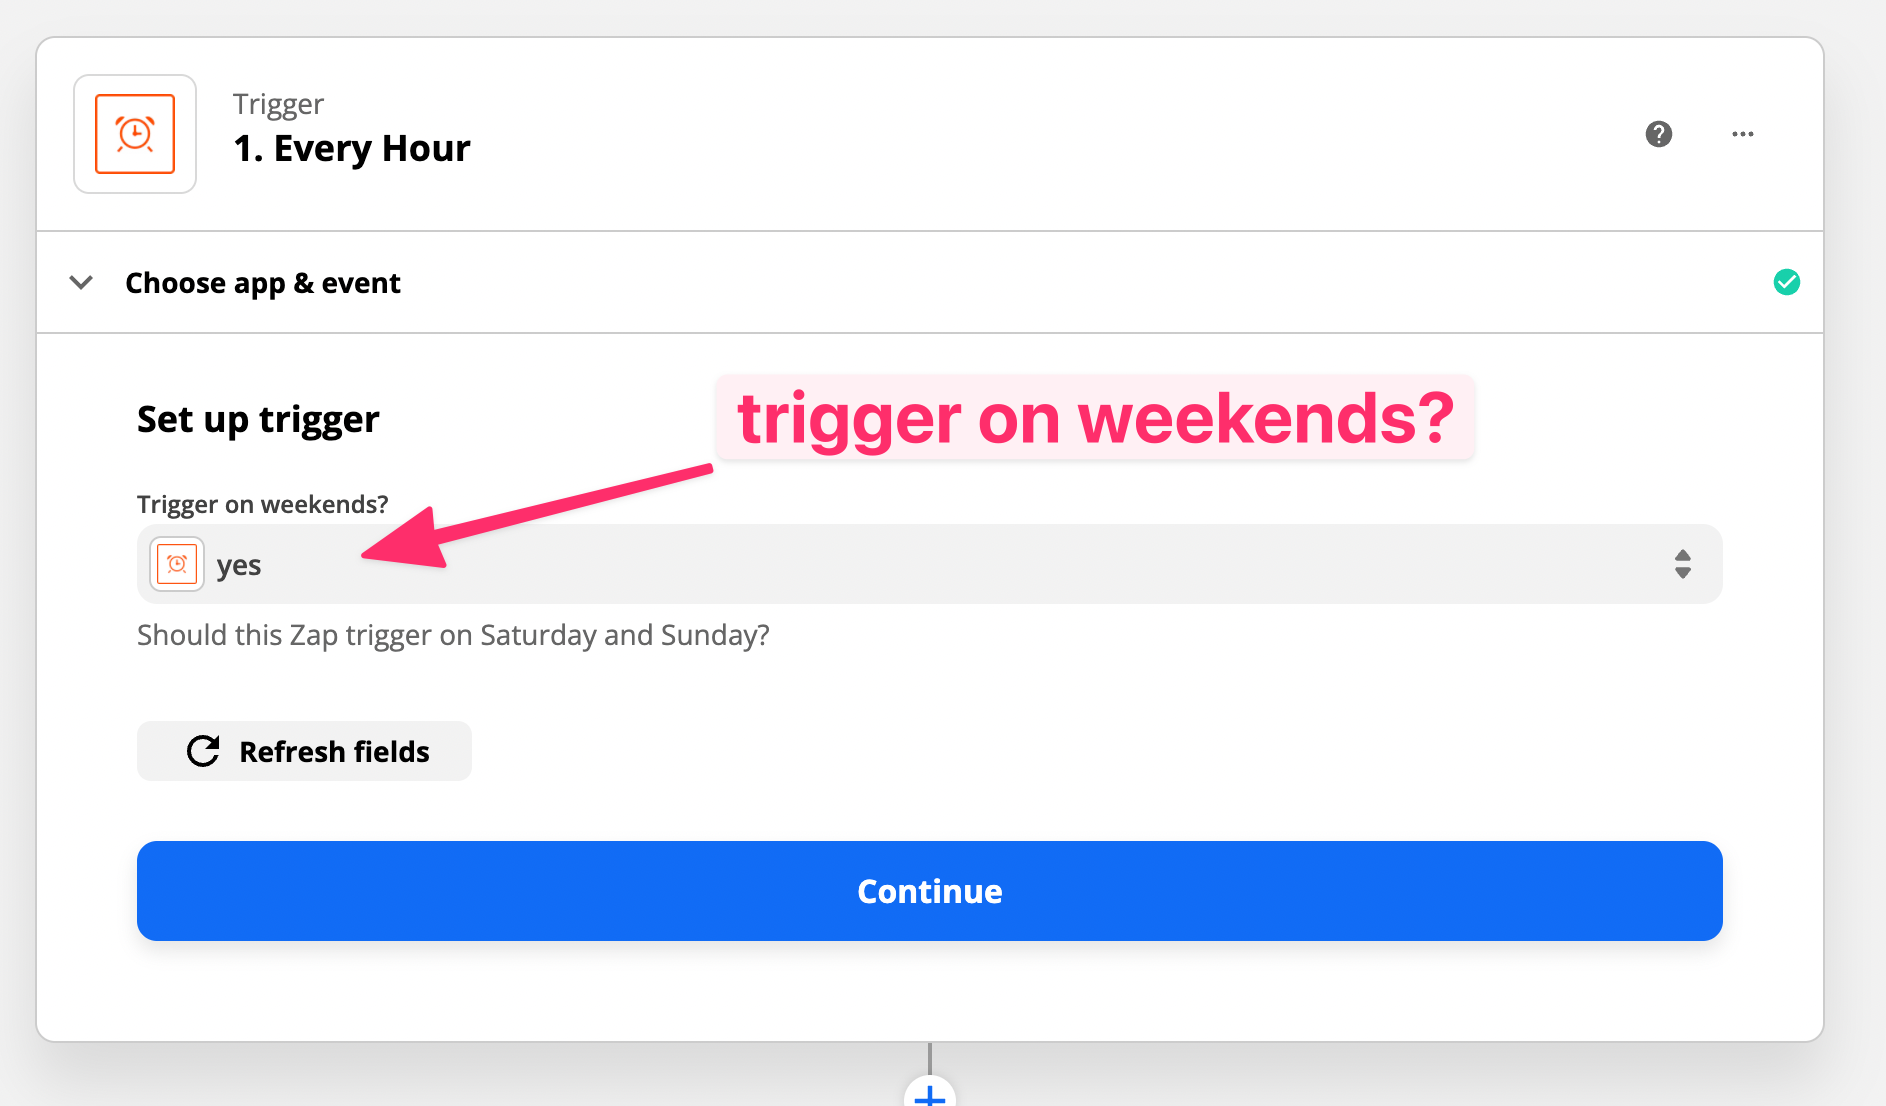
Click continue and the next step will ask whether you want the zap to trigger on weekends or not, and you can leave this as is.
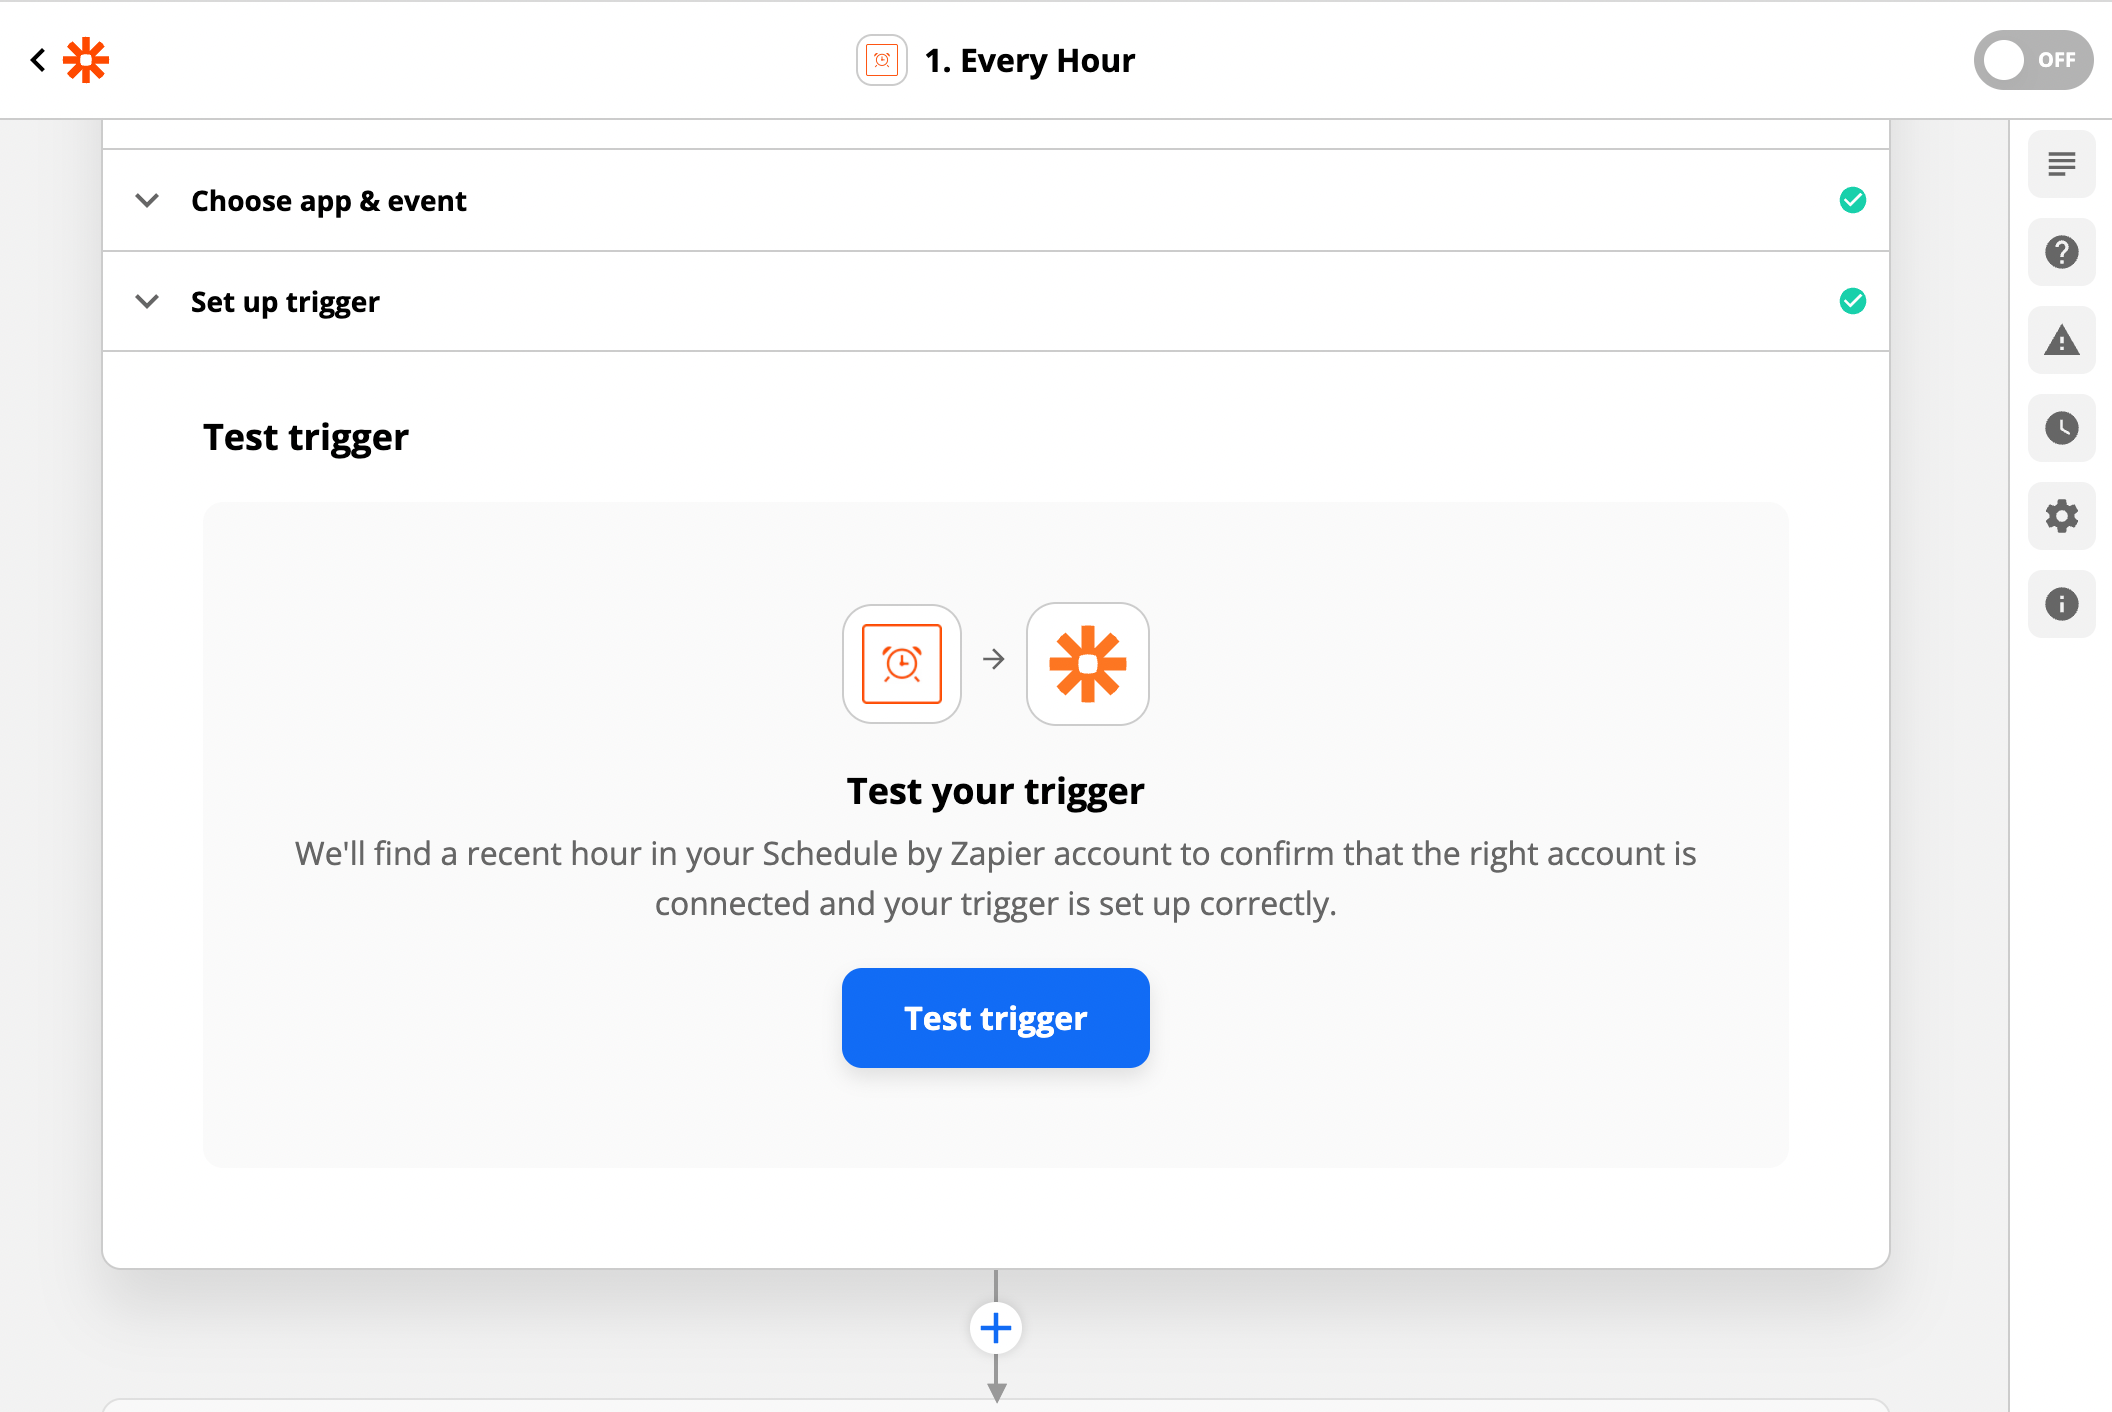
Now the trigger editor will ask you to test the trigger. This may seem a bit strange since we haven't hooked the trigger up to anything yet, but just go with it and click 'Test Trigger'.
Zapier finds an hour that satisfies the trigger.
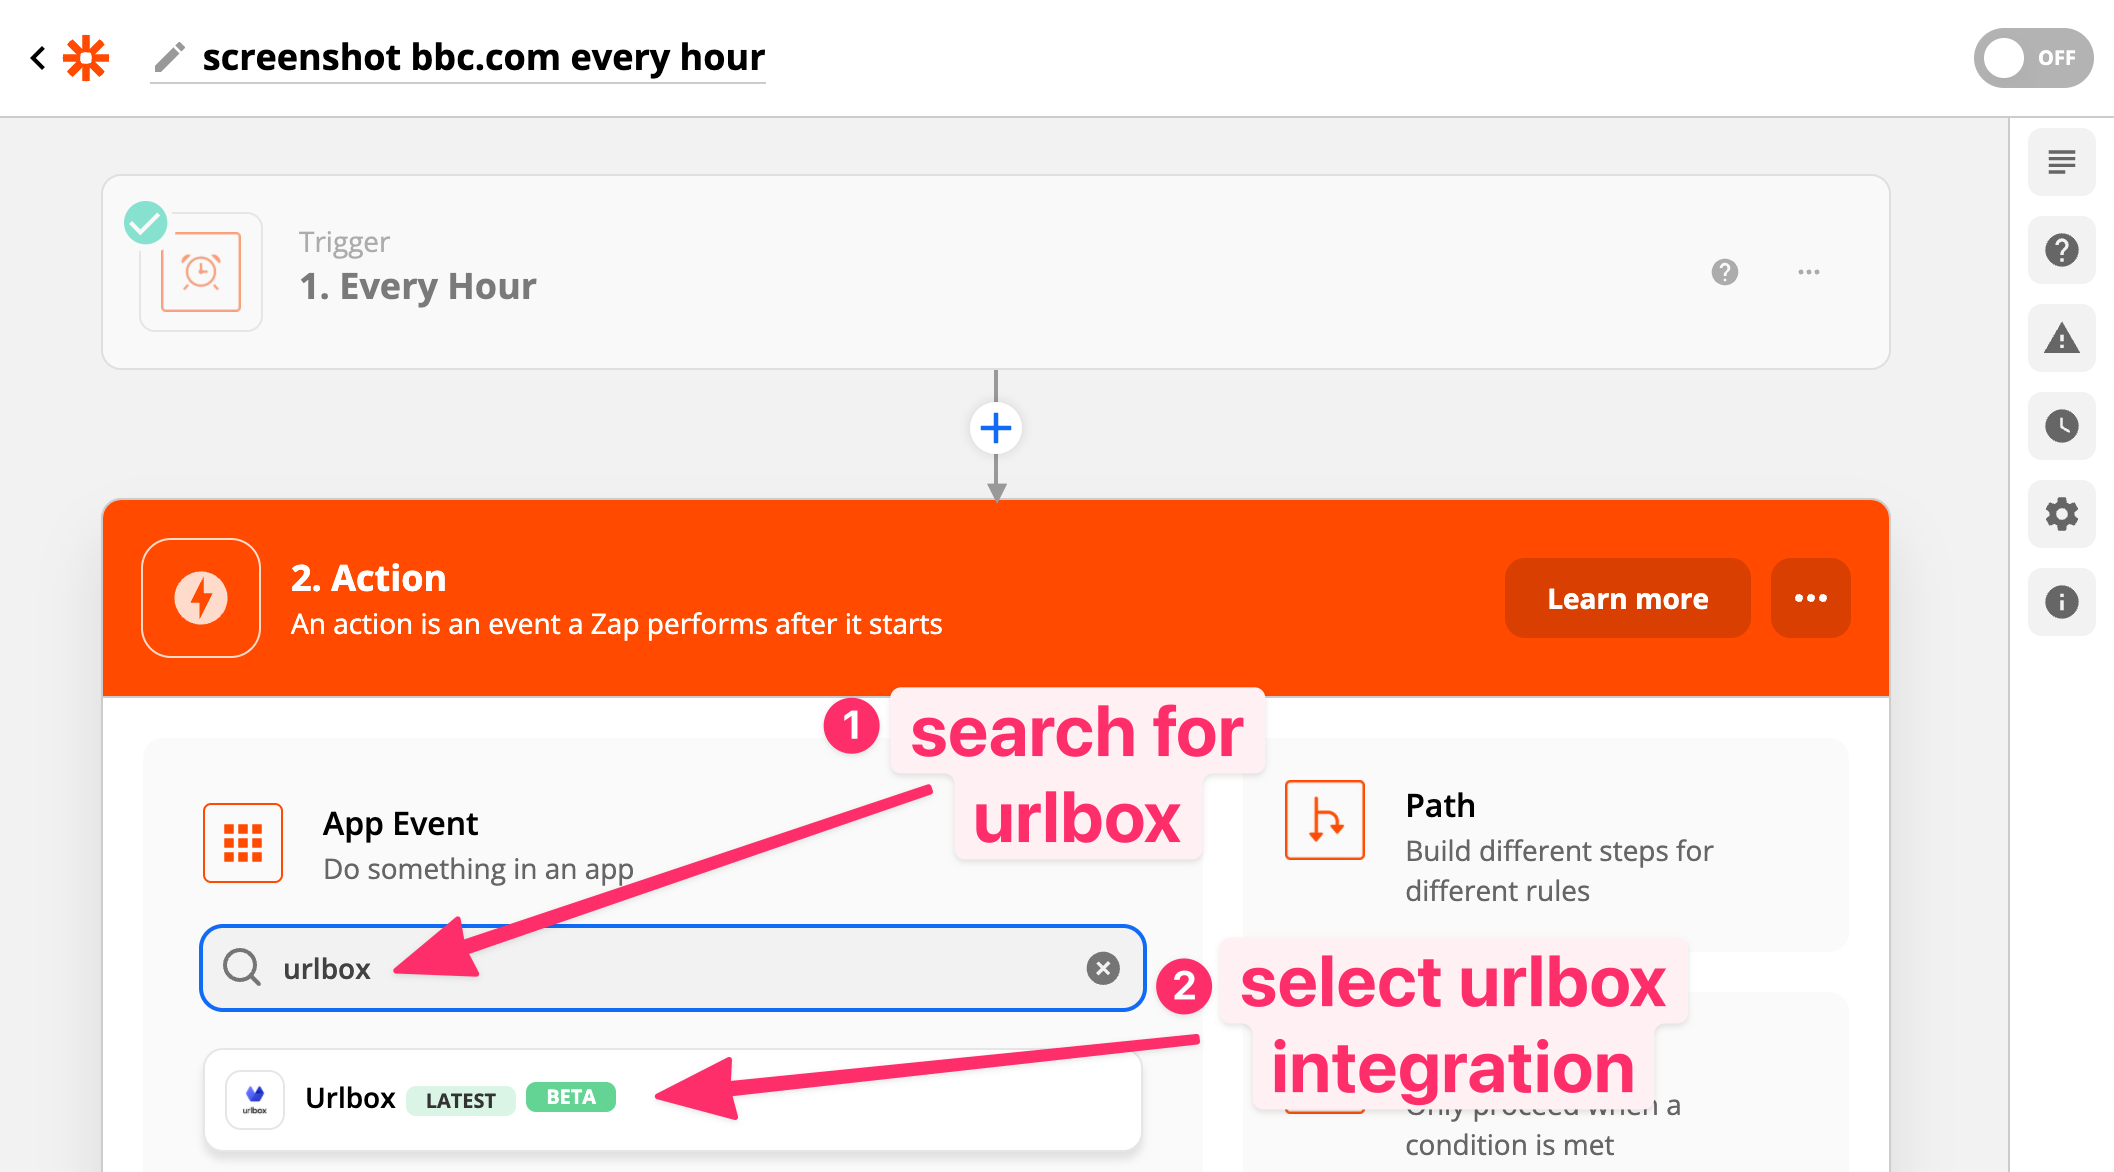
Click continue and you'll see the next step, which is to choose the action to be executed when the trigger is fired.
Choosing to take a screenshot when the trigger is fired
In the search box, search for 'urlbox' and select the Urlbox integration:
Now choose 'Generate Screenshot from URL' from the Action Event dropdown:
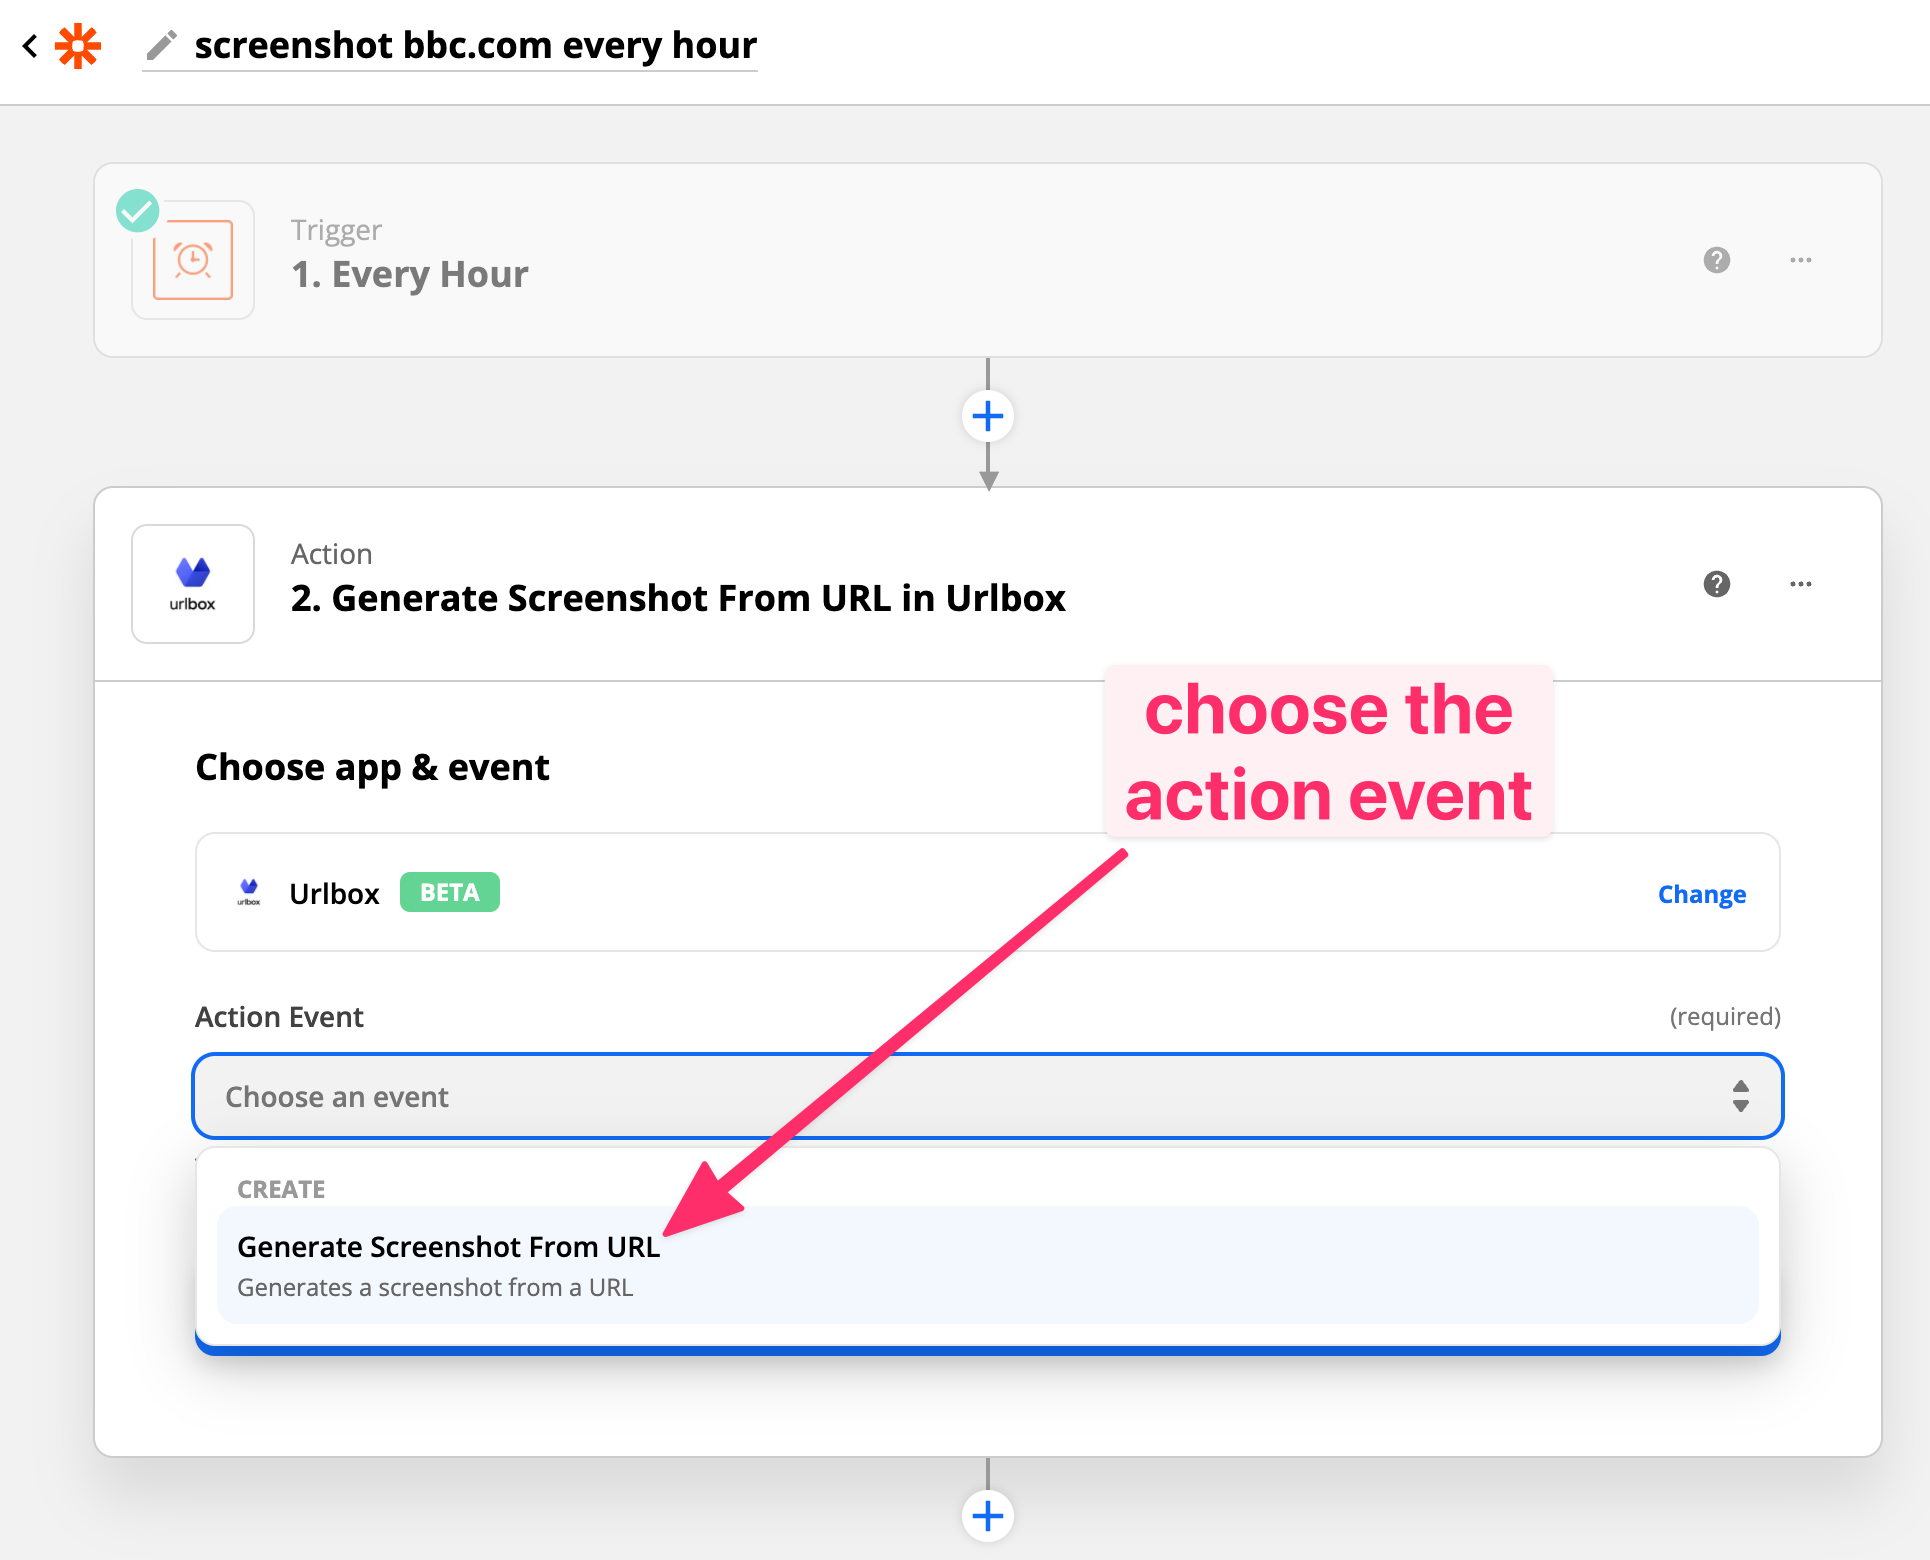
and click Continue.
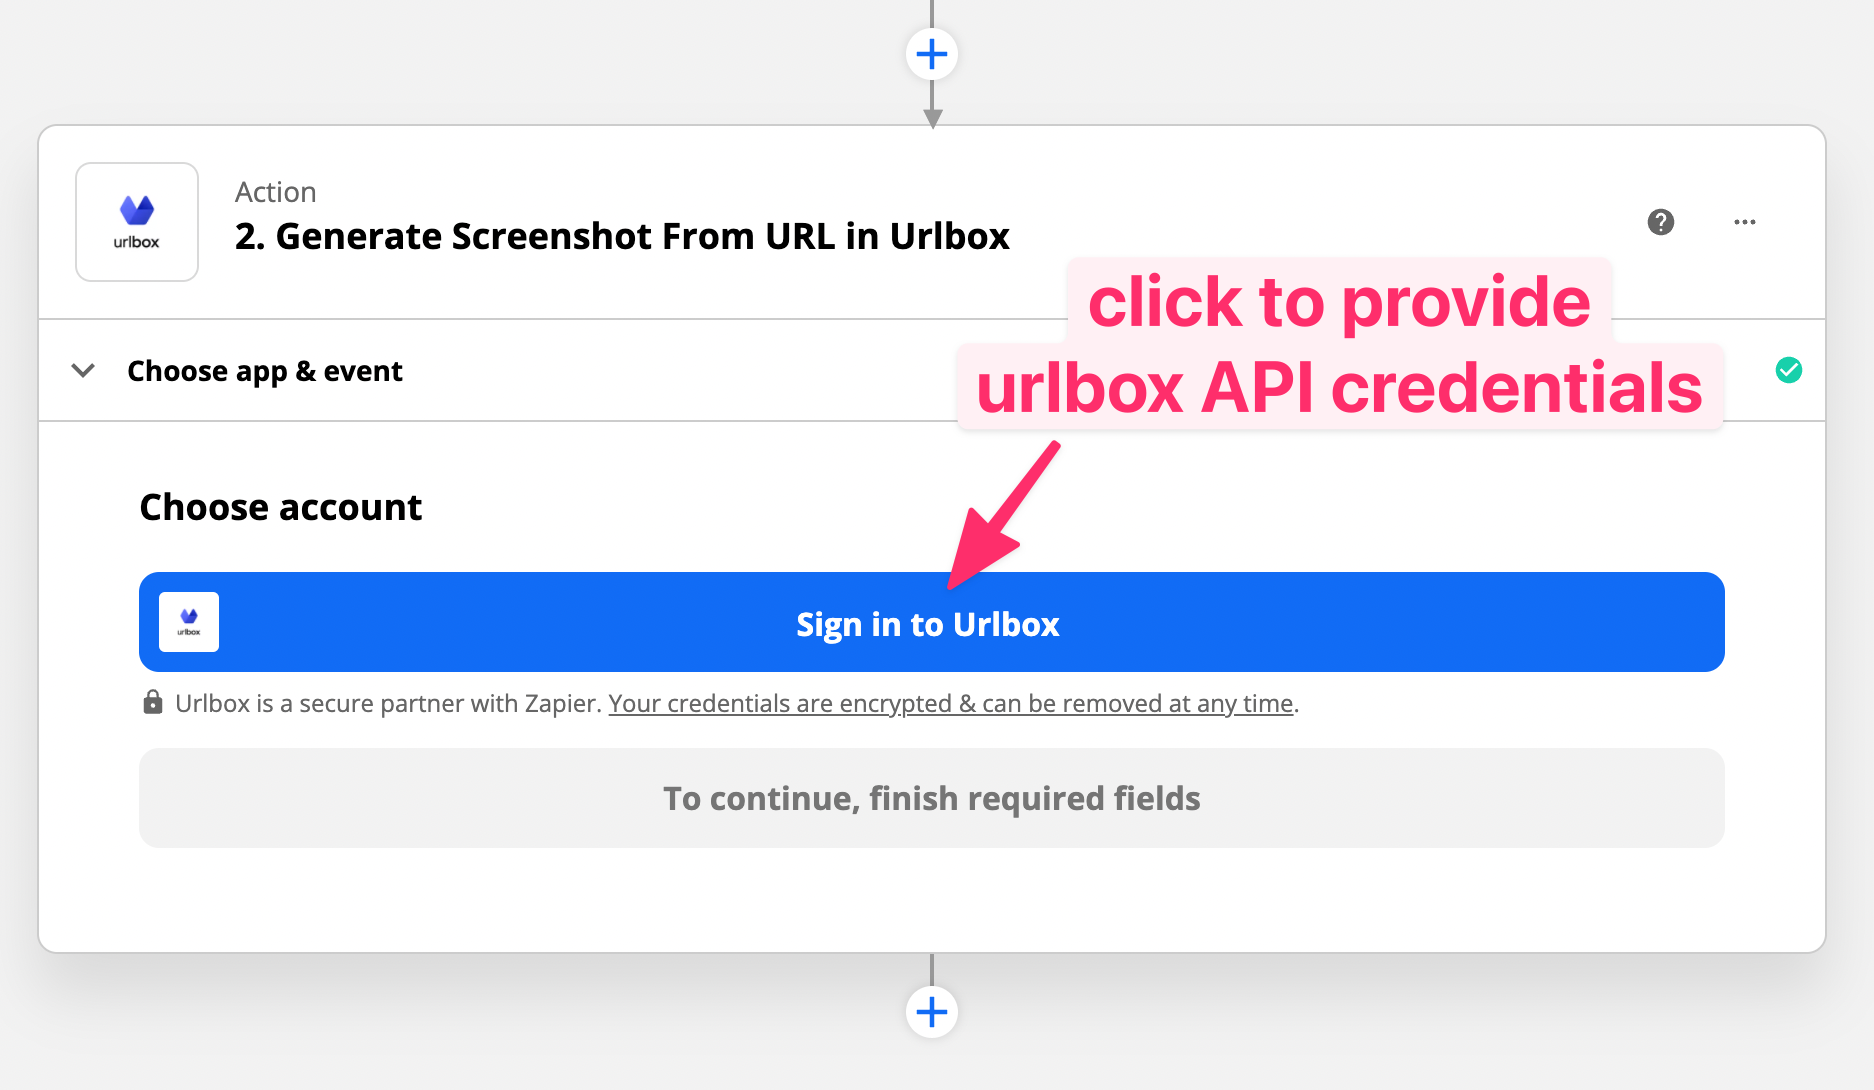
Connecting to Urlbox Screenshot API
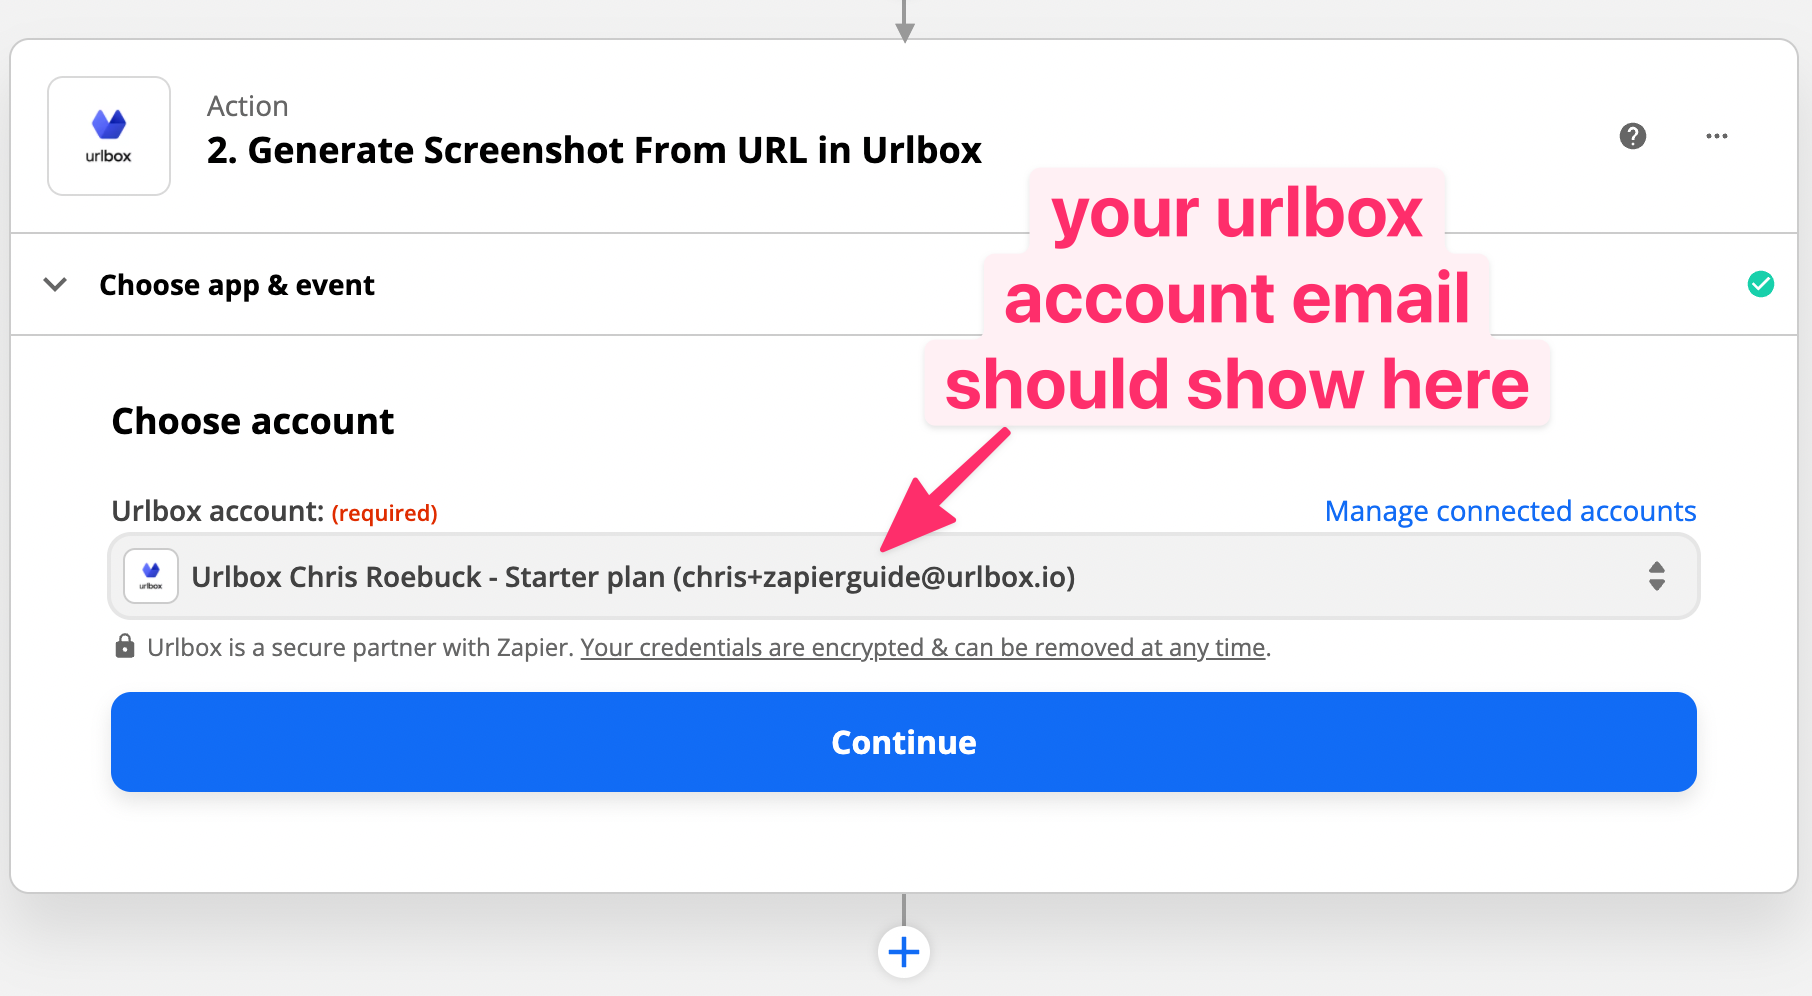
This is where you connect your Urlbox account to your Zapier zap, click the 'Sign in to Urlbox' button:
A new window will pop-up asking for your Urlbox secret key, which you were given when you signed up with Urlbox earlier:
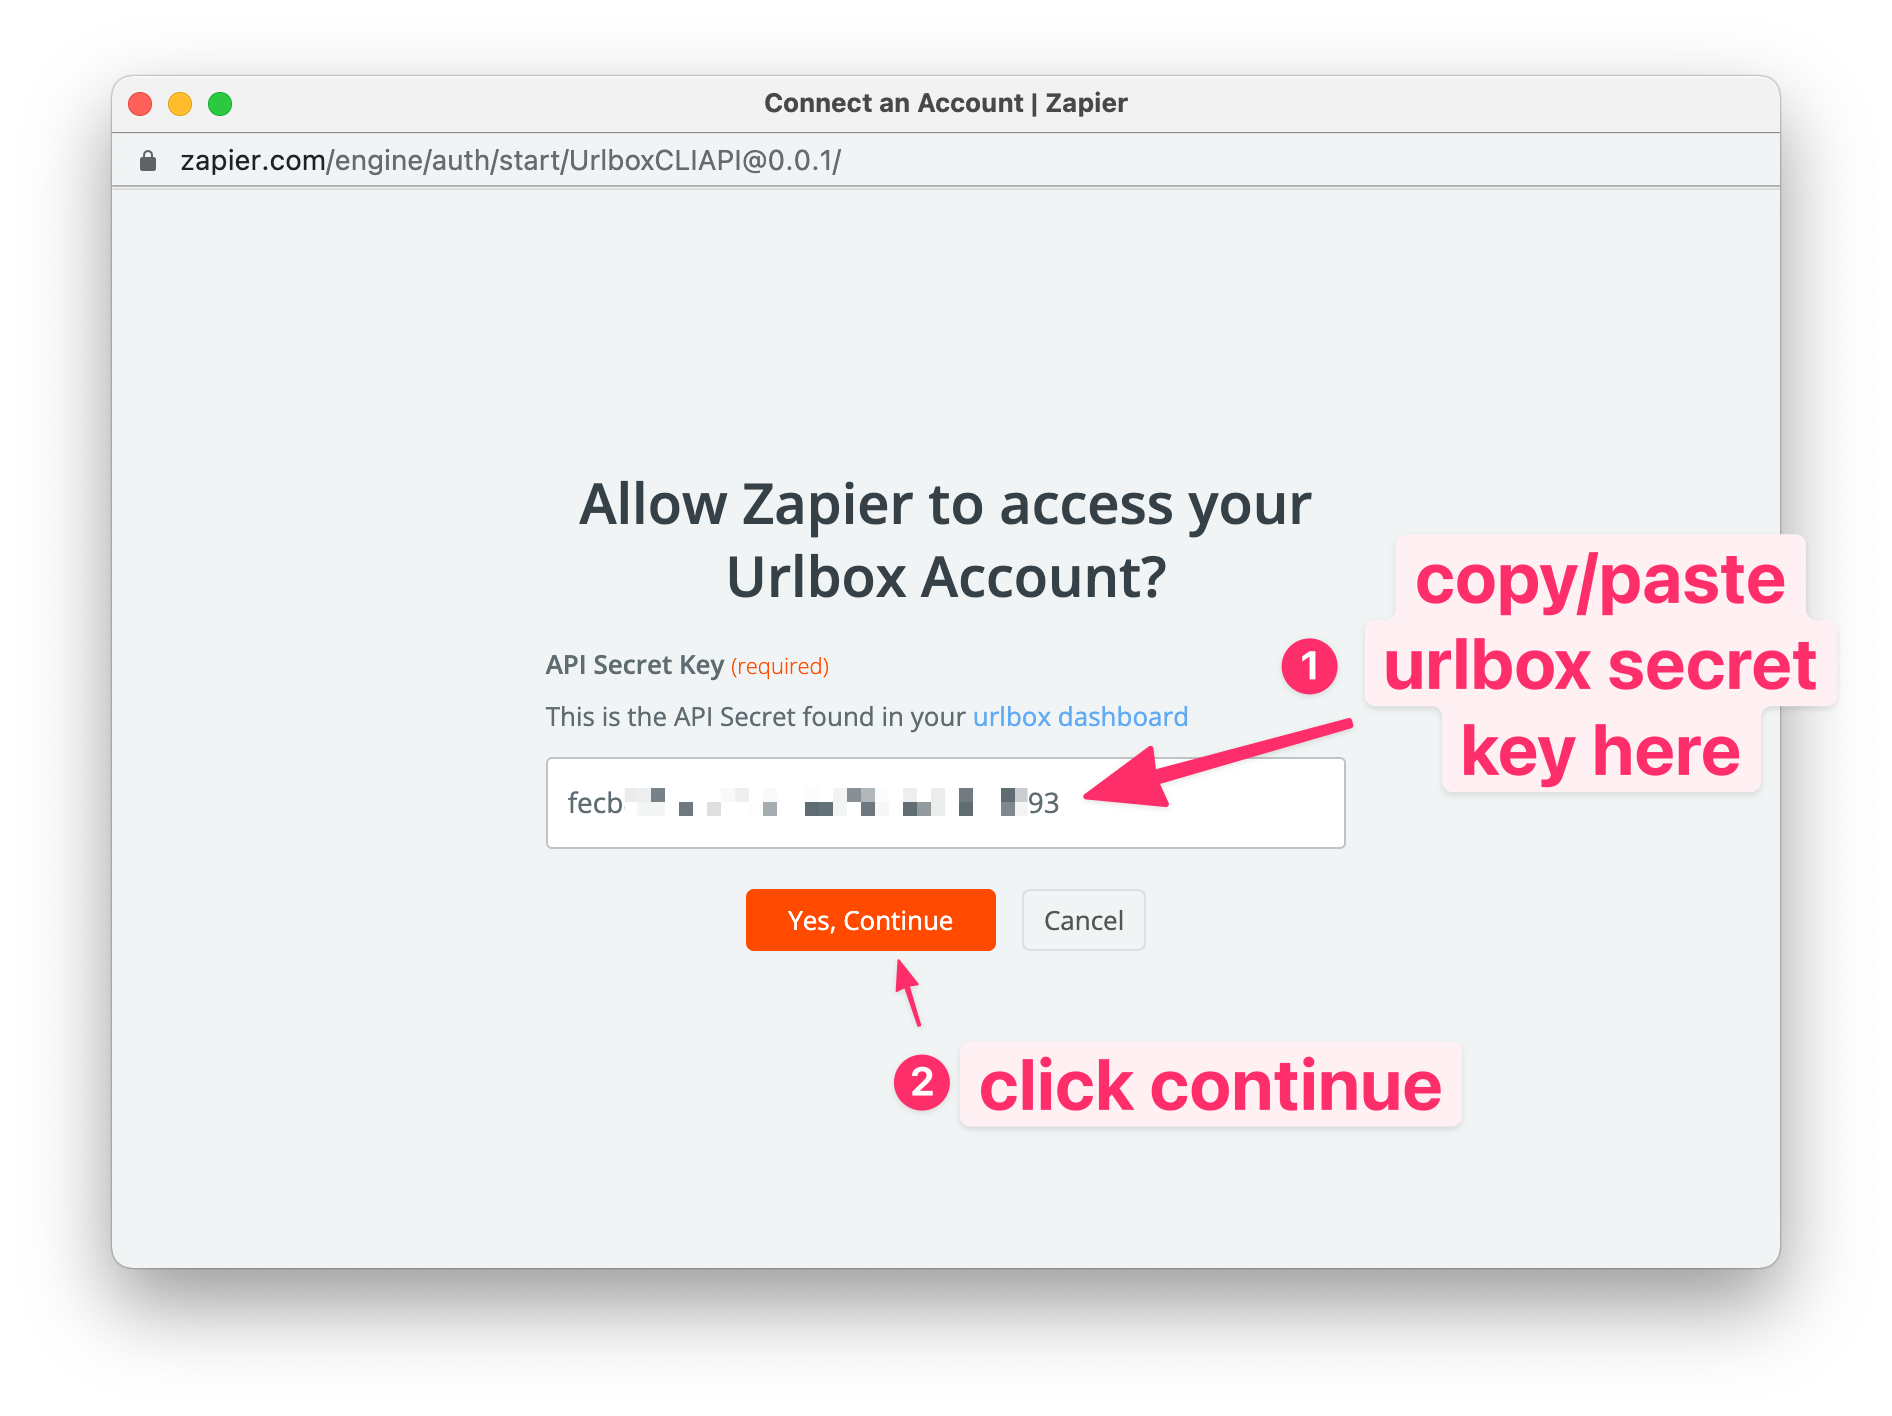
When you've pasted in your secret key and clicked on the 'Yes, Continue' button, the pop-up should close and on the zap editor you will see your account details filled in:
Click Continue now, and you will progress to the next set of options that allow you to configure the settings for the screenshot that urlbox will take on a schedule.
Configuring screenshot options for Urlbox
For this example, since we want to take an hourly screenshot of bbc.com, we will set the Url field to 'bbc.com'.
We just want a normal viewport screenshot, rather than a full-page screenshot, so we will most settings to their defaults.
If you do want to take full page screenshots on a schedule, then this is the screen where you can configure all of the options that will be used when urlbox takes the screenshot every day:
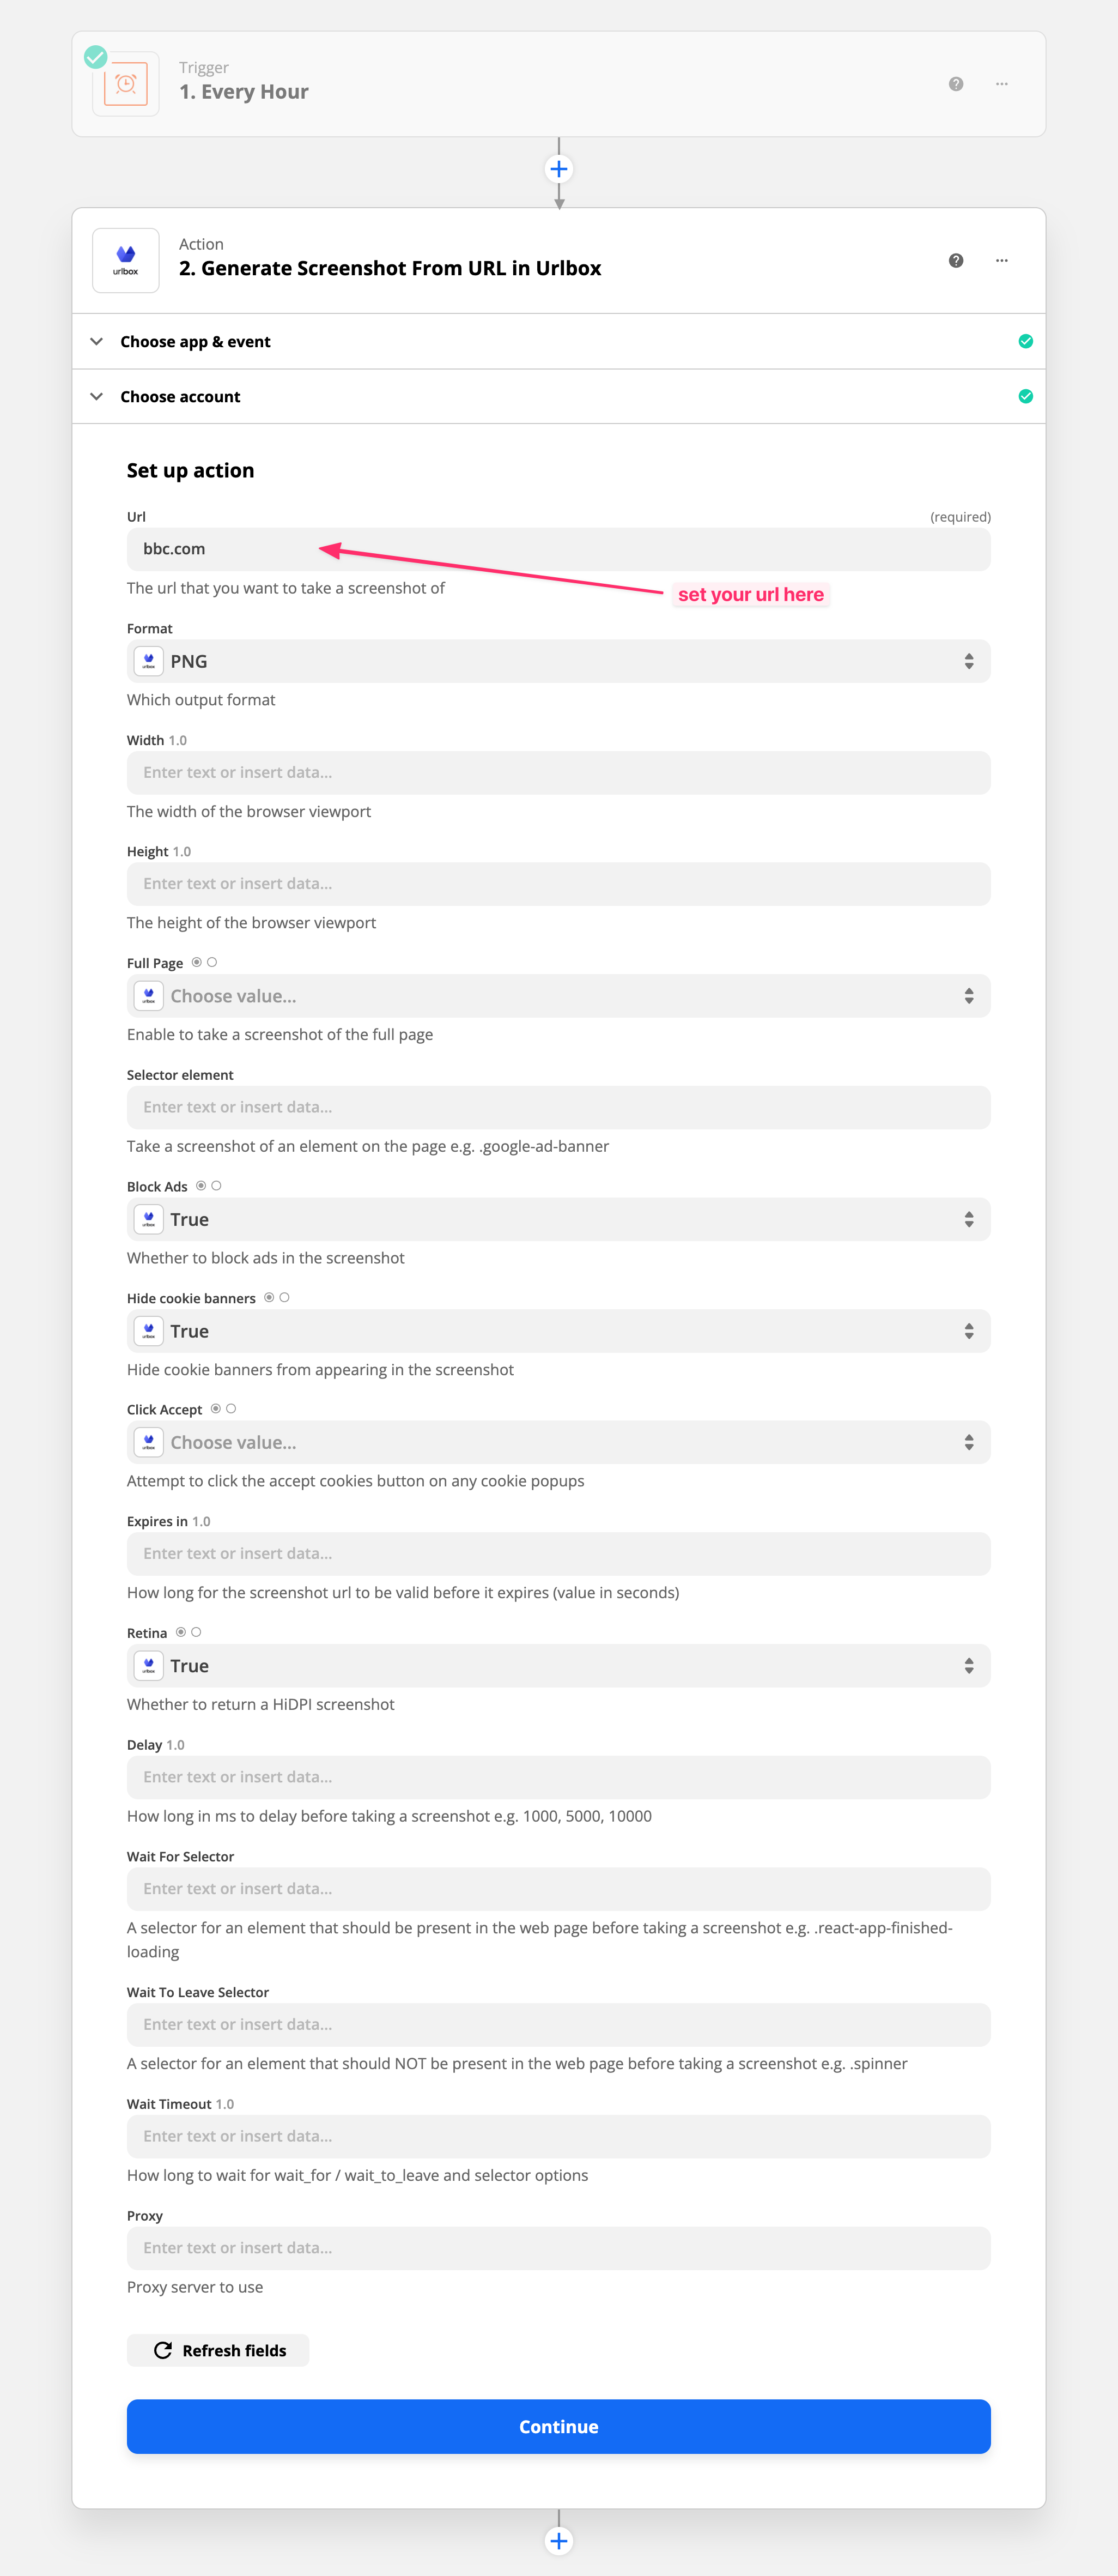
In the example, we have set the block_ads option to true, hide_cookie_banners to true in order to hide cookie banners from the screenshot, and we have set the retina option to true in order to take a high dpi screenshot at 2x resolution.
If any option is missing from the zapier integration, that you require for your screenshots, please do let us know and we will update the zapier integration.
Once you're happy with your screenshot options, click the continue button to progress to the next step.
Sending a test screenshot
The next step asks you to send a test screenshot to urlbox, you can check that all of the options are configured correctly before clicking on Test & Continue:
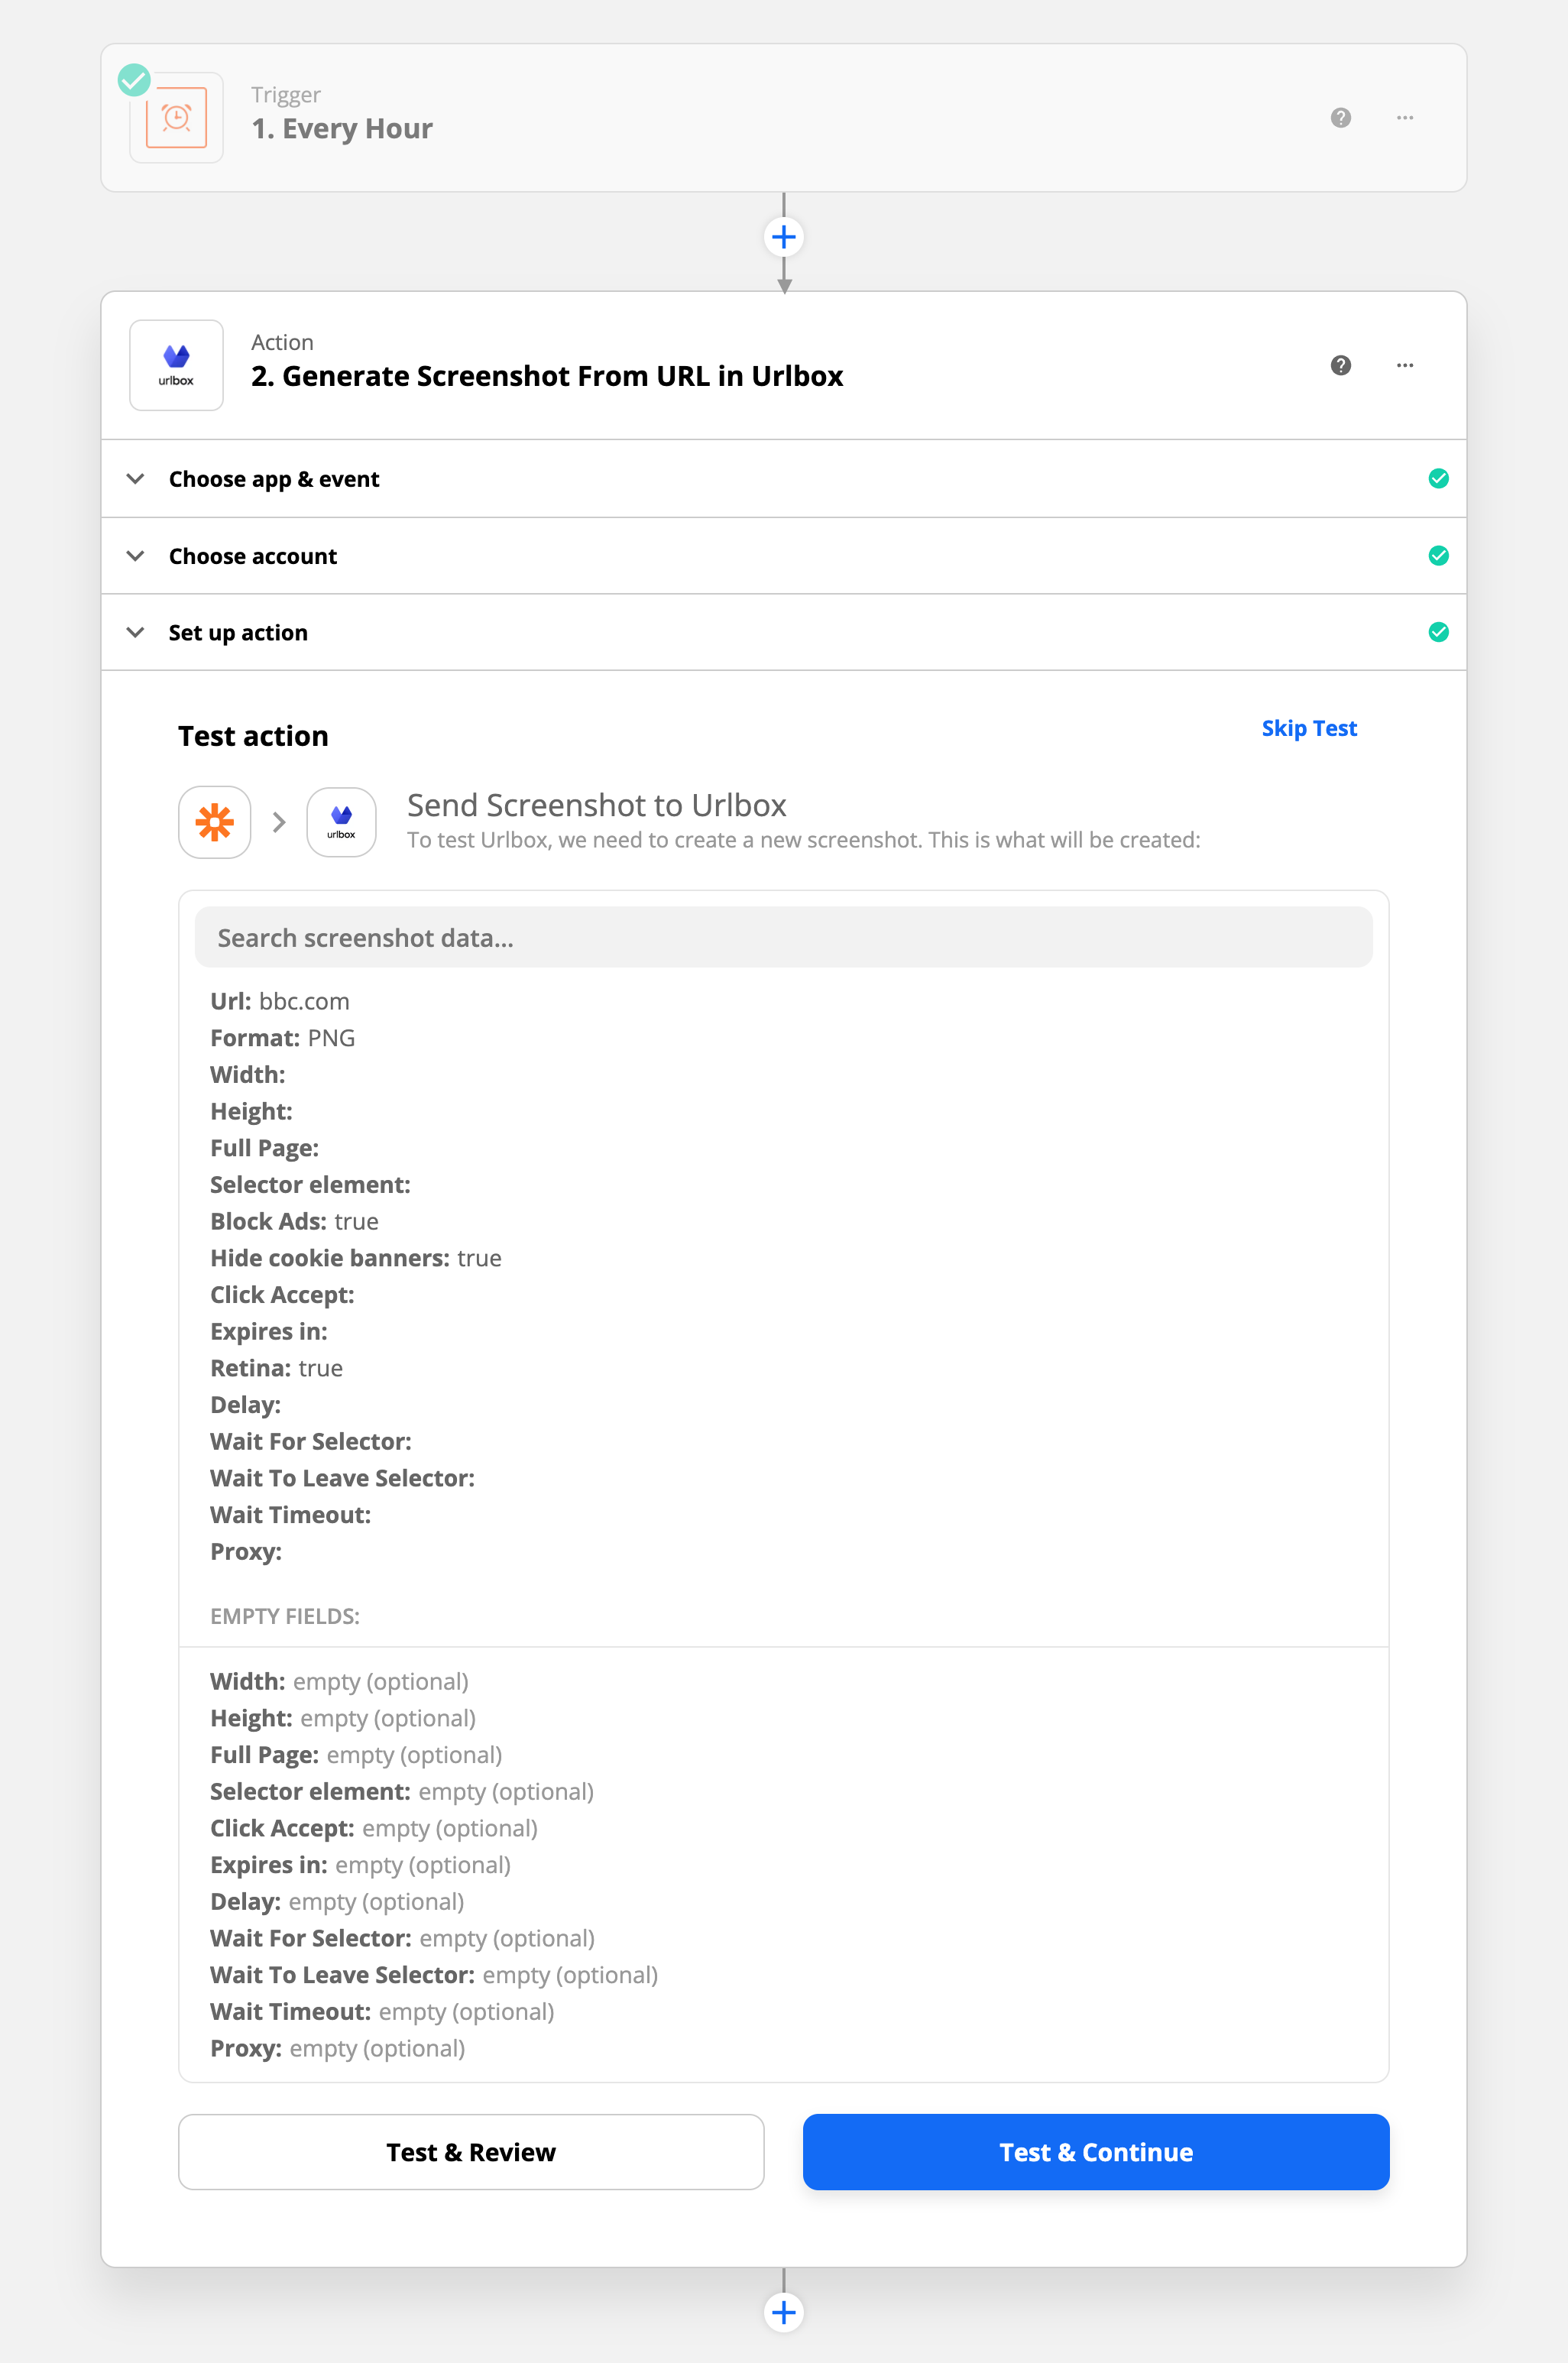
Once you click on Test & Continue, Zapier will send a one-off request to urlbox in order to test that everything is working smoothly:
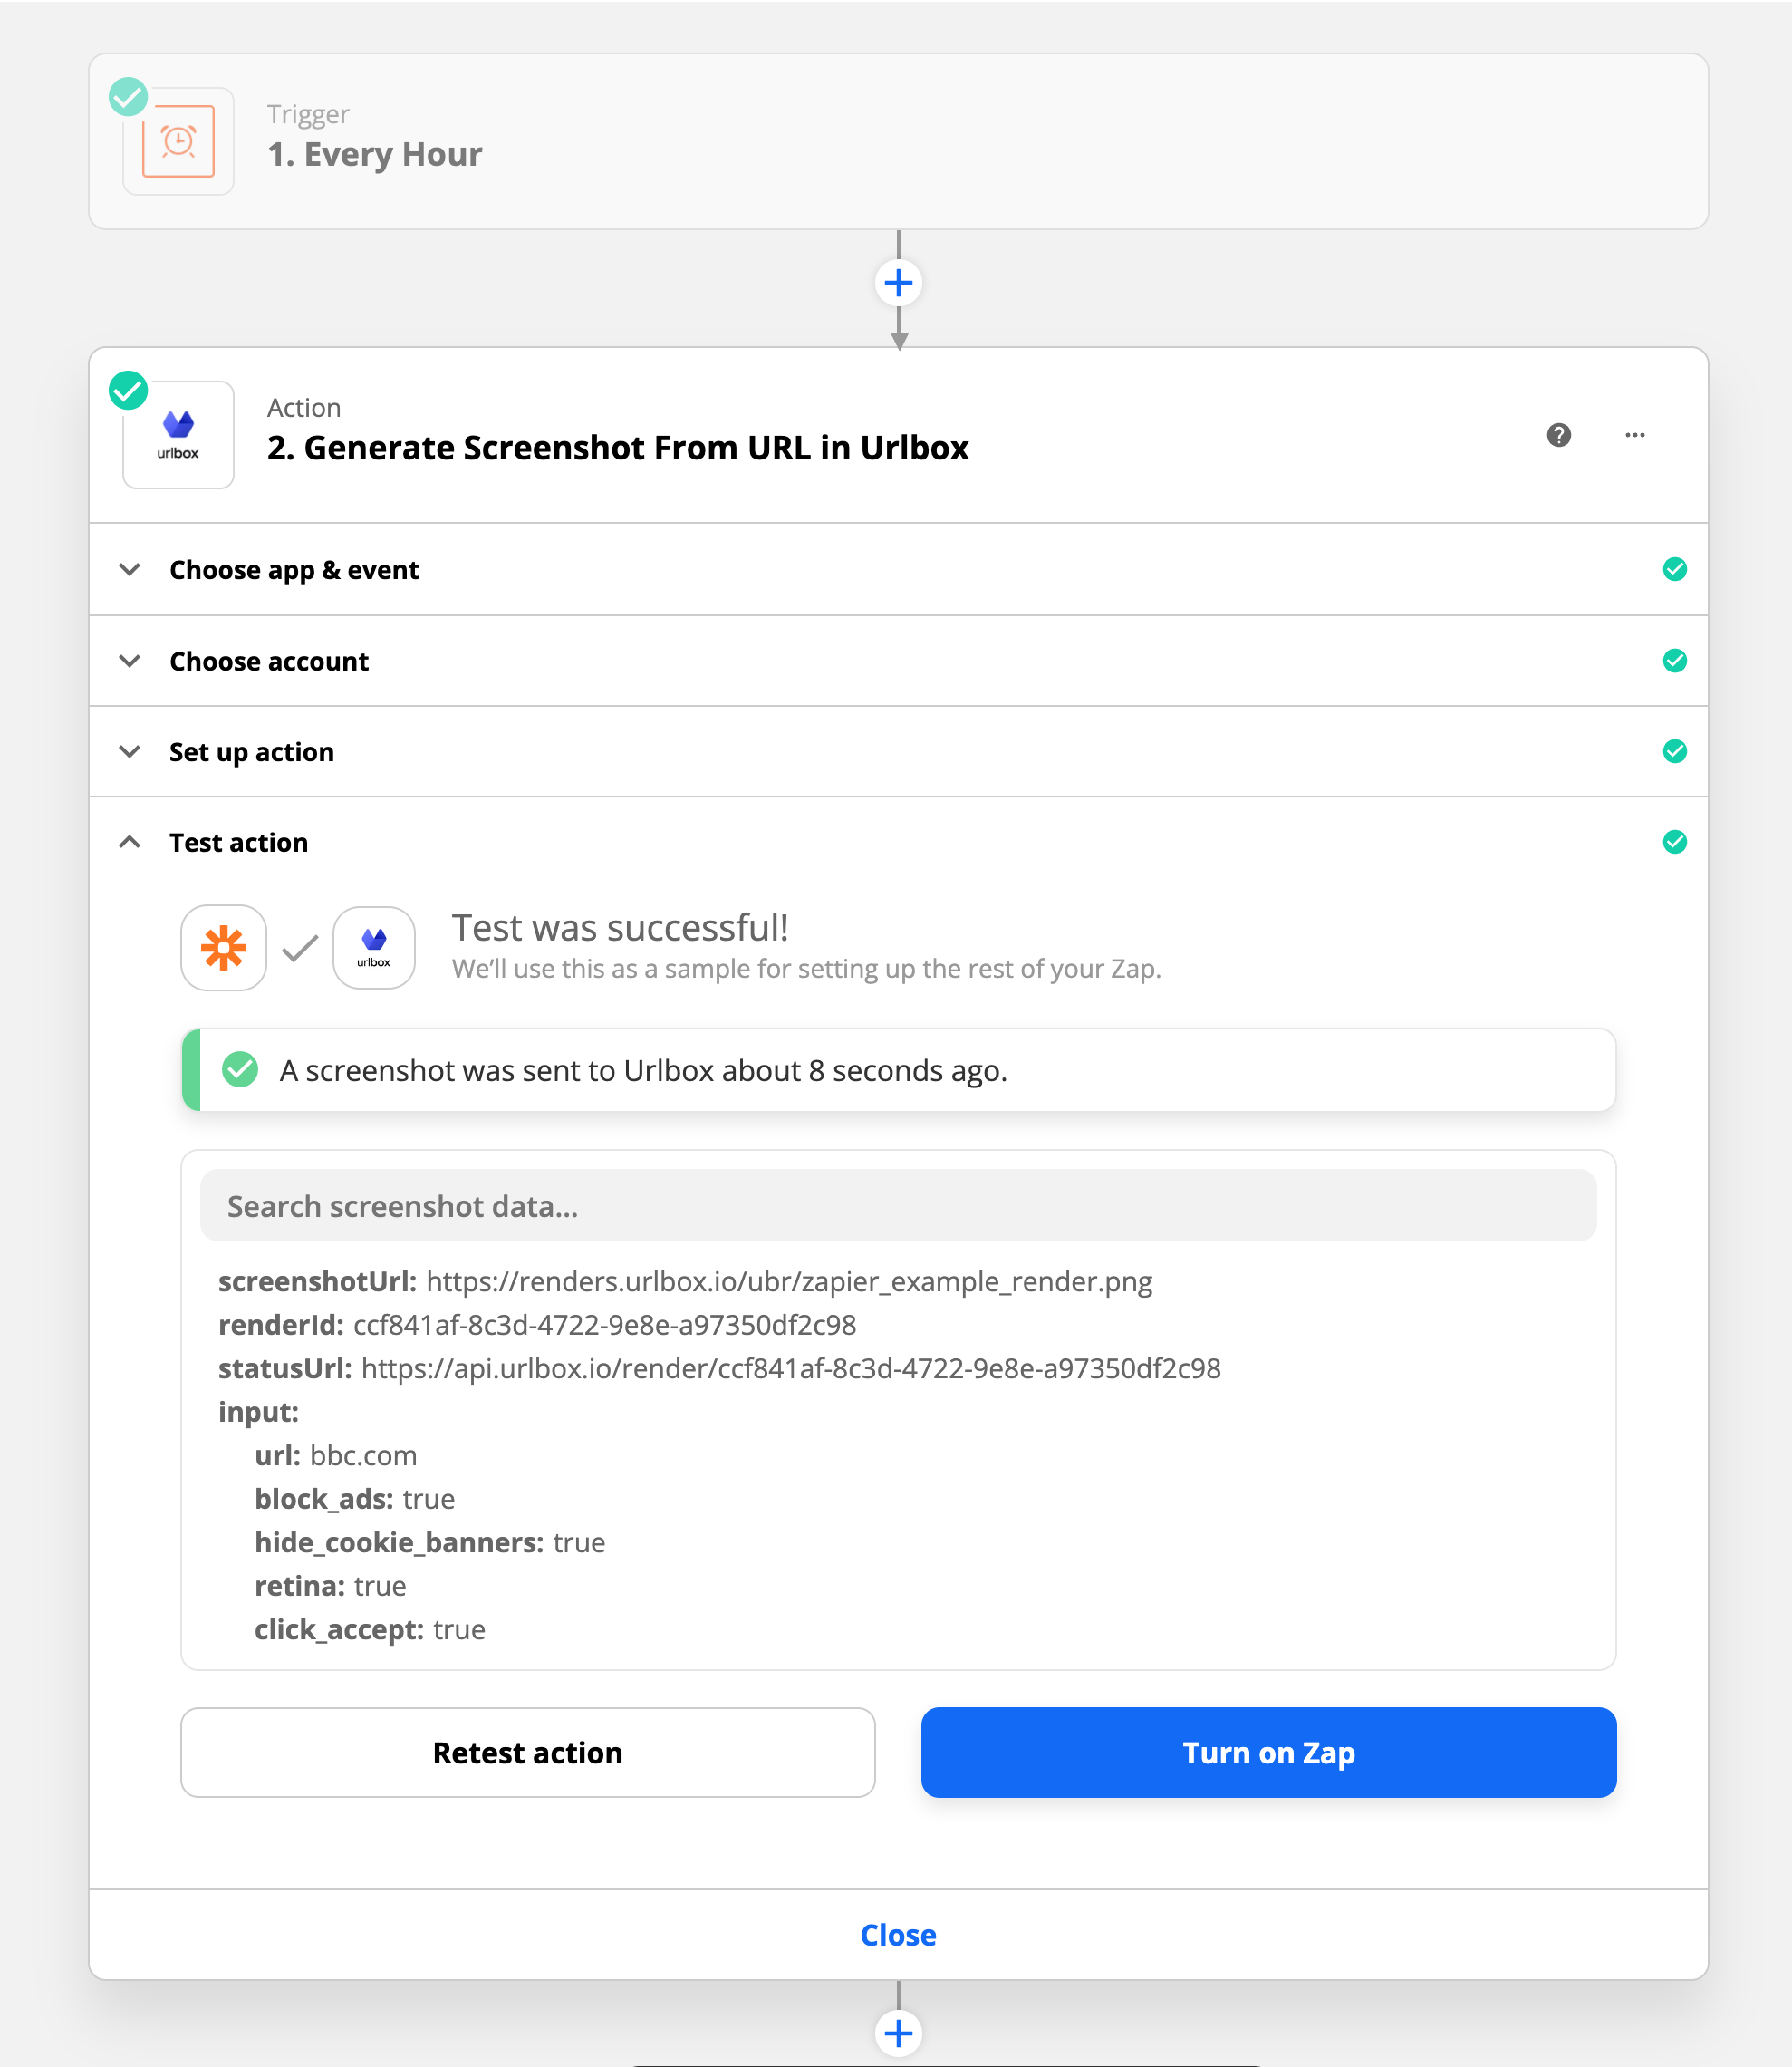
From here you can click 'Turn on Zap' and your zap will be ready to go. Every hour from now on, it will make a request to urlbox to take a screenshot of bbc.com.
This is great and all, but what if we want to store our screenshots somewhere, or save them to permanent cloud storage?
The screenshot url that urlbox returns is only valid for 30 days, so we'll want to add an extra step to our zap to store the screenshot somewhere else.
Storing the screenshot permanently
There are many places we can store the screenshot, for example we could save it to an amazon S3 bucket using the S3 zapier integration, or we could upload the screenshot to Dropbox.
For our example, we will choose to store the screenshot to Google Drive, but the process is very similar for any zapier action that allows you to upload a file from a URL.
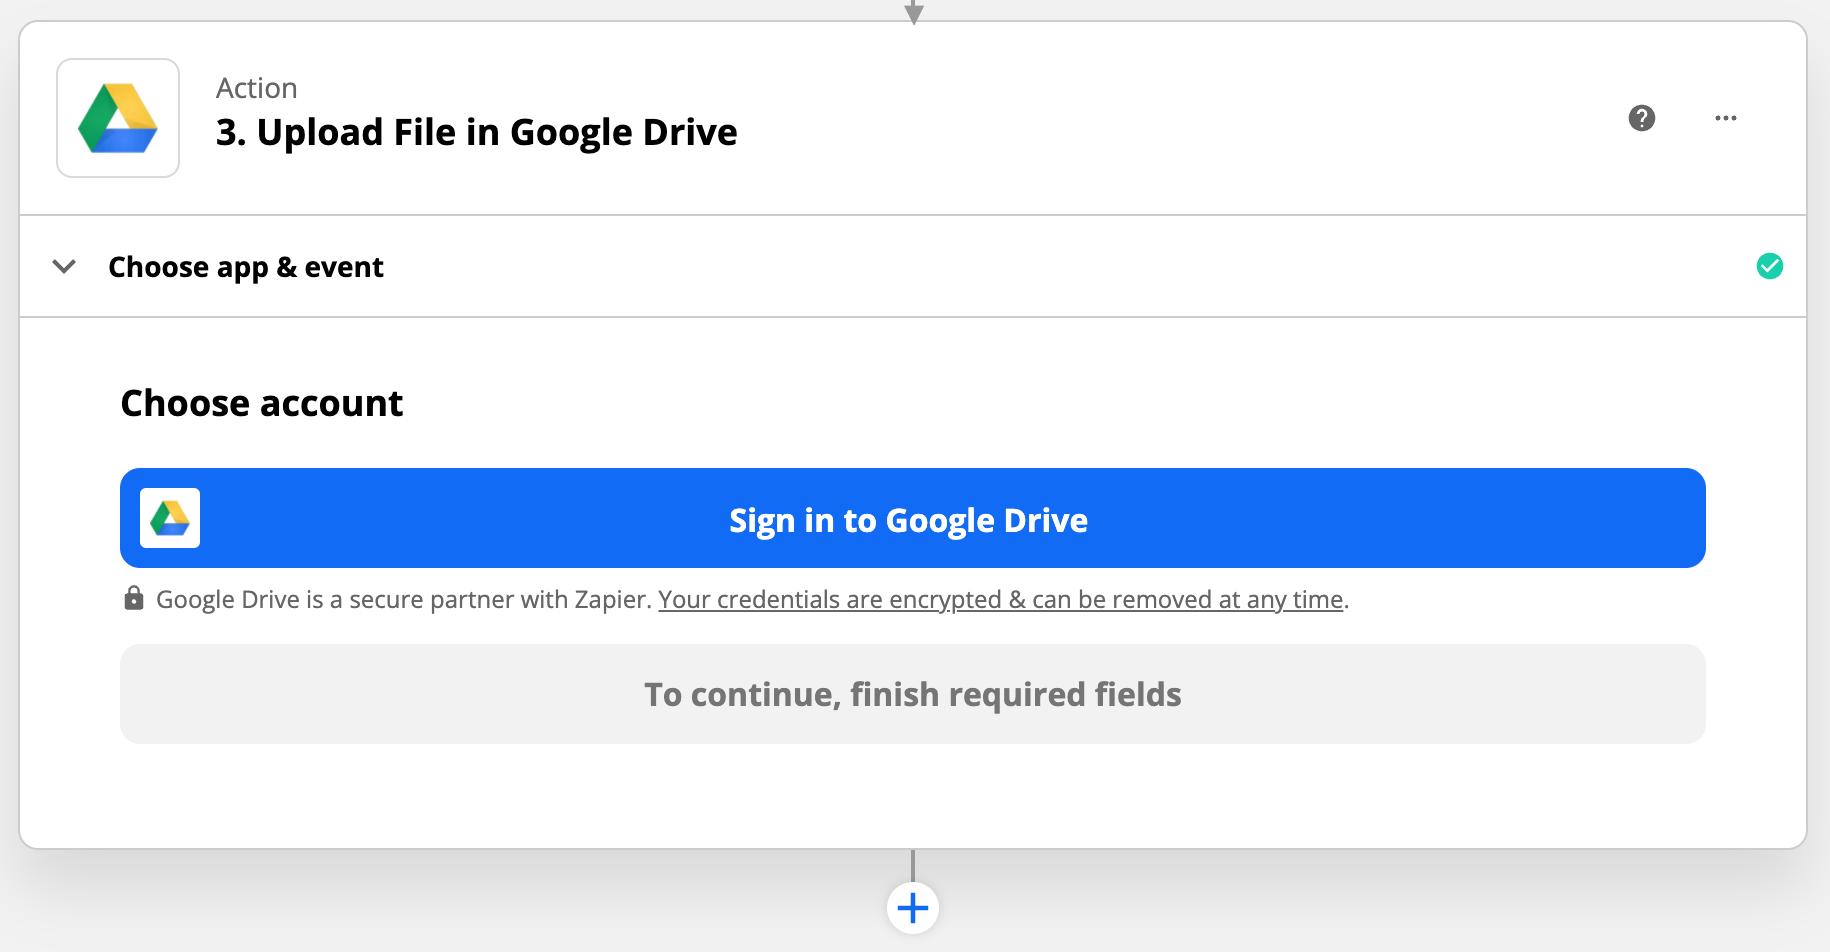
To upload the screenshot to Google Drive, we'll click the plus button below our Urlbox action and search for the Google Drive action. We'll then choose 'Upload File' from the Action Event dropdown:

Click continue. Now we'll be asked to sign in to Google Drive:
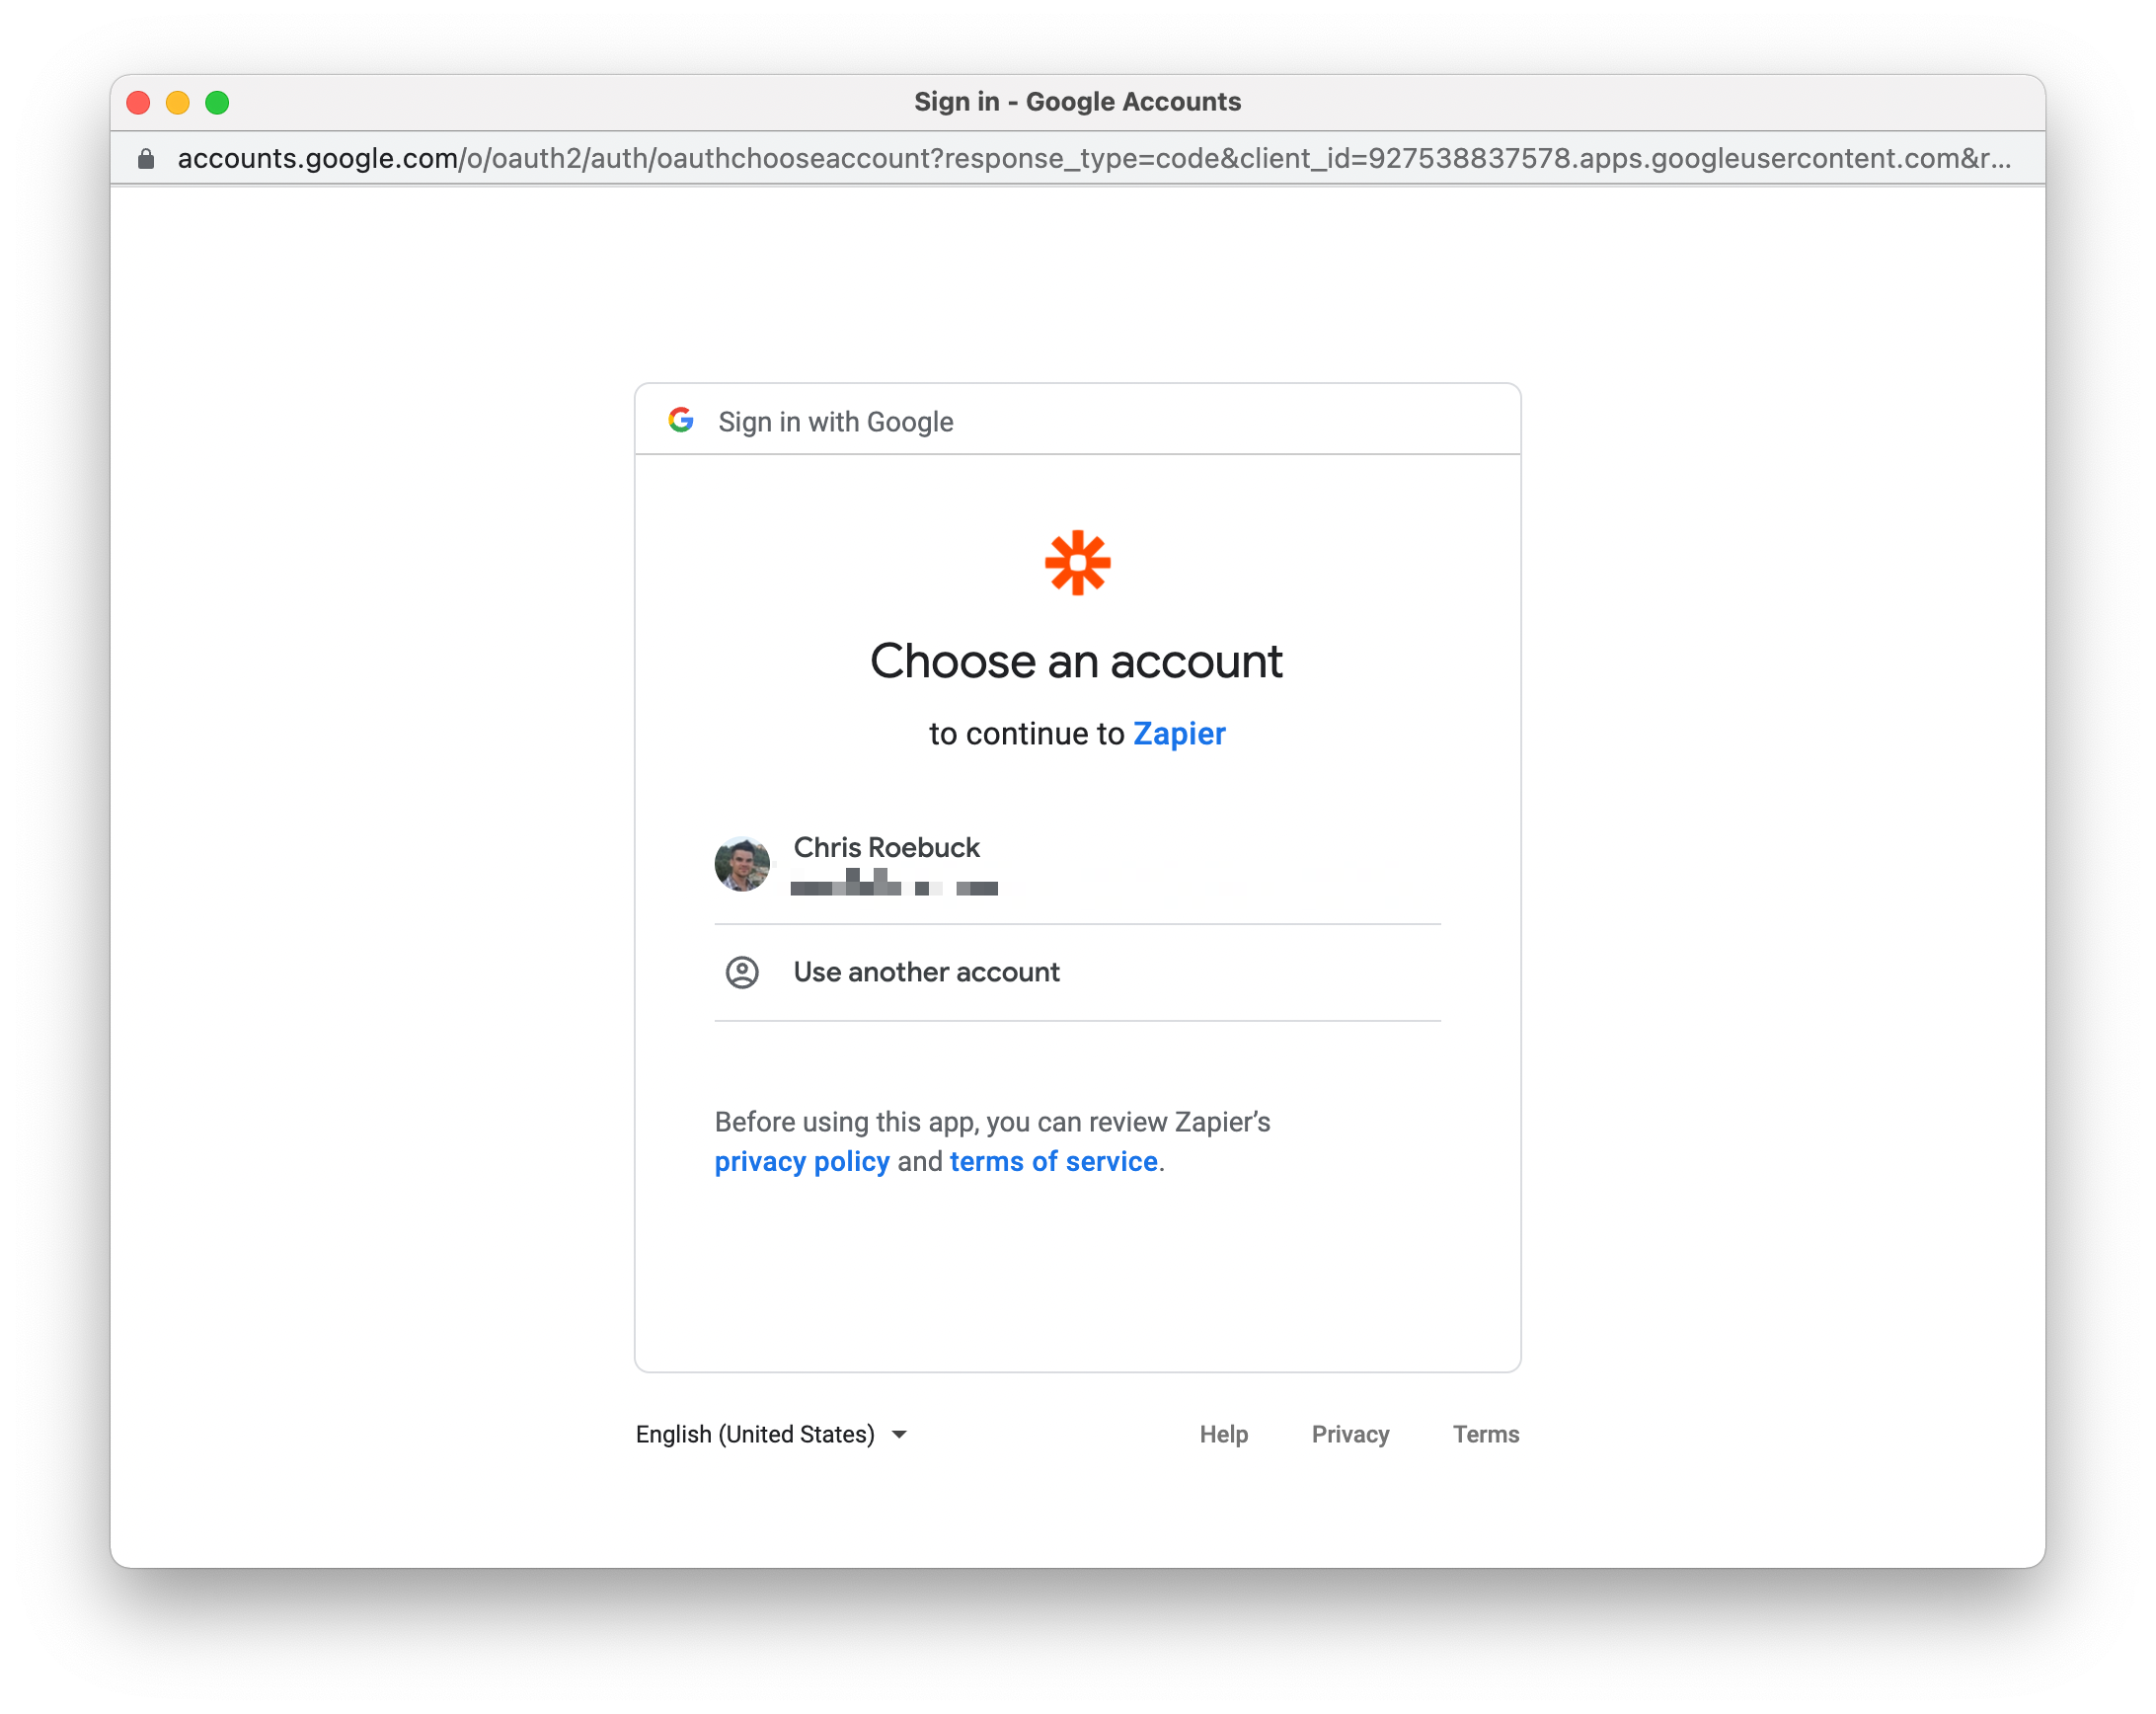
Once you click the 'Sign in to Google Drive' button, another pop up window will open and you'll be taken through the steps to sign in to your Google account:
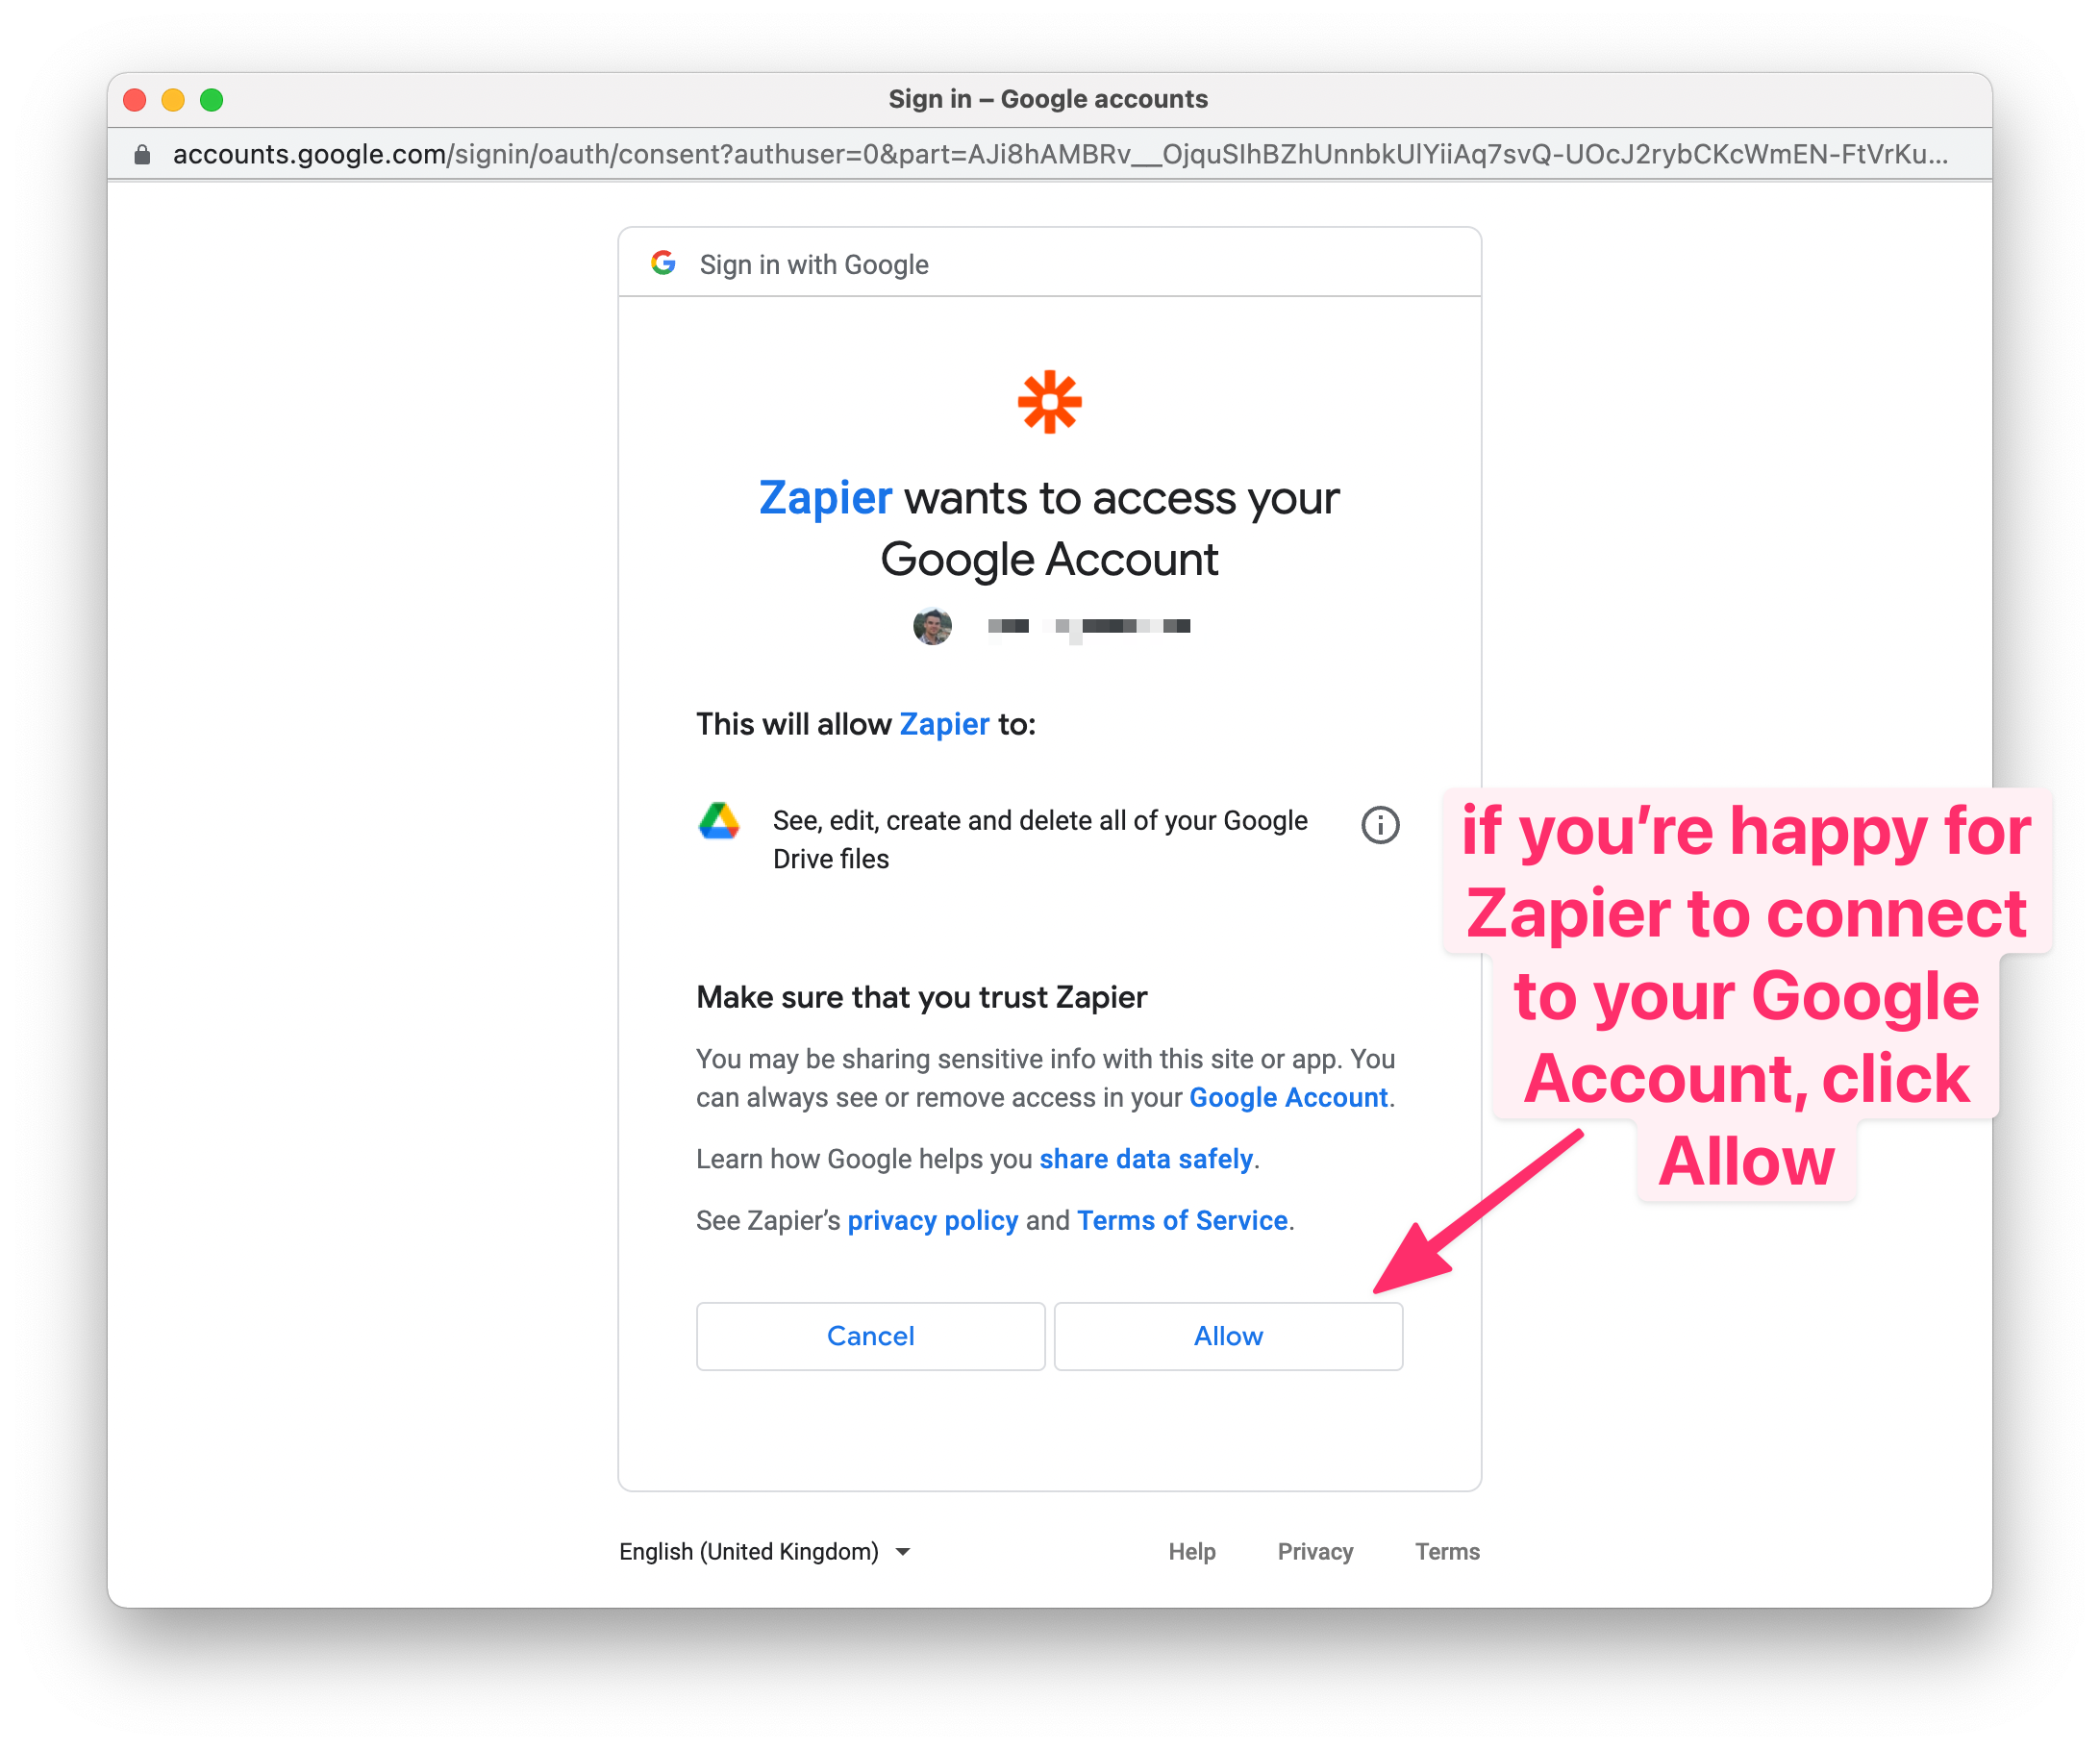
Make sure you're happy for Zapier to access your Google account, and with the permissions it has over your Google Drive files, then click Allow.
Now that your Google Drive account is linked to the Zapier zap, you can click Continue to move to the next step.
Now the zap editor will allow you to configure the settings for the Google Drive action.
Configuring the screenshot location in Google Drive
Here you can choose which particular Drive and folder you want to upload the screenshot to.
The most important part is to ensure that you map the Screenshot URL output field from Urlbox to the File input field of the Google Drive action:
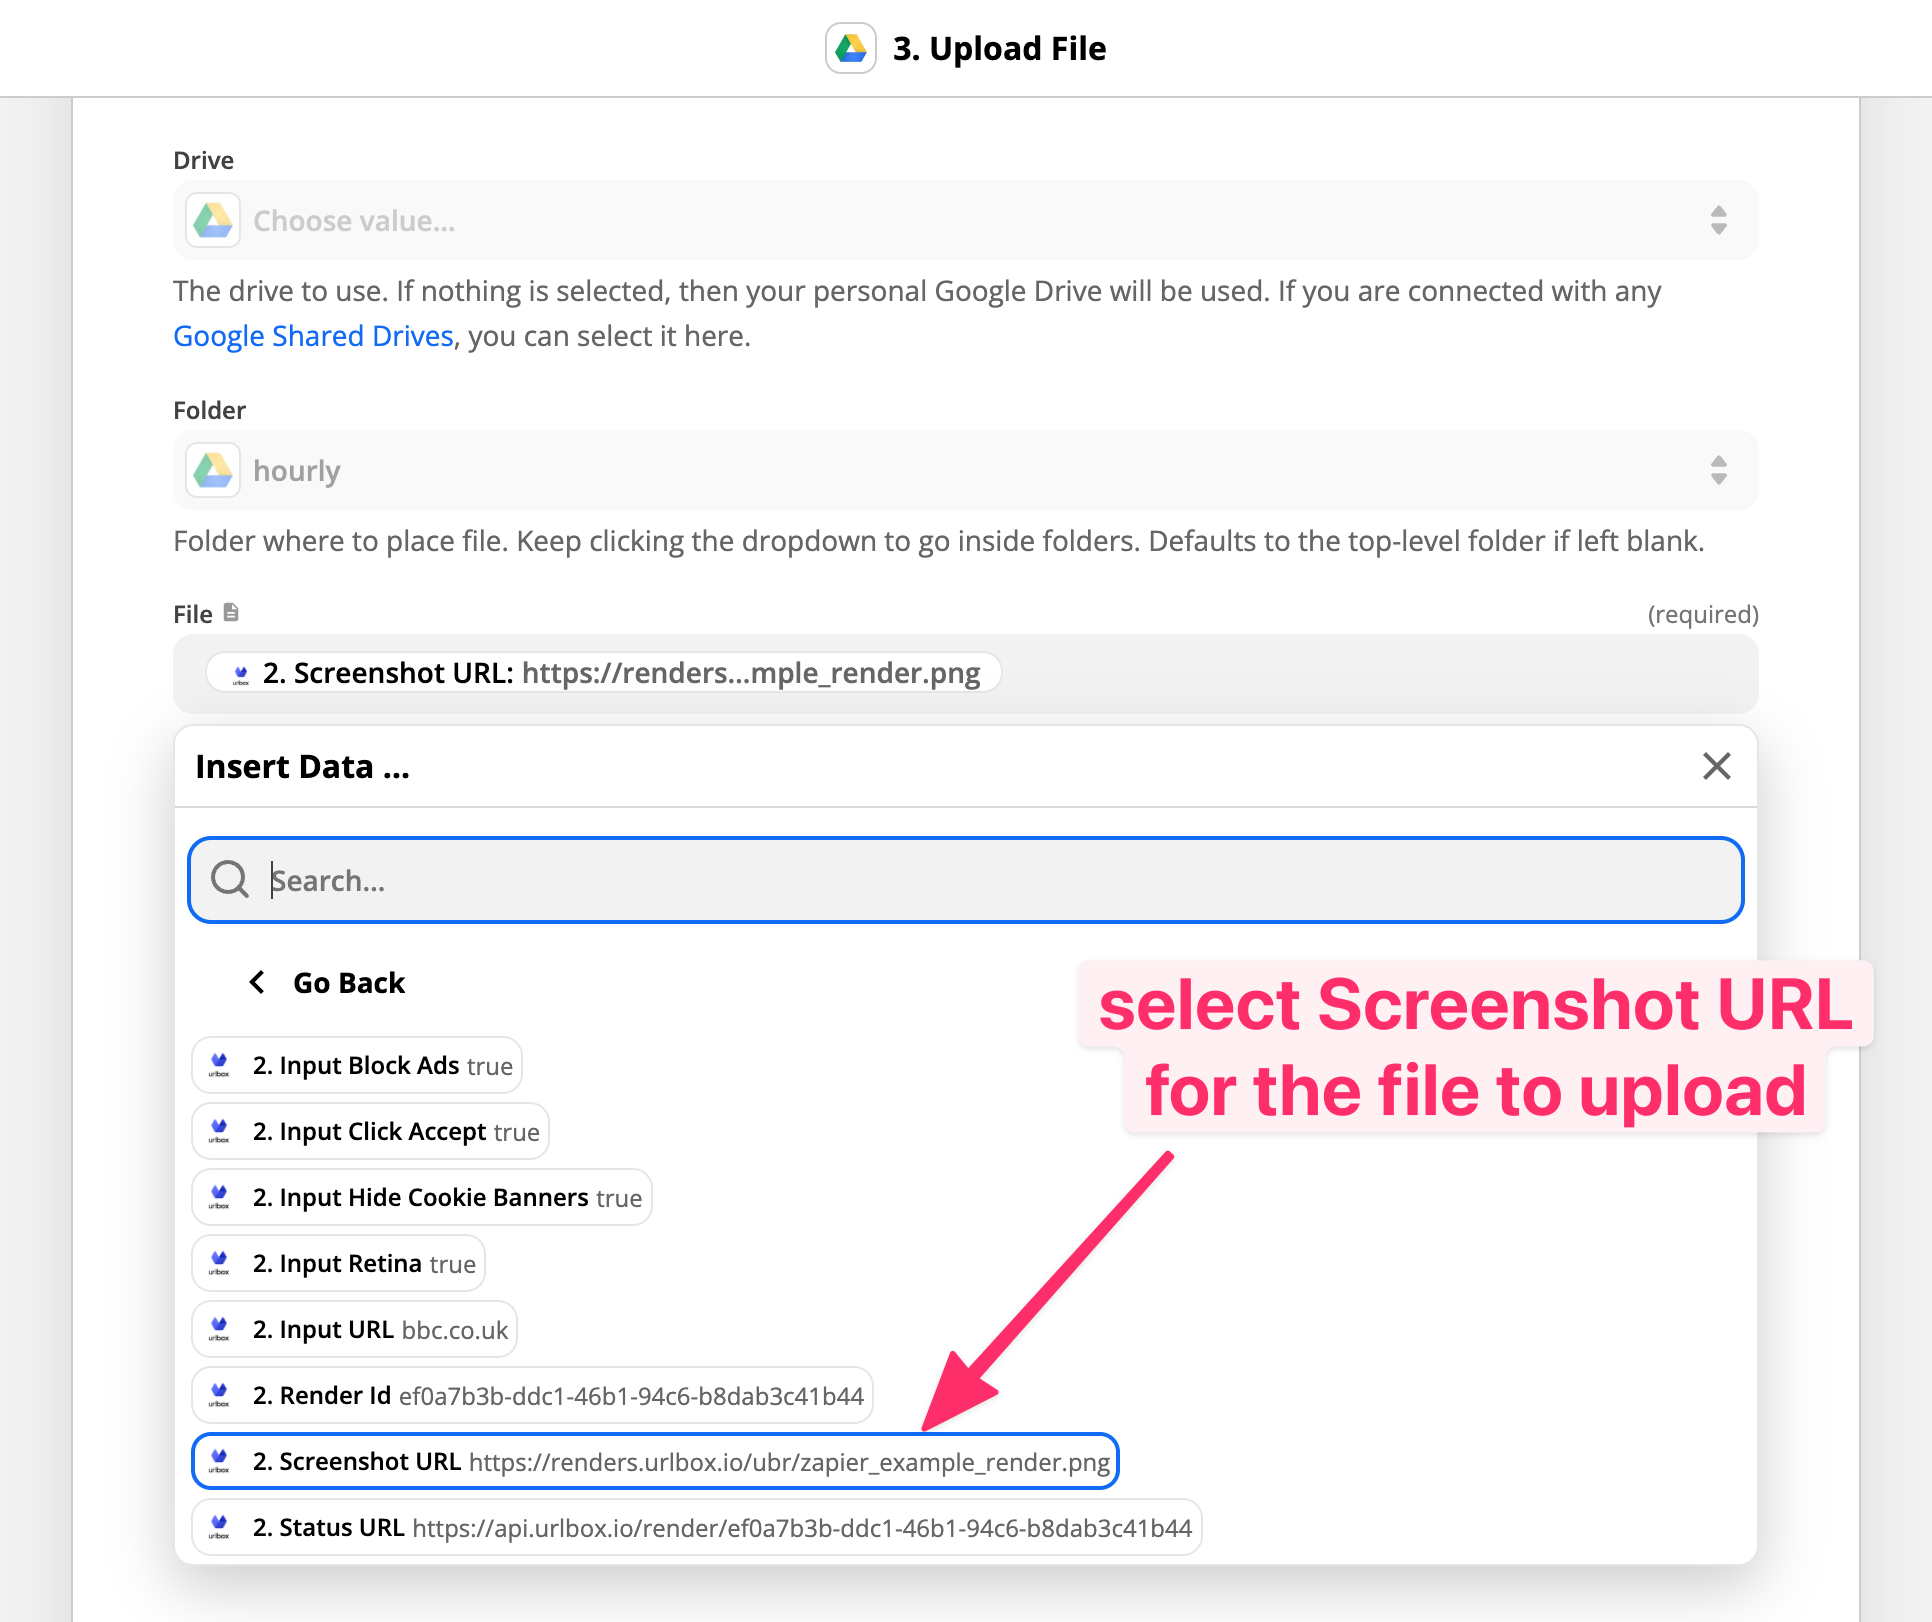
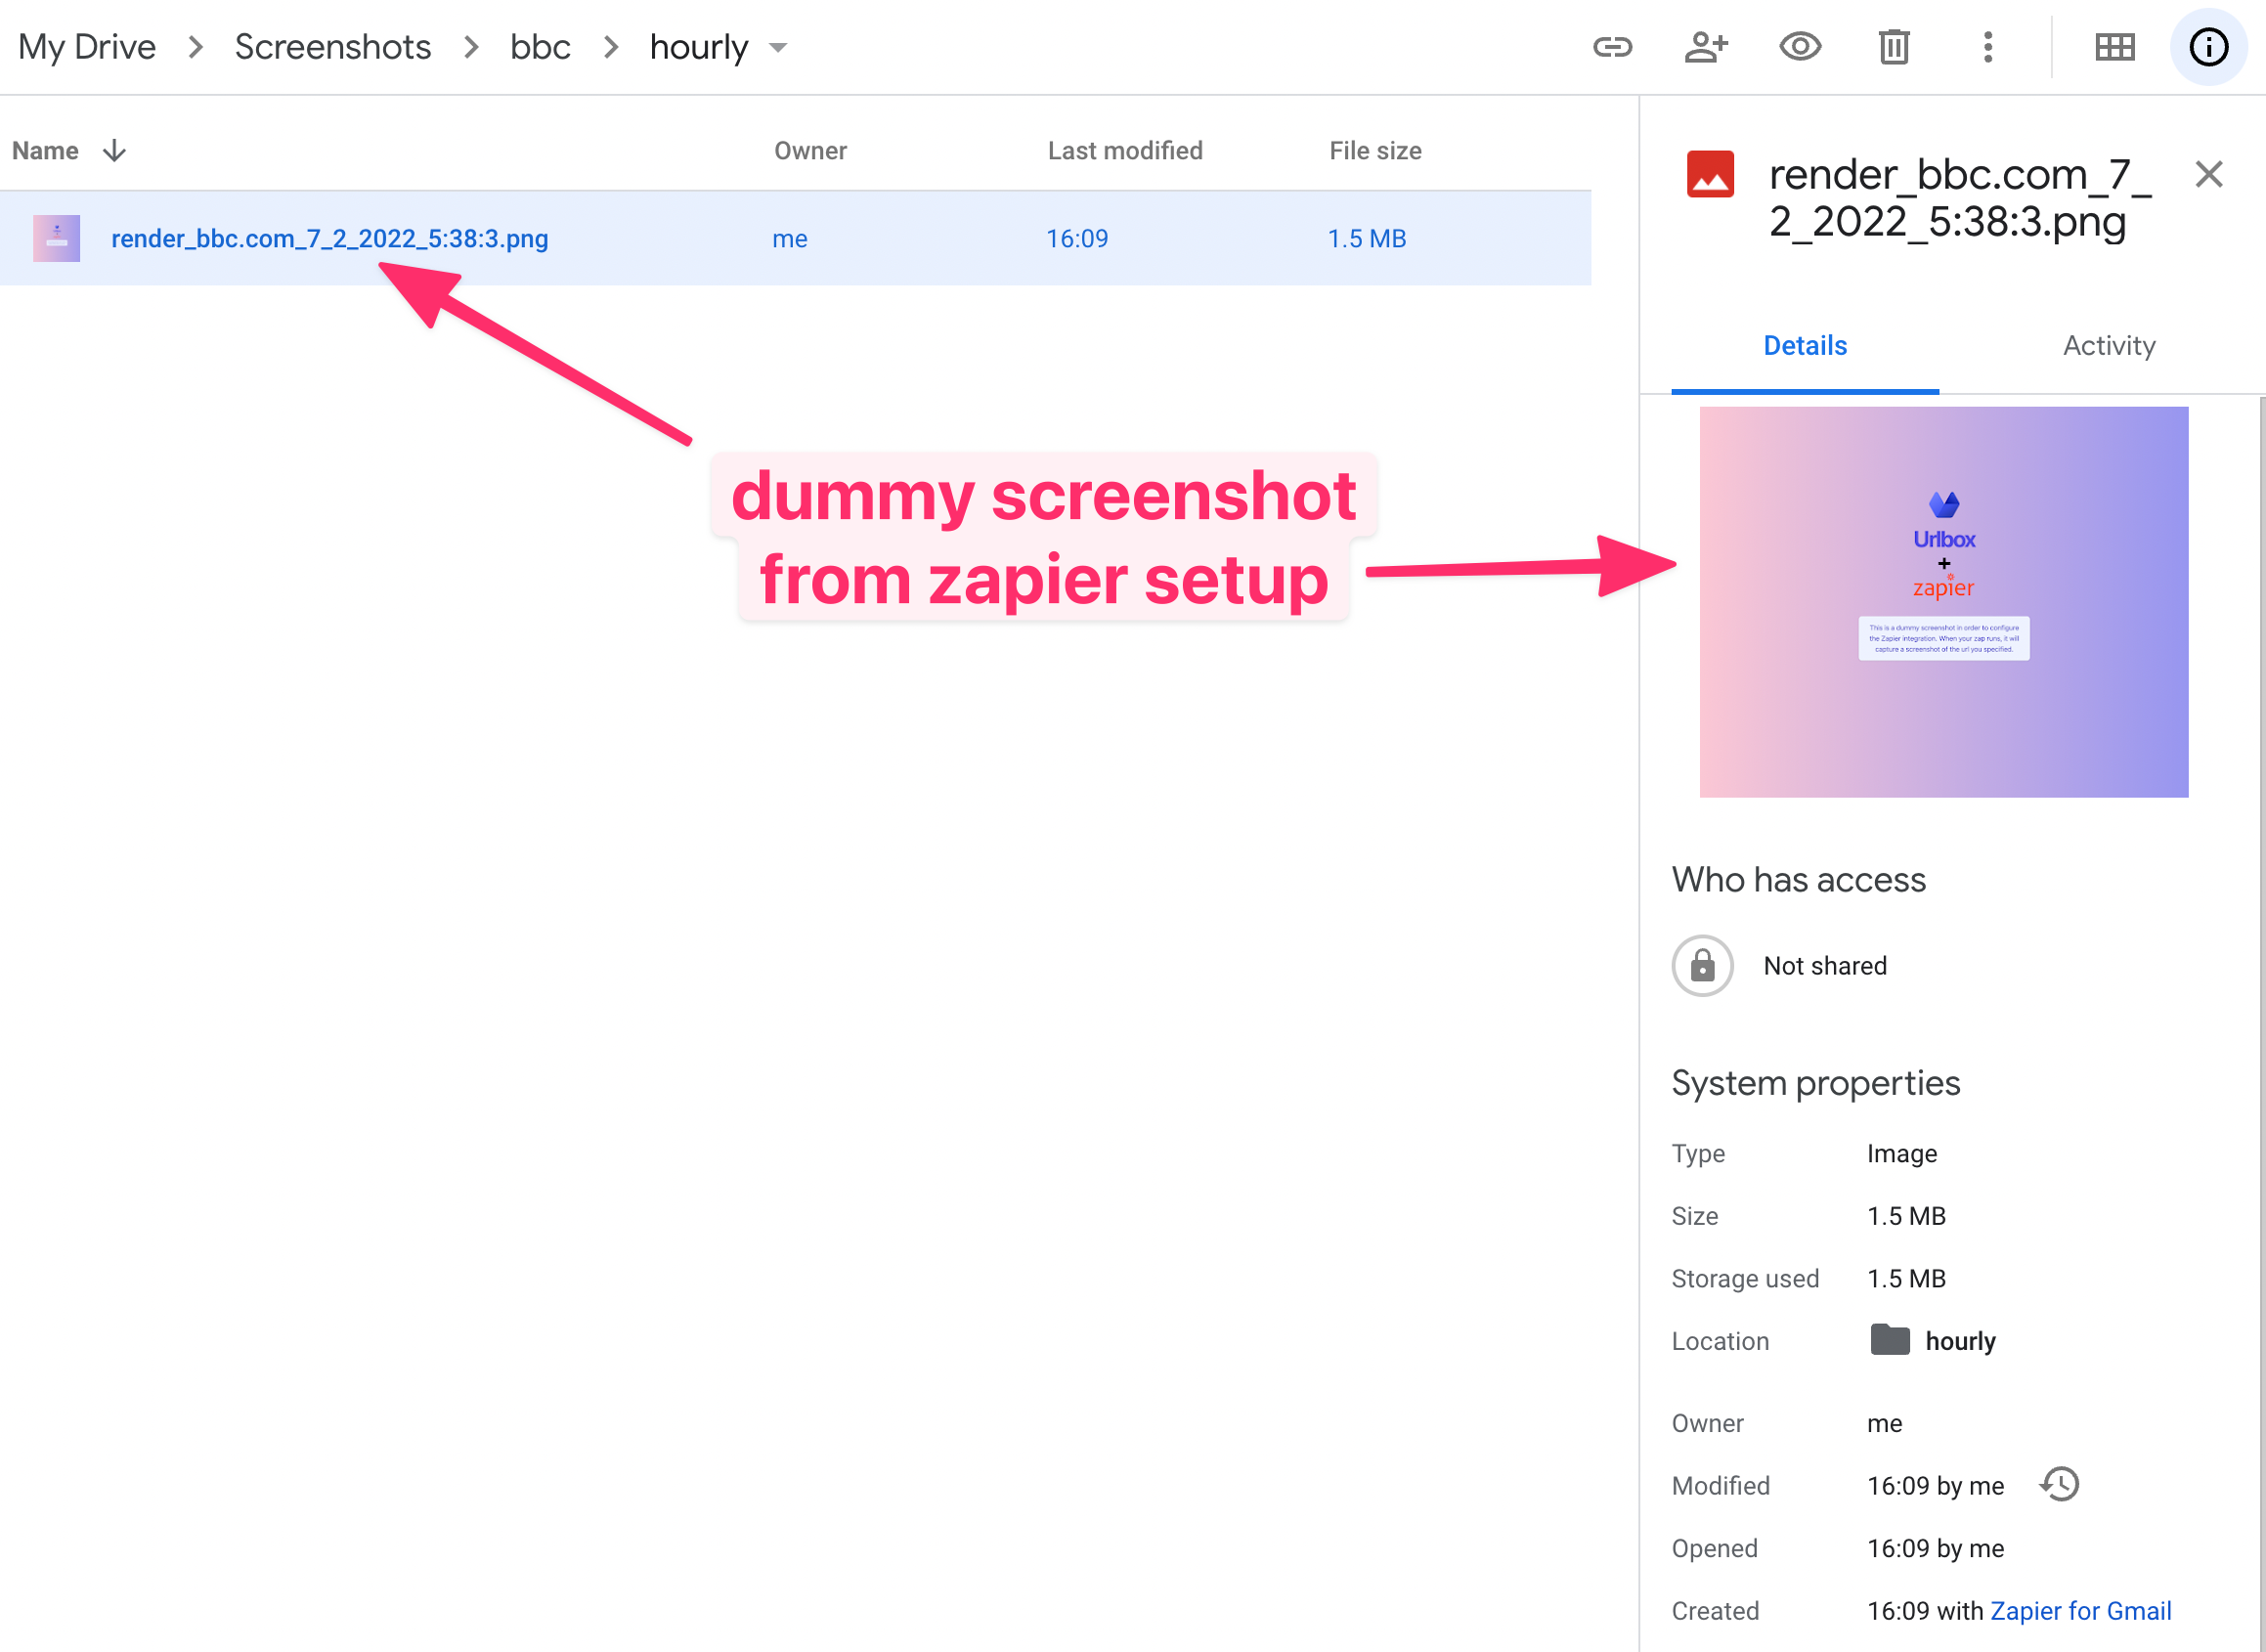
The Screenshot URL shown in the zap editor will be a dummy url to a dummy image. This is sample data that is used to setup the zap. When the zap is run it will be replaced with an actual screenshot URL.
Next we should choose a filename for the file when it is saved in Google Drive.
We can use a combination of outputs from the Schedule action and the Urlbox action to generate a dynamic filename that includes the url and the time that the file was taken.
Based on the screenshot below, the filename will be roughly:
render_{url}_{day}_{month}_{year}:{hour}:{minute}:{second}.pngwhich based on the time and url used will become:
render_bbc.com_7_2_2022_5:38:3.png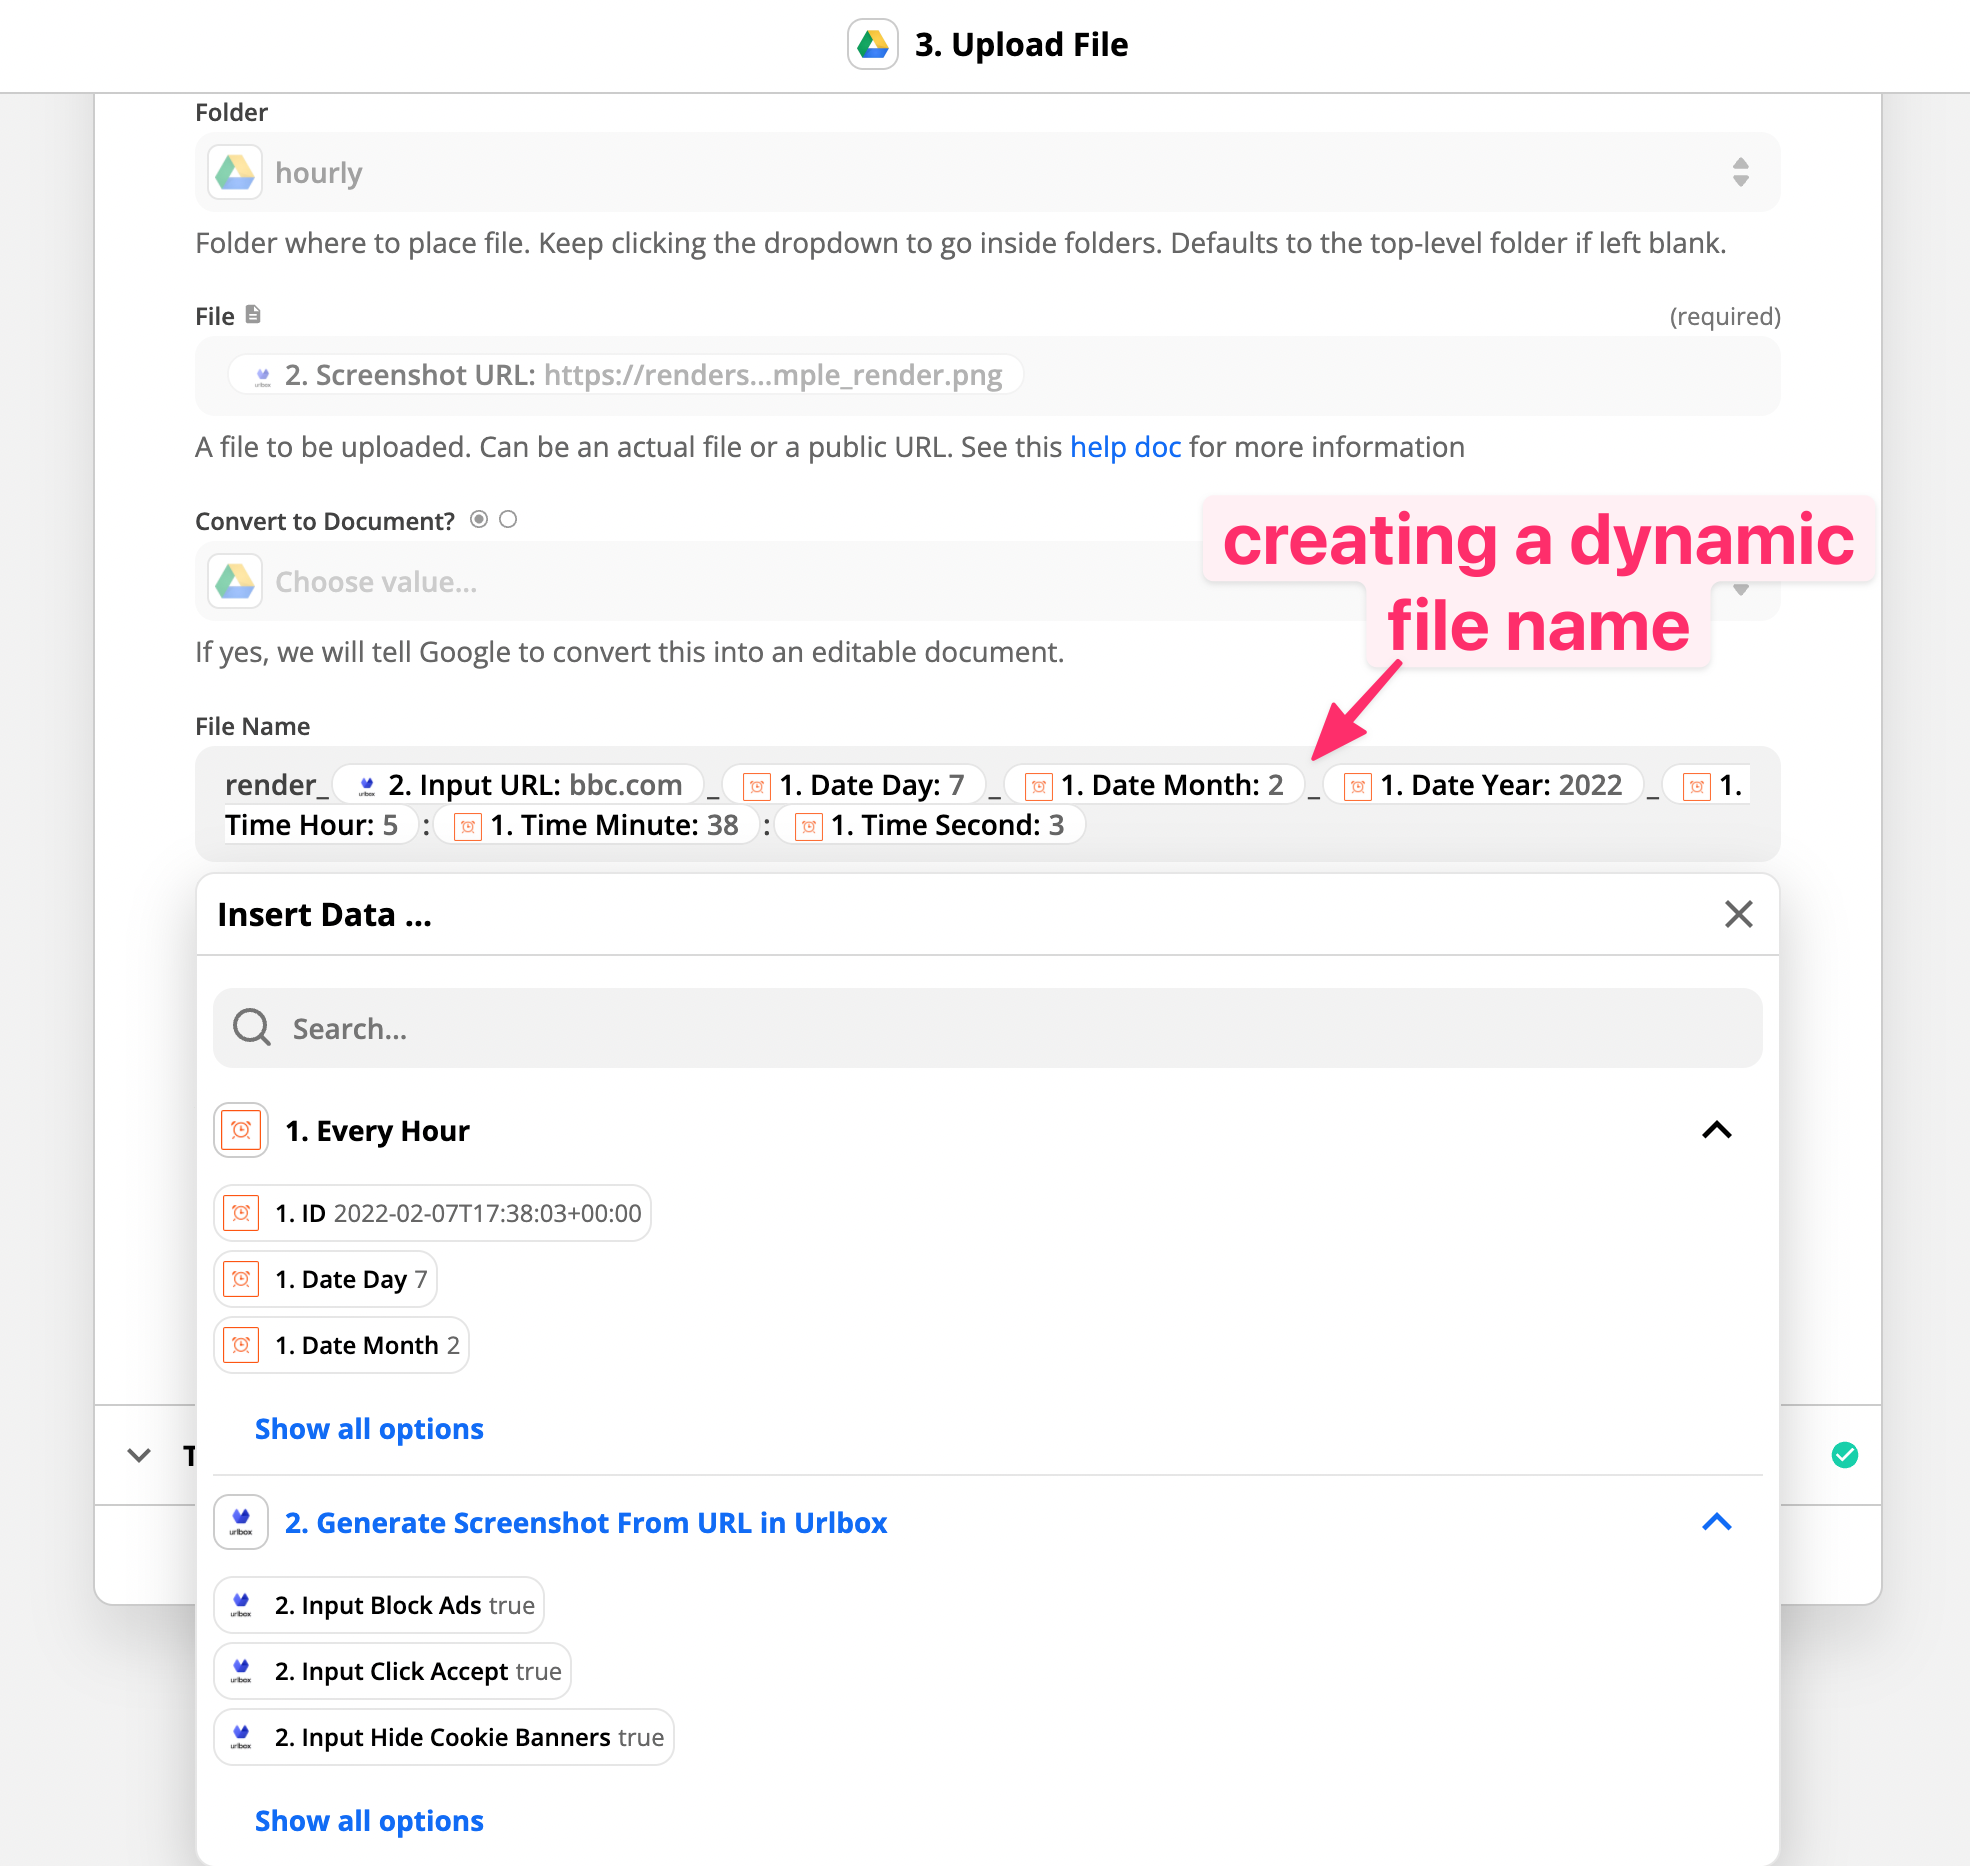
Almost done!
Now we can run the final test, to ensure that everything is working as expected:
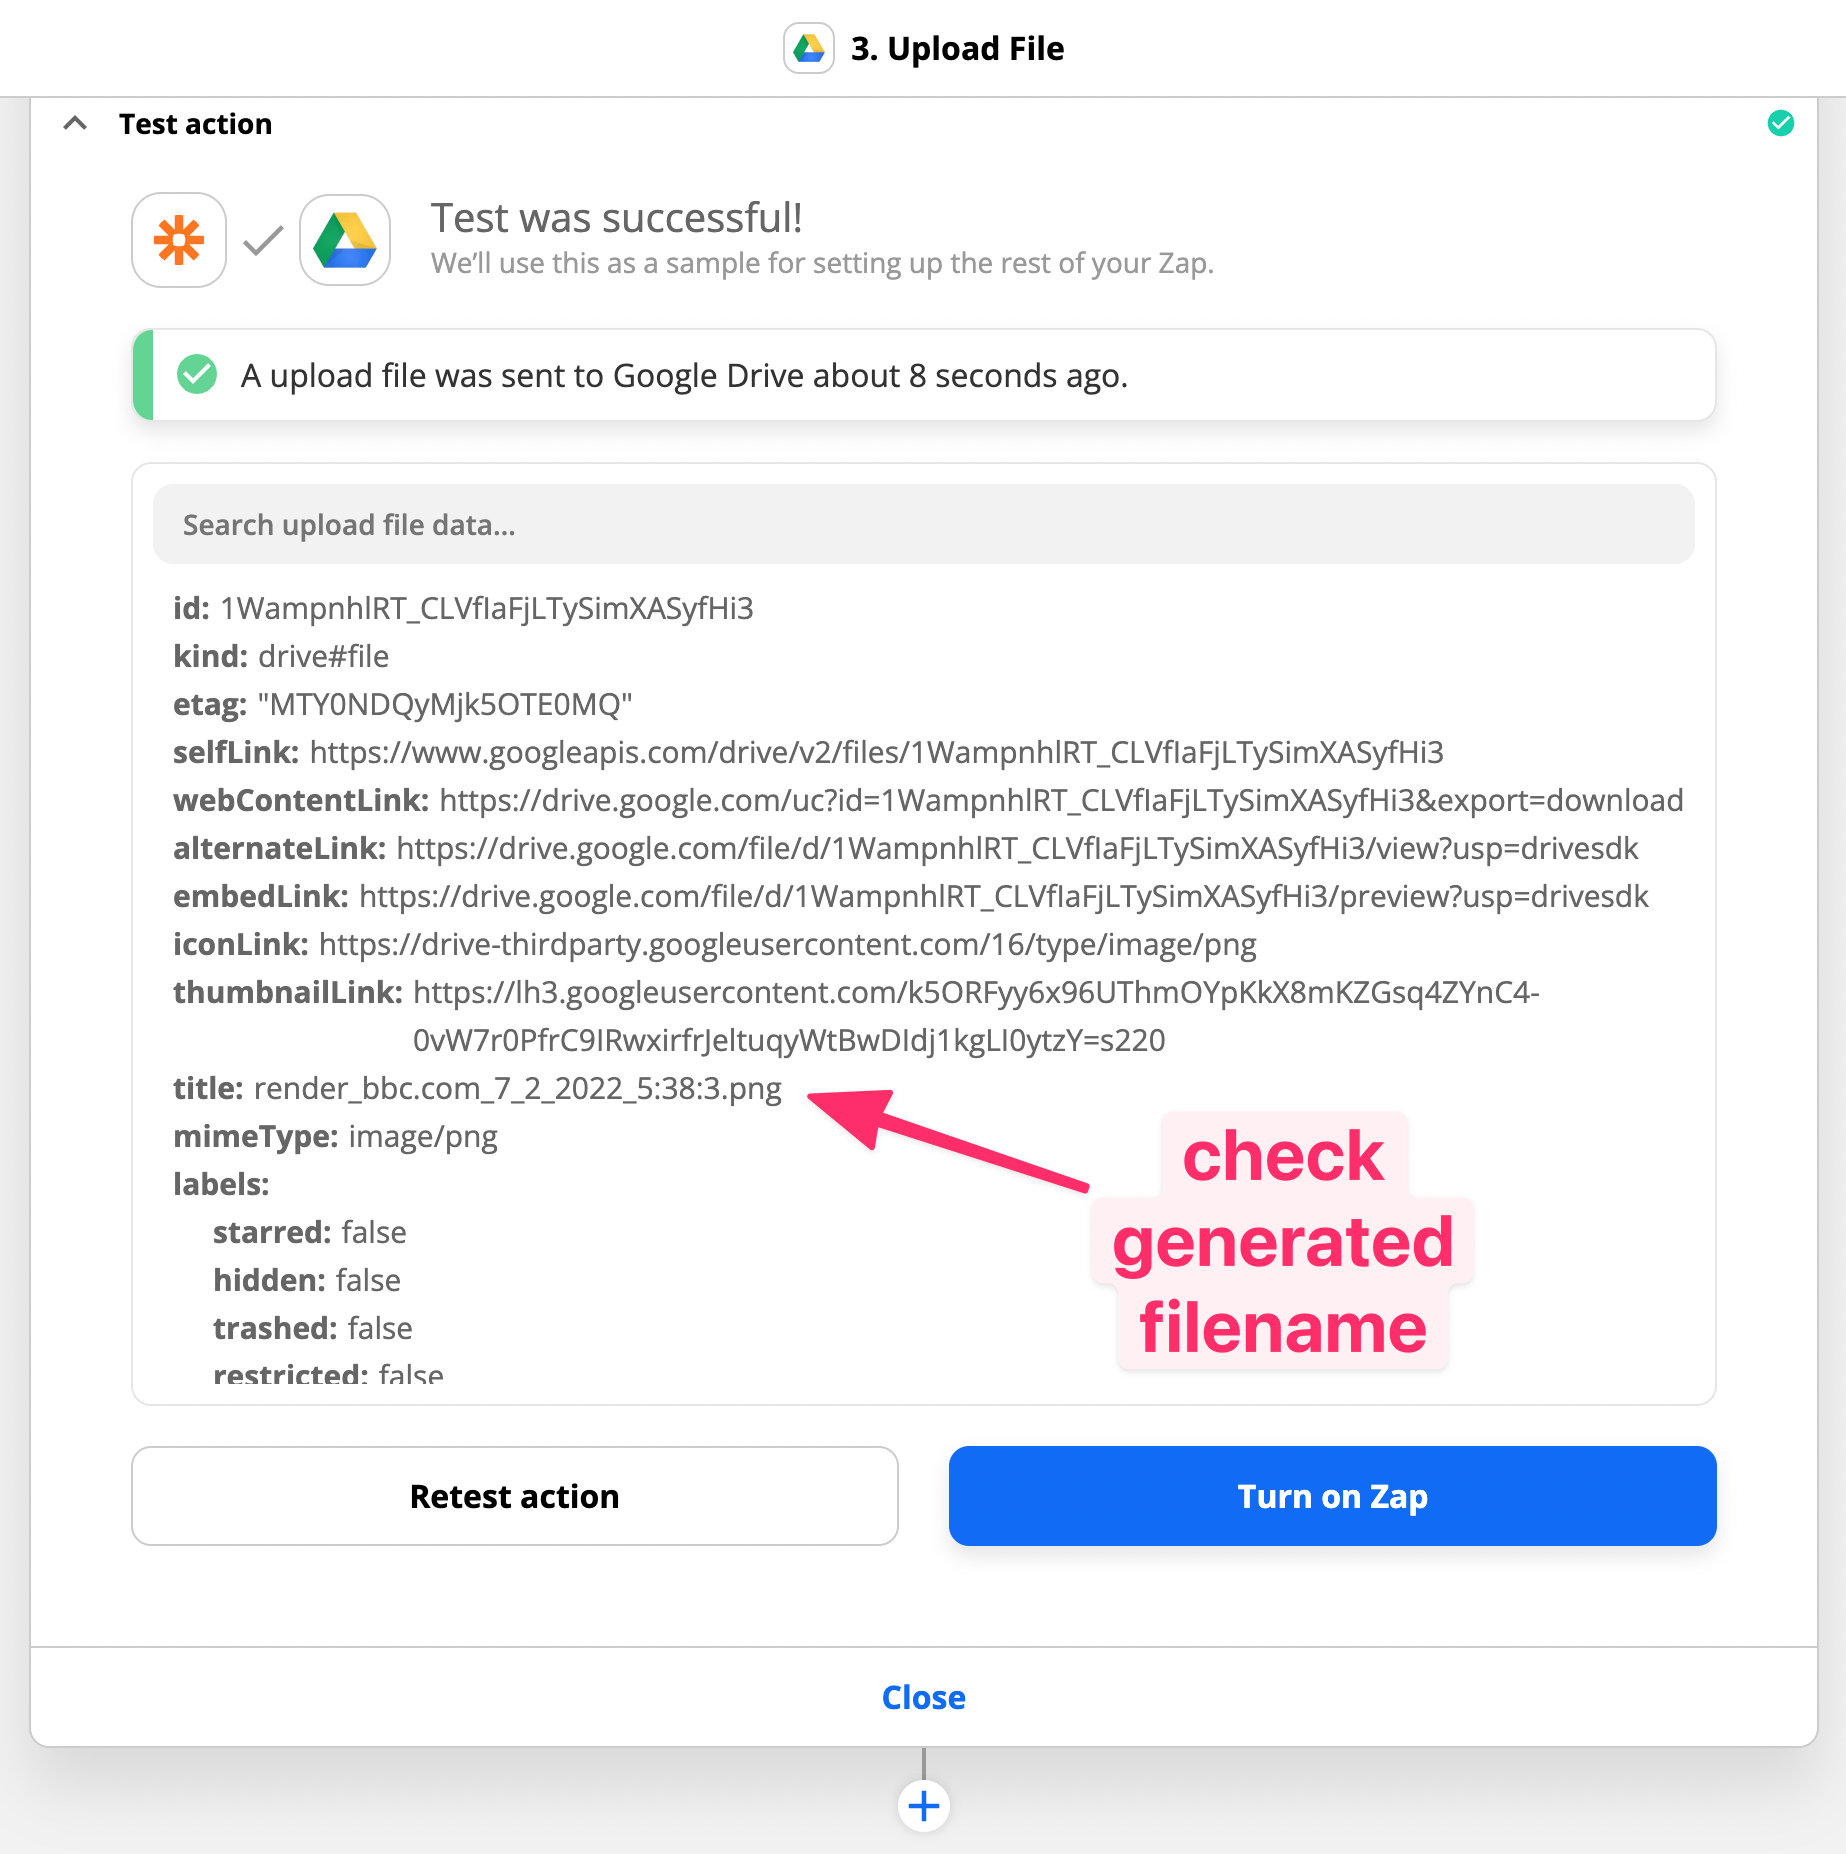
Great Success!
If we now check in our google drive folder, we should see the screenshot from the zapier test:
Ok, finally let's turn the zap on.
Leave the zap running for a few hours, and then check your Google Drive folder.
You should see one screenshot for every hour you left the zap running:

Conclusion
In this article we learned how to capture hourly screenshots of a website, using bbc.com as our example.
This kind of automation is useful for capturing screenshots of websites that change frequently over time.
Automating screenshots in this way is made possible using the Urlbox screenshot API. You can also see how to use Urlbox with Airtable to capture screenshots of URLs in Airtable.
With Urlbox you can:
Discover the power of the Urlbox in our API docs.
