
A tear sheet used to be a page cut or torn from a newspaper or magazine proving an advertisement was published. Used primarily by media buying agencies, tear sheets have evolved from physical pieces of paper to PDF documents.
Today, most tear sheets are full-page screenshots of different websites, from news portals to blogs and even search engine pages.
In this article, you'll learn how to automatically create tear sheets of different ad campaigns and share them with your clients, regardless of the ads' placement.
Types of tear sheet automations
You can automatically create tear sheets in different ways. You can leverage no-code tools like screenshot API.
Keep in mind that you have to take into consideration these two factors before picking the right solution:
1. How many programmatic ads you launch daily/weekly/monthly;
2. Your technical knowledge or your budget to hire a programmer.
How to capture native ad screenshots with Zapier
The fastest way to capture ad screenshots is by using Zapier and a screenshot service. For this example, I will use Urlbox, as it's one of the most complex and reliable services available.
Note: You can follow a previous article that covers how to create a swipe file with Google Sheets and Zapier if you want to screenshot ads on multiple pages and save the images. The workflow will be identical to that described in the article, but instead of calling your folder "Swipe file," you can give it another name, like "Ads Screenshots."
For the following example, I will presume you publish native ads on certain websites at specific time intervals (daily, weekly, monthly).
So follow along and learn how to automatically capture, save and share ad screenshots from a specific webpage.
Before anything else, make sure you have created a premium Zapier account and a Urlbox account, both of which have a 7-day free trial period.
Step 1 - Create a new Zap
With all the accounts created, you can create your first Zap. Now go ahead and click on the "Schedule" option on the right part of the screen.
This built-in tool developed by Zapier allows you to specify how often you want the Zap to run. Basically, how often do you want to screenshot the targeted webpage?
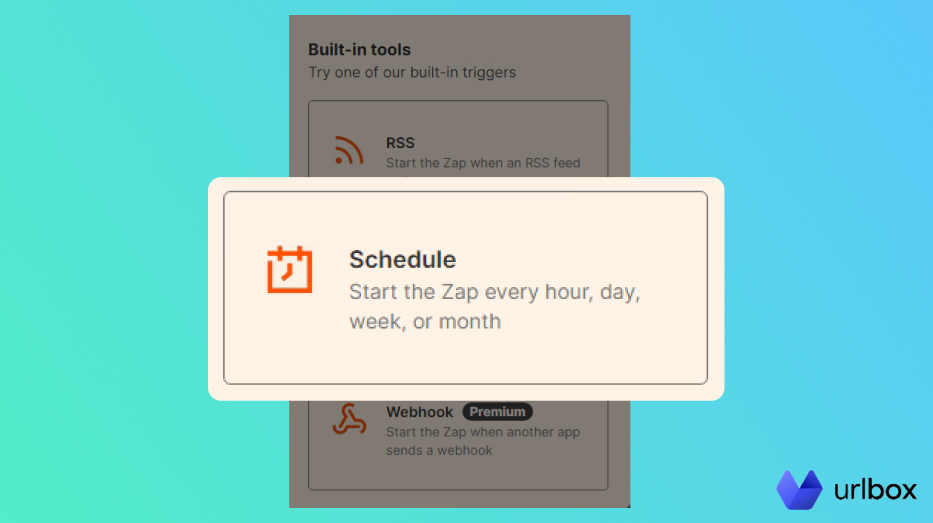
You can pick whatever time interval works best for you, but I will go with "weekly".
After you pick the frequency, you will have to set up the trigger. Zapier requires 2 parameters for the weekly trigger:
- Day of the Week
- Time of Day (if you haven't set up your time zone, then the default will be UTC, or GMT+00:00).
Let's say I publish a new ad every Monday at 8:00 AM.

Once you've configured the trigger, go ahead and save it. Next, you'll need to test it, and you can move on to the next step.
Step 2 - Capture the screenshot with Urlbox
Use the search bar to find the Urlbox connector. Make sure you give access to Zapier by login into your account.
Pick the "Generate Screenshot From URL" event by clicking on the drop-down box, then click "Continue". Next, you'll have to select your account.
Once that is done, you can continue setting up the actual Action.
As stated before, this example revolves around a webpage that features a new ad each week. To keep things simple, I will use markets.businessinsider.com as the example webpage.
I will copy and paste that URL into the corresponding field.
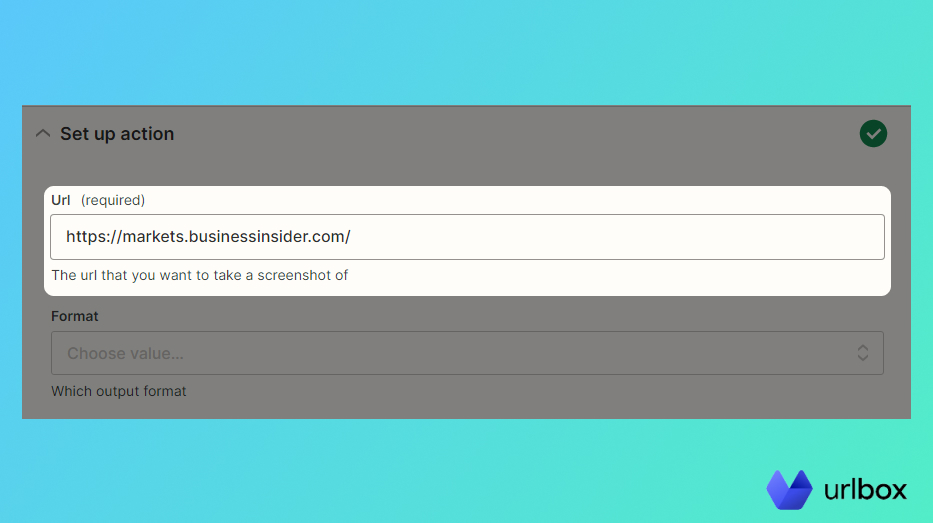
Now it's time to select the output format.
As a best practice, if you want to capture a full page screenshot, you should pick PDF, but if you want to capture just the hero section (above the fold), you can go with JPG or PNG.
I will pick PNG as I want my screenshot to reflect the ad banner below the main menu.
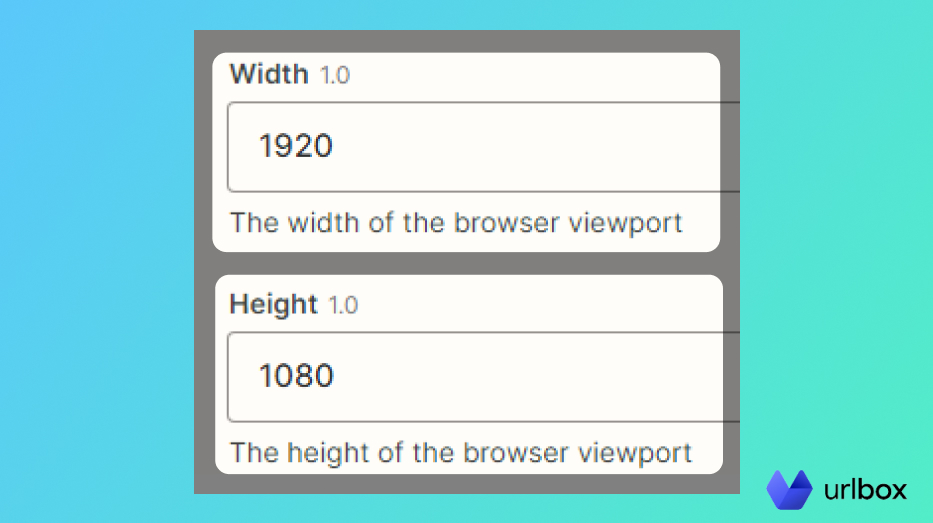
Now you have to specify the viewport's width and height, basically the image's final dimension. I will go with the Full HD resolution of 1920 by 1080.
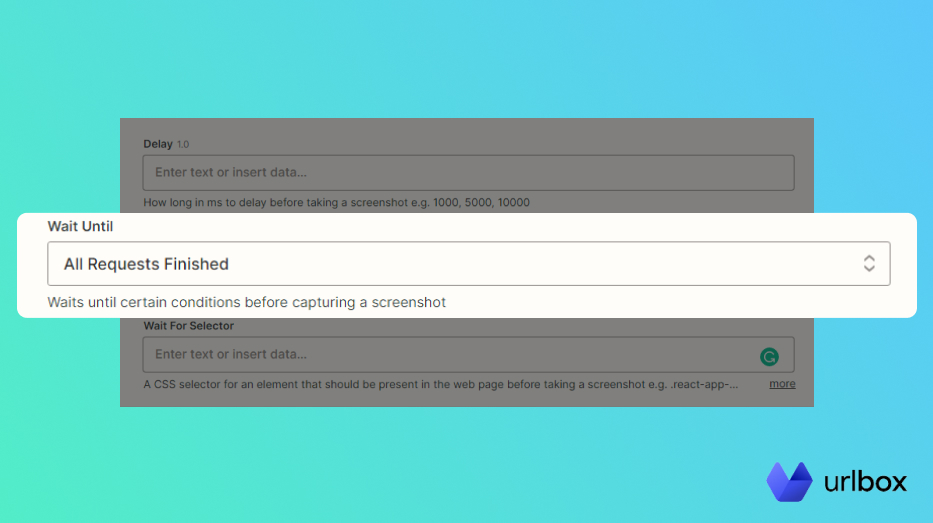
You can go the extra mile and configure Urlbox to take the screenshot only after all requests have finished. This will ensure the website is fully loaded before Urlbox screenshots it.
Once you are done, go ahead and test your action. If you followed all steps, then everything should be fine.
Next, you'll need a place to save the screenshot.
Step 3 - Save the image to Google Drive
Now that you configured Zapier to capture a screenshot of a webpage every Monday at 9 AM, it's time to tell Zapier where the image should be saved.
Note: I will use Google Drive in this example, but you can go with whatever cloud storage provider you want, as long as it has a Zapier connection.
Select Google Drive as the Action App, then select Upload File as the Event. Follow the steps to connect your Google Account to Zapier.
Once that is done, you have to set up the action.
Pick the Drive where you want to save the file and the Parent Folder. You will have to manually create the folder on your Drive before it will appear in the drop-down list.
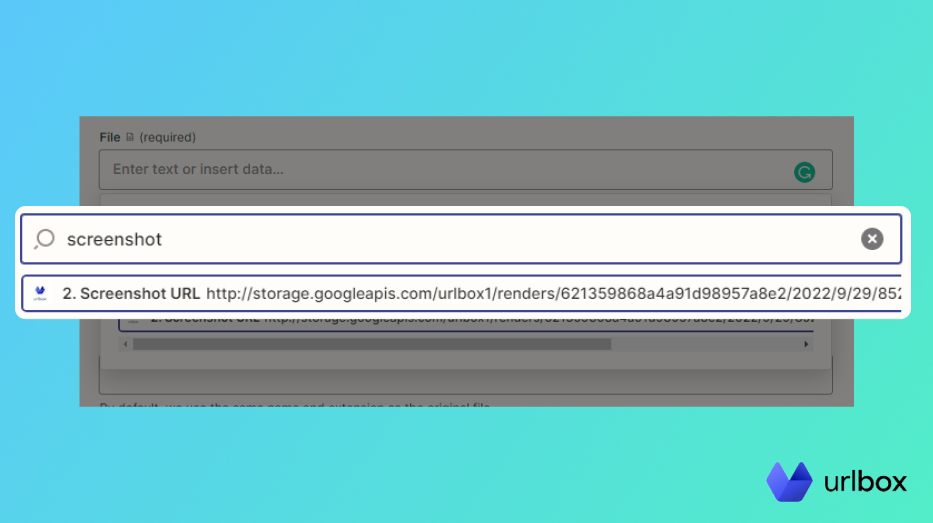
Now for the last step, click on the File field, then search for "screenshot" in the search box. Click on the "Screenshot URL" variable.
Simply click save and test the action. You are done!
Optional - Step 4 - Change the file name
If you want to keep things organized, you can change the final image name to include the date and time of the screenshot.
This field accepts data and plain text, so we will combine these 2.
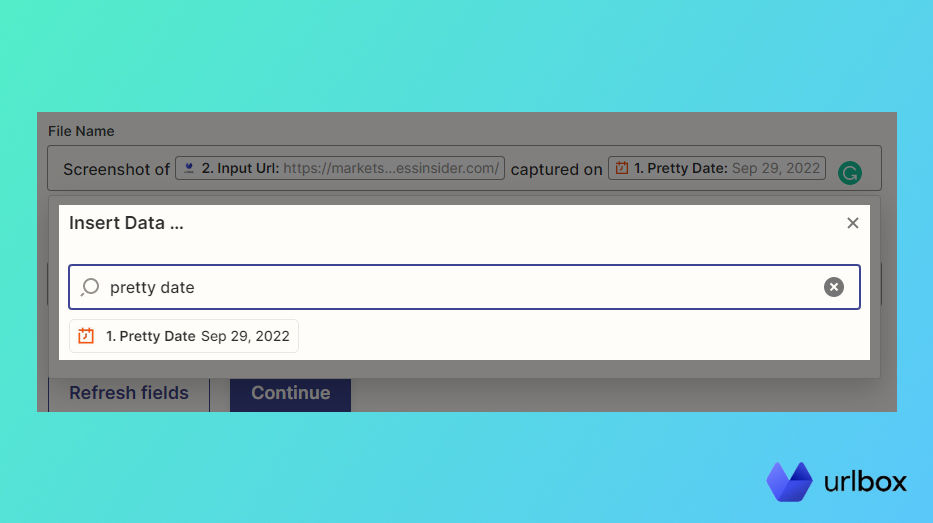
1. Start typing "Screenshot of", followed by a space.
2. Use the search bar to find the Input URL (this is the URL of the page you just screenshotted) and click on it.
3. Add another space, type in "captured on," and add one more space.
4. Use the search bar again to find the "Pretty Date" variable.
The final image from this example will have the name:
Screenshot of https://markets.businessinsider.com/ captured on Sep 22, 2022.
Remember, this method works best if you track a couple of dozen websites (20 to 30). But if you plan to scale your operation or run programmatic ads, you will need a dedicated service.
Best way to capture programmatic ads screenshots
You need to have advanced technical knowledge or the help of a developer if you want to use this method.
But in the end, it will definitely pay off, especially since the costs of no-code tools can rise exponentially with the number of tasks you want to automate. Plus, you'll have to spend countless hours to keep everything working as expected.
With that in mind, creating your own tool that can automatically capture ad screenshots makes sense.
You can speed up the development process using a screenshot service API, all while minimizing the number of development hours you have to invest in debugging.
Urlbox - Best API to capture programmatic ads screenshots
Urlbox is one of the best APIs to capture programmatic ad screenshots, built specifically as a fast, reliable way to generate high-quality screenshots.
It works seamlessly with all major programming languages (Python/Django, C#, Node.js) and comes with a complete set of features, so you can make sure the final screenshot will look exactly as you want it to.
Urlbox lets you configure how the page will be rendered before it generates the screenshot. Among others, here are some options and features people use the most:
- Specify a custom User Agent
- Generate retina quality images
- Automatically hide or accept cookie banners
- Tunnel the request through a proxy of your choice
- Capture full page screenshots that support infinite scroll
- Set a delay before capturing the screenshot (either in ms or on specific events).
In addition, you can instruct Urlbox to save the final image in any format you want (PNG, JPG, PDF, WEBP or AVIF).
Note: You can visit the official documentation to better understand how Urlbox works.
As mentioned before, once you start scaling, your costs will skyrocket, but that's not the case with Urlbox. You'll get a 7-day free trial when you first sign up regardless of the plan you choose (no credit card required), then you can either upgrade, downgrade or keep your current plan.
Depending on the scale of your operation, you can pick a plan that works for you.
What is the best way to capture ad screenshots and automatically create tear sheets?
Based on everything I have covered, you should clearly know what would work best for you.
Ultimately, it all depends on how many ads you publish monthly, how many websites you have, and how much you want to invest.
If you are starting out or running a small media buying agency, then you'll be better off going with the no-code method, but if you plan on scaling your operation, you should go with a dedicated screenshot service API.
